background image

10

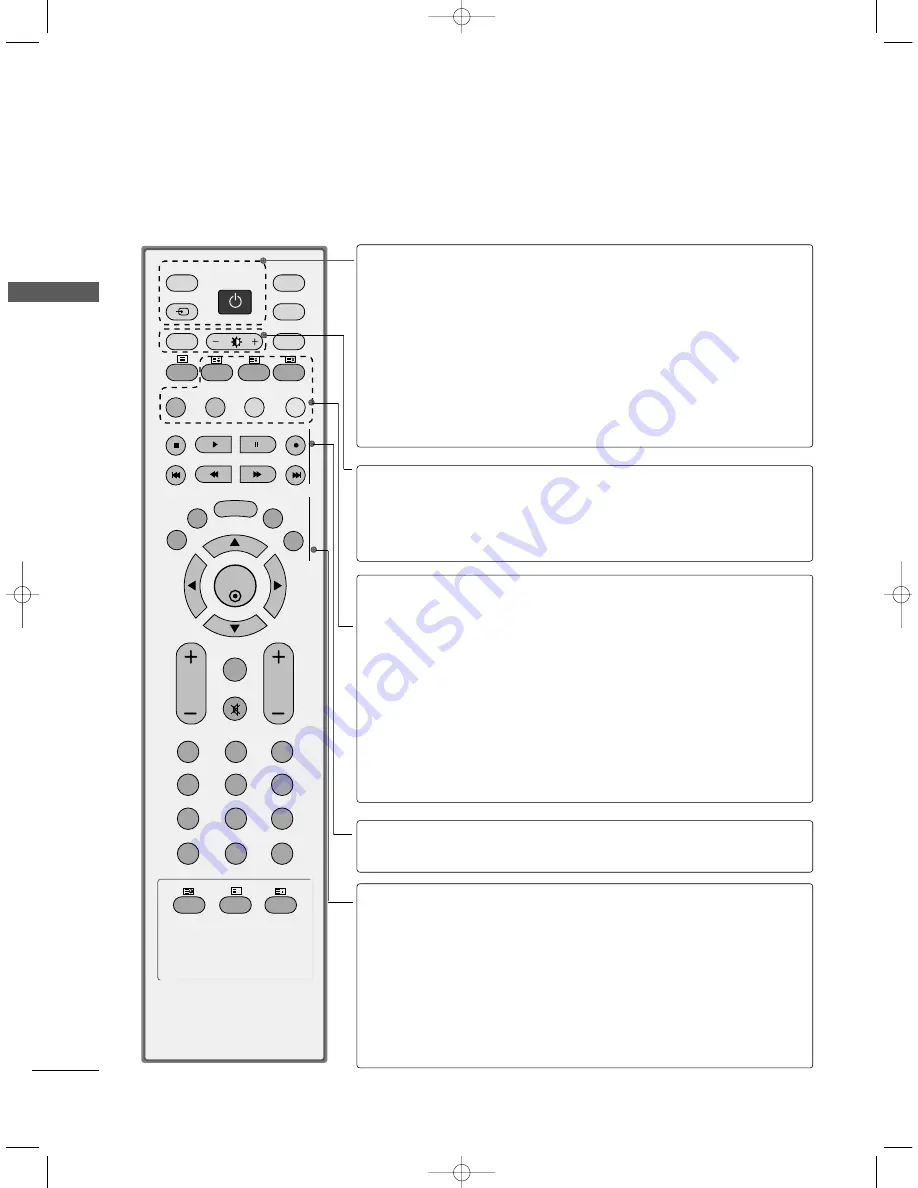
REMOTE CONTROL KEY FUNCTIONS

When using the remote control, aim it at the remote control sensor on the TV.

INTRODUCTION

INTR

ODUCTION

OK 

INPUT

TV

TV

PIP PR-

PIP PR+

PIP INPUT

DVD

ARC

EXIT

VOL

TIME

REVEAL

INDEX

Q.VIEW

PR

SLEEP

LIST

I/II

MENU

PIP

SIZE

POSTION

VCR

POWER

1

2

3

4

5

6

7

8

9

*

0

FAV

?

TEXT

INPUT

MUTE

POWER

TV INPUT

INPUT

Switches the set on from standby or off to standby.

Returns to the TV viewing from any mode.
Switches the set on from standby.

If you press the button once, the input source OSD
will appear on screen. Press the 

D

D

E

E

button and then

OK button to select the desired input source (TV, AV
(42PC3RV*) or AV1, AV2 (except 42PC3RV*),

Component1, Component2, RGB, HDMI).
Switches the set on from standby.

ARC

Brightness

adjustment

Selects your desired picture format.  

Adjusts screen brightness.
It returns to the default settings brightness by changing
mode source.

PIP

SIZE

POSITION

PIP PR - /+

PIP INPUT

Coloured 

buttons

Switches the sub picture PIP, DW mode.

Adjusts the sub picture size.

Moves the sub picture.

Selects a programme for the sub picture.

Selects the input source for the sub picture in PIP/Twin
picture mode.

These buttons are used for teletext (only T

TE

ELLE

ET

TE

EX

XT

T

models) or P

Prro

og

grraam

mm

mee  eed

diitt.

VCR/DVD  

control buttons

Controls some video cassette recorders or DVD players
when you have already selected DVD or VCR mode button. 

EXIT

LIST

MENU

I/II

SLEEP

Clears all on-screen displays and returns to TV viewing
from any menu.

Displays the programme table.

Selects a menu.

Selects the sound output.

Sets the sleep timer.

0323G_1-en_rev04  6/5/06 3:34 PM  Page 10

Summary of Contents for 26LC2R-TJ

Page 1: ... yo ou ur r s se et t Retain it for future reference Record model number and serial number of the set See the label attached on the back cover and quote this information to your dealer when you require service P NO 38289U0323G 0607 REV06 Printed in Korea LCD TV PLASMA TV OWNER S MANUAL LCD TV MODELS 26LC2R 32LC2R PLASMA TV MODELS 42PC1RV 42PC3RV This figure is the logo of 26LC2R TJ 32LC2R TJ for A...

Page 2: ...0323G_1 en_rev04 6 5 06 3 34 PM Page 2 ...

Page 3: ...6 7 8 9 FAV 0 TE XT INP UT MU TE Remote Control Power Cord 2 Wall brackets 2 eye bolts 2 TV brackets 2 Wall brackets 2 bolts F Fo or r 2 26 6L LC C2 2R R 3 32 2L LC C2 2R R F Fo or r 4 42 2P PC C1 1R RV V 4 42 2P PC C3 3R RV V 4 bolts for stand assembly 3 32 2L LC C2 2R R o on nl ly y Cable Management 2 bolts for stand assembly Refer to p 12 This feature is not available for all models F Fo or r 3...

Page 4: ...5 NICAM Reception 56 Speaker Sound Output Selection 56 T Ti im me e M Me en nu u O Op pt ti io on ns s Clock Setup 57 On Off Time 58 Auto Sleep 59 Sleep Timer 59 S Sp pe ec ci ia al l M Me en nu u O Op pt ti io on ns s Child Lock 60 ISM Image Sticking Minimization Method 61 Low Power 62 XD Demo 63 INSTALLATION Stand Installation 12 13 Basic Connection How to Remove the Cable Management 14 15 Insta...

Page 5: ...icture Format 66 67 Selecting Wide VGA XGA mode 68 Initializing Reset to original factory settings 69 APPENDIX Programming the Remote 70 Programming code 70 71 Troubleshooting Checklist 72 73 Maintenance 74 Product Specifications 75 External Control Device Setup 76 IR Codes 83 Remote control ir codes 84 0323G_1 en_rev04 6 5 06 3 34 PM Page 3 ...

Page 6: ...n may be somewhat different from your TV Front Panel Controls PR VOL OK MENU INPUT PROGRAMME Buttons VOLUME Buttons MENU Button OK Button INPUT Button POWER Button PR VOL OK OK MENU INPUT Power Standby Indicator illuminates red in standby mode illuminates white when the set is switched on PR VOL OK MENU INPUT 0323G_1 en_rev04 6 5 06 3 34 PM Page 4 ...

Page 7: ...n may be somewhat different from your TV Front Panel Controls PR VOL OK MENU INPUT Remote Control Sensor Power Standby Indicator illuminates red in standby mode illuminates white when the set is switched on PROGRAMME Buttons VOLUME Buttons OK Button MENU Button INPUT Button ON OFF Button 0323G_1 en_rev04 6 5 06 3 34 PM Page 5 ...

Page 8: ...xternal device to these jacks Component Input Connect a component video audio device to these jacks Remote Control Port Connect your wired remote control here RGB Audio Input Connect the monitor output from a PC to the appropriate input port HDMI Input Connect a HDMI signal to HDMI port with HDMI cable Power Cord Socket This TV operates on an AC power The voltage is indicated on the Specifications...

Page 9: ...nt from your TV Front Panel Controls PR VOL OK MENU INPUT R I Remote Control Sensor Power Standby Indicator illuminates red in standby mode illuminates white when the set is switched on PROGRAMME Buttons VOLUME Buttons OK Button MENU Button INPUT Button ON OFF Button Stand This feature is not available for all models 0323G_1 en_rev04 6 5 06 3 34 PM Page 7 ...

Page 10: ...e control here RGB Audio Input Connect the monitor output from a PC DTV to the appropriate input port HDMI Input Connect a HDMI signal to HDMI port with HDMI cable Power Cord Socket This TV operates on an AC power The voltage is indicated on the Product Specifications page Never attempt to operate the TV on DC power AV Output Connect second TV or monitor to the AV OUT socket on the set S Video Inp...

Page 11: ...GB Audio Input Connect the monitor output from a PC DTV to the appropriate input port HDMI Input Connect a HDMI signal to HDMI port with HDMI cable Power Cord Socket This TV operates on an AC power The voltage is indicated on the Product Specifications page Never attempt to operate the TV on DC power AV Output Connect second TV or monitor to the AV OUT socket on the set S Video Input Connect S Vid...

Page 12: ...from standby ARC Brightness adjustment Selects your desired picture format Adjusts screen brightness It returns to the default settings brightness by changing mode source PIP SIZE POSITION PIP PR PIP INPUT Coloured buttons Switches the sub picture PIP DW mode Adjusts the sub picture size Moves the sub picture Selects a programme for the sub picture Selects the input source for the sub picture in P...

Page 13: ...TEXT BUTTONS These buttons are used for teletext For further details see the Teletext section THUMBSTICK Up Down Left Right OK Allows you to navigate the on screen menus and adjust the system settings to your preference Accepts your selection or displays the current mode VOLUME UP DOWN Q VIEW MUTE Programme UP DOWN 0 9 number button FAV Adjusts the volume Returns to the previously viewed programme...

Page 14: ...utward NOTE Place the set with the screen facing down on a cushion or soft cloth as shown in Figures 1 Before unfolding the stand please make sure two locks A on the bottom of the stand push outward Pull the stand out as shown above in Figures 2 3 After unfolding the stand please insert and tighten the screws in the holes B on the bottom of the stand When connecting cables to the set Do not diseng...

Page 15: ... side down on a cushioned surface that will protect set and screen from damage Place the hook of the stand in the back of the set as shown Install the 4 bolts provided securely in the back of the set This feature is not available for all models 0323G_1 en_rev04 6 5 06 3 34 PM Page 13 ...

Page 16: ...t the cables as necessary To connect an additional equipment see the E Ex xt te er rn na al l e eq qu ui ip pm me en nt t C Co on nn ne ec ct ti io on ns s section Reinstall the C CA AB BL LE E M MA AN NA AG GE EM ME EN NT T as shown 1 2 3 CABLE MANAGEMENT These models have two cable arrangement methods according to the stand type Stand type 1 Stand type 2 0323G_1 en_rev04 6 5 06 3 34 PM Page 14 ...

Page 17: ...n ne ec ct ti io on ns s section 1 Install the C CA AB BL LE E M MA AN NA AG GE EM ME EN NT T as shown 2 Bundle the cables using the supplied twister holder 3 Hold the C CA AB BL LE E M MA AN NA AG GE EM ME EN NT T with both hands and pull it upward NOTE G G Do not hold the CABLE MANAGEMENT when moving the product If the product is dropped you may be injured or the product may be broken HOW TO REM...

Page 18: ...and Setup Guide GROUNDING Ensure that you connect the earth ground wire to prevent possible electric shock If grounding methods are not pos sible have a qualified electrician install a separate circuit breaker Do not try to ground the unit by connecting it to telephone wires lightening rods or gas pipes Power Supply Short circuit Breaker The TV can be installed in various ways such as on a wall or...

Page 19: ...that is big and strong enough for the size and weight of the product G G To use the product safely make sure that the height of the bracket that is mounted on the wall is same as that of the product 2 3 1 1 2 Use the eye bolts or TV brackets bolts to fix the product to the wall as shown in the picture If your product has the bolts in the eye bolts position before inserting the eye bolts loosen the...

Page 20: ...ignal amplifier to the antenna as shown to the right If signal needs to be split for two TVs use an antenna signal splitter for connection S Si ig gn na al l A Am mp pl li if fi ie er r UHF VHF ANTENNA IN Multi family Dwellings Apartments Connect to wall antenna socket Single family Dwellings Houses Connect to wall jack for outdoor antenna Outdoor Antenna Wall Antenna Socket VHF Antenna UHF Antenn...

Page 21: ... N socket of the VCR Press the P PL LA AY Y button on the VCR and match the appropriate programme between the TV and VCR for viewing 1 2 3 S VIDEO OUT IN R AUDIO L VIDEO 3 4 OUTPUT SWITCH ANT OUT ANT IN MONO AUDIO VIDEO S VIDEO AV IN 1 AV OUT VIDEO AUDIO 2 1 COMPONENT IN 2 1 AUDIO OUT VARIABLE ANTENNA IN V VC CR R 1 When connecting with a RCA cable Connect the A AU UD DI IO O V VI ID DE EO O jacks...

Page 22: ...input on the set The picture quality is improved com pared to normal composite RCA cable input Connect the audio outputs of the VCR to the A AU UD DI IO O input jacks on the set Insert a video tape into the VCR and press PLAY on the VCR Refer to the VCR owner s manual 1 2 3 Select AV or AV1 input source with using the I IN NP PU UT T button on the remote control 4 NOTE G G If both S VIDEO and VIDE...

Page 23: ...atch the jack colors Video yellow Audio Left white and Audio Right red Select AV2 input source with using the I IN NP PU UT T button on the remote control except 42PC3RV If connected to A AV V I IN N1 1 input select AV1 input source If connected to A AV V I IN N input select AV input source 42PC3RV Operate the corresponding external equipment Refer to external equipment operating guide 1 2 3 0323G...

Page 24: ...Component1 or Component2 input source with using the I IN NP PU UT T button on the remote control 4 Refer to the DVD player s manual for operating instruc tions 5 When connecting with a S Video cable Connect the S VIDEO output of the DVD to the S S V VI ID DE EO O input on the set Connect the audio outputs of the DVD to the A AU UD DI IO O input jacks on the set Turn on the DVD player insert a DVD...

Page 25: ...DMI input source with using the I IN NP PU UT T button on the remote control Refer to the DVD player s manual for operating instruc tions 1 2 3 NOTE G G TV can receive the video and audio signal simultaneously with using a HDMI cable G G If the DVD supports Auto HDMI function the DVD output resolution will be automatically set to 1280x720p G G If the DVD does not support Auto HDMI you need to set ...

Page 26: ...h a HDMI to DVI cable Connect the DVI output of the digital set top box to the H HD DM MI I I IN N jack on the set Connect the audio outputs of the set top box to the A AU UD DI IO O I IN N R RG GB B jack on the set Turn on the digital set top box Refer to the owner s manual for the digital set top box 1 2 3 Select HDMI input source with using the I IN NP PU UT T button on the remote control 4 G G...

Page 27: ...2C IN CONTR CONTROL SER SERVICE VICE AUDIO OUT UDIO OUT VARIABLE HDMI IN AUDIO VIDEO S VIDEO AV IN 3 VIDEO AUDIO COMPONENT IN HDMI DVD OUTPUT 1 1 When connecting with a HDMI cable Connect the HDMI output of the digital set top box to the H HD DM MI I I IN N jack on the set Select HDMI input source with using the I IN NP PU UT T button on the remote control Turn on the digital set top box Refer to ...

Page 28: ...aphic card The synchronization input form for Horizontal and Vertical frequencies is separate We recommend using 640x480 60Hz 42PC1RV 42PC3RV 1360x768 60Hz 26LC2R 32LC2R for the PC mode they pro vide the best picture quality If the resolution of PC is over SXGA there will be no picture on the set Connect the audio cable from the PC to the Audio input on the set Audio cables are not included with t...

Page 29: ...0 800x600 1024x768 1280x768 1360x768 1366x768 Supported Display Resolution RGB PC mode 26LC2R 32LC2R Supported Display Resolution RGB PC mode 42PC1RV 42PC3RV Horizontal Vertical Frequency KHz Frequency Hz 31 5 70 8 31 5 70 8 31 5 59 9 31 5 60 0 31 5 60 0 37 9 60 3 48 4 60 0 Resolution 640x350 720x400 640x480 848x480 852x480 800x600 1024x768 0323G_1 en_rev04 6 5 06 3 34 PM Page 27 ...

Page 30: ...mote control and then the TV will switch on Turning on the TV Press the V VO OL L button to adjust the volume If you want to switch the sound off press the M MU UT TE E button You can cancel this function by pressing the M MU UT TE E V VO OL L or I I I II I button Volume Adjustment Press the P PR R or NUMBER button to select a programme number Programme selection 1 1 1 2 Press the M ME EN NU U but...

Page 31: ...erent inputs sources on your TV screen at the same time One source will be large and the other source will show a smaller inset image PIP function is available in the Component RGB HDMI mode But it can t adjust 480i 576i resolution of Component mode PIP Mode DW2 Mode PIP Off Programme Selection for Sub Picture 1 Press the P PI IP P P PR R button to select a programme for the sub picture The select...

Page 32: ...ch input source for the sub picture is displayed It is available in TV AV1 AV2 mode Sub Picture Size Adjustment PIP mode only Press the S SI IZ ZE E button to adjust the sub picture size With S SI IZ ZE E button in PIP mode sub picture is adjusted Moving the Sub Picture PIP mode only Press the P PO OS SI IT TI IO ON N button Repeatedly press the P PO OS SI IT TI IO ON N button then sub picture mov...

Page 33: ...ives up to the minute information on news weather television programmes share prices and many other topics The teletext decoder of this TV can support the SIMPLE TOP and FASTEXT systems SIMPLE standard tele text consists of a number of pages which are selected by directly entering the corresponding page number TOP and FASTEXT are more modern methods allowing quick and easy selection of teletext in...

Page 34: ...ction Alternatively the P PR R button can be used A A D Di ir re ec ct t p pa ag ge e s se el le ec ct ti io on n Corresponding to the SIMPLE teletext mode you can select a page by entering it as a three digit number using the NUMBER buttons in TOP mode FASTEXT The teletext pages are colour coded along the bottom of the screen and are selected by pressing the corre sponding coloured button A A P P...

Page 35: ...ress this button to view the updated teletext page A A T TI IM ME E When viewing a TV programme press this button to display the time at the top right hand corner of the screen Press this button again to remove the display In the teletext mode press this button to select a sub page num ber The sub page number is displayed at the bottom of the screen To hold or change the sub page press the RED GRE...

Page 36: ... this manual the OSD On Screen Display may be different from your TV s because it is just example to help the TV operation c In the teletext mode menus are not displayed S St ta at ti io on n m me en nu u P Pi ic ct tu ur re e m me en nu u S So ou un nd d m me en nu u T Ti im me e m me en nu u S Sp pe ec ci ia al l m me en nu u S Sc cr re ee en n m me en nu u Auto programme Manual programme Progra...

Page 37: ... K Ireland Hong Kong South Africa DK PAL D K SECAM D K East Europe China Africa CIS M USA Korea Philippines Press the D D E E button to select Storage from Press the D D E E button or NUMBER buttons to select the beginning programme number If you use NUMBER buttons any number under 10 is entered with a numeric 0 in front of it i e 0 05 5 for 5 Press the D D E E button to select Search Press the G ...

Page 38: ... desired programme number with the F F G G button or number buttons If possible select the programme number directly with the number buttons Any number under 10 is entered with a numeric 0 in front of it i e 0 05 5 for 5 Press the D D E E button to select Search Press the F F G G button to commence searching If a station is found the search will stop Press the O OK K button to store it To store an...

Page 39: ... EX XI IT T button to return to normal TV viewing OK PIP PR PIP PR PIP INPUT ARC EXIT VOL Q VIEW MUTE PR SLEEP LIST I II MENU TEXT PIP SIZE POSTION VCR 1 2 3 4 5 6 Manual programme DE F G OK MENU F G Storage System Band Channel Fine G Search Name 1 2 3 4 5 6 3 4 5 1 Auto programme Manual programme Programme edit Favourite programme Station DE F G OK MENU Station DE F G OK MENU Auto programme Manua...

Page 40: ...A to Z Press the F F G G button to select the position and make your choice of the second character and so on Press the O OK K button to store it Press the E EX XI IT T button to return to normal TV viewing OK PIP PR PIP PR PIP INPUT ARC EXIT VOL Q VIEW MUTE PR SLEEP LIST I II MENU TEXT PIP SIZE POSTION VCR 1 2 3 4 5 6 Manual programme DE F G OK MENU C 05 Storage System Band Channel Fine Search Na...

Page 41: ...programmes are shifted down one position A A M Mo ov vi in ng g a a p pr ro og gr ra am mm me e 1 Select a programme to be moved with the D D E E F F G G button 2 Press the YELLOW button 3 Move the programme to the desired programme number with the D D E E F F G G button 4 Press the YELLOW button again to release this function A A S Sk ki ip pp pi in ng g a a p pr ro og gr ra am mm me e n nu um mb...

Page 42: ... 5 To store another programme repeat steps 4 to 5 You can store up to 8 programmes Press the E EX XI IT T button to return to normal TV viewing This function lets you select your favourite programmes directly Repeatedly press the F FA AV V button to select stored favourite programmes OK EXIT VOL TIME REVEAL INDEX Q VIEW MUTE PR SLEEP LIST I II MENU 1 2 3 4 5 6 7 8 9 10 FAV 1 2 3 4 5 6 7 2 3 4 5 1 ...

Page 43: ... e Select a programme with the D D E E F F G G button Then press the O OK K button The set switches to the chosen programme number A A P Pa ag gi in ng g t th hr ro ou ug gh h a a p pr ro og gr ra am mm me e t ta ab bl le e There are 1 0 programme table pages in which contain 100 programmes Pressing the D D E E F F G G button repeatedly turns the pages Press the L LI IS ST T button to return to no...

Page 44: ...ess the G G button and then D D E E button to select PSM Press the G G button and then D D E E button to select Dynamic Standard Mild User 1 or User 2 Press the E EX XI IT T button to return to TV viewing or press the M ME EN NU U button to return to the previous menu A A PSM adjusts the TV for the best picture appearance Select the preset value in the PSM menu based on the programme category A A ...

Page 45: ...klevelsinthepicture B Br ri ig gh ht tn ne es ss s Increases or decreases amount of white in the your picture C Co ol lo ou ur r Adjusts intensity of all colours S Sh ha ar rp pn ne es ss s Adjusts the level of crispness in the edges between the light and darkareasofthepicture Thelowerthelevel thesoftertheimage T Ti in nt t Adjuststhebalance between red and green levels OK PIP PR PIP PR PIP INPUT ...

Page 46: ... LIST I II MENU TEXT PIP SIZE POSTION 1 2 3 Press the M ME EN NU U button and then D D E E button to select the Picture menu Press the G G button and then D D E E button to select CSM Press the G G button and then D D E E button to select either Cool Normal Warm or User Press the E EX XI IT T button to return to TV viewing or press the M ME EN NU U button to return to the previous menu 1 2 3 4 1 2...

Page 47: ... D D E E button to select Red Green or Blue Press the F F G G button to make appropriate adjustments Press the E EX XI IT T button to return to TV viewing or press the M ME EN NU U button to return to the previous menu OK PIP PR PIP PR PIP INPUT EXIT VOL Q VIEW MUTE PR SLEEP LIST I II MENU TEXT PIP SIZE POSTION 1 2 3 User DE F G OK MENU Red 30 G Green 0 Blue 0 Red 25 F G E 4 5 1 2 3 4 5 6 1 2 3 PS...

Page 48: ... the G G button and then D D E E button to select On or Off Press the E EX XI IT T button to return to normal TV viewing XD is LG electronic s unique picture improving technology to display a real HD source through an advanced digital signal processing algo rithm It s not available to use this function in RGB PC mode Manual DE F G OK MENU On Off XD Contrast G XD Colour XD NR A A X XD D C Co on nt ...

Page 49: ...1 2 3 Press the M ME EN NU U button and then D D E E button to select the Picture menu Press the G G button and then D D E E button to select Advanced Press the G G button and then D D E E button to select Cinema Press the G G button and then D D E E button to select On or Off Press the E EX XI IT T button to return to TV viewing or press the M ME EN NU U button to return to the previous menu 1 2 ...

Page 50: ...o select the Picture menu Press the G G button and then D D E E button to select Advanced Press the G G button and then D D E E button to select Black Level Press the G G button and then D D E E button to select Low or High A A L Lo ow w The reflection of the screen gets darker A A H Hi ig gh h The reflection of the screen gets brighter Press the E EX XI IT T button to return to TV viewing or pres...

Page 51: ...on to select the Picture menu Press the G G button and then D D E E button to select Reset Press the G G button to initialize the adjusted value Returns to the default settings PSM CSM XD Advanced at the factory To set OK PIP PR PIP PR PIP INPUT EXIT VOL Q VIEW MUTE PR SLEEP LIST I II MENU TEXT PIP SIZE POSTION 1 2 3 4 5 6 1 2 3 0323G_2 en_rev04 6 5 06 3 35 PM Page 49 ...

Page 52: ...the original sound when lis tening to the music M Mo ov vi ie e Select this option to enjoy sublime sound S Sp po or rt ts s Select this option to watch sports broadcasting U Us se er r Select this option to use the user defined audio set tings OK PIP PR PIP PR PIP INPUT EXIT VOL Q VIEW MUTE PR SLEEP LIST I II MENU TEXT PIP SIZE POSTION 1 2 3 4 5 6 Press the M ME EN NU U button and then D D E E bu...

Page 53: ...n Make appropriate sound level with the D D E E button Press the E EX XI IT T button to return to TV viewing or press the M ME EN NU U button to return to the previous menu Adjust the sound equalizer OK PIP PR PIP PR PIP INPUT EXIT Q VIEW SLEEP LIST I II MENU TEXT PIP SIZE POSTION User DE F G OK MENU 0 1 0 5 1 5 5 0 10 kHz 1 2 3 4 5 6 2 3 4 5 1 SSM AVL Balance 0 Speaker Sound DE F G OK MENU Surrou...

Page 54: ...elect AVL Press the G G button and then D D E E button to select On or Off Press the E EX XI IT T button to return to TV viewing or press the M ME EN NU U button to return to the previous menu AVL automatically keeps on an equal volume level even if you change programmes 1 2 3 4 1 2 3 SSM AVL Balance 0 Speaker Sound DE F G OK MENU On Off Sound DE F G OK MENU SSM AVL G Balance 0 Speaker TV MENU Sou...

Page 55: ...utton to select the SOUND menu Press the G G button and then D D E E button to select Balance Press the G G button and then F F G G button to make desired adjustment Press the E EX XI IT T button to return to TV viewing or press the M ME EN NU U button to return to the previous menu 1 2 3 4 1 1 2 3 SSM AVL Balance 0 Speaker Sound DE F G OK MENU Sound DE F G OK MENU SSM AVL Balance R15 G Speaker 03...

Page 56: ...NU U button and then D D E E button to select the SOUND menu Press the G G button and then D D E E button to select Speaker Press the G G button and then D D E E button to select On or Off Press the E EX XI IT T button to return to TV viewing or press the M ME EN NU U button to return to the previous menu OK PIP PR PIP PR PIP INPUT EXIT SLEEP LIST I II MENU TEXT PIP SIZE POSTION 1 2 3 4 1 1 2 3 SS...

Page 57: ...ceived two languages dual language you can switch to DUAL I DUAL II or DUAL I II by pressing the I I I II I button repeatedly OK INPUT TV TV INPUT PIP PR PIP PR PIP INPUT DVD ARC EXIT VOL Q VIEW PR SLEEP LIST I II MENU TEXT PIP SIZE POSTION VCR POWER When a programme is selected the sound information for the sta tion appears after the programme number and station name disap pear DUAL I Sends the p...

Page 58: ...ound can be received Sound output can be selected according to the type of received broadcast as follows by pressing the I I I II I button repeatedly SPEAKER SOUND OUTPUT SELECTION In AV Component RGB and HDMI mode you can select output sound for the left and right loud speakers Repeatedly press the I I I II I button to select the sound output L R Audio signal from audio L input is sent to the lef...

Page 59: ...minutes Press the E EX XI IT T button to return to normal TV viewing OK PIP PR PIP PR PIP INPUT EXIT VOL Q VIEW MUTE PR SLEEP LIST I II MENU TEXT PIP SIZE POSTION 1 2 3 4 5 6 7 8 9 You must set the time correctly before using on off time function If current time setting is erased by a power failure or the set is unplugged reset the clock 1 2 3 4 5 1 2 3 Time DE F G OK MENU Clock Off time On time A...

Page 60: ...to TV viewing or press the M ME EN NU U button to return to the previous menu The Off time automatically switches the set to standby at the preset time Two hours after the set is switched on by the on time function it will automatically switch back to standby mode unless a button has been pressed Once the on time off time is set these functions operate daily at the preset time Off time function ov...

Page 61: ... to remember to switch the set off before you go to sleep The sleep timer automatically switches the set to stand by after the preset time has elapsed SLEEP TIMER Press the S SL LE EE EP P button repeatedly to select the number of minutes The display will appear on the screen followed by 10 20 30 60 90 120 180 and 240 When the number of minutes you want is displayed on the screen the timer begins ...

Page 62: ...tton to return to the previous menu OK PIP PR PIP PR PIP INPUT EXIT VOL Q VIEW MUTE PR SLEEP LIST I II MENU TEXT PIP SIZE POSTION 1 2 3 4 5 6 NOTE G G In C Ch hi il ld d l lo oc ck k O On n if the set is turned off press the r r I I I IN NP PU UT T P PR R D D E E button on the set or P PO OW WE ER R I IN NP PU UT T T TV V P PR R or NUMBER buttons on the remote control G G With the C Ch hi il ld d ...

Page 63: ...he image Avoid allowing a fixed image to remain on the set s screen for a long period of time It s not available to use this function in 26LC2R 32LC2R models W Wh hi it te e w wa as sh h White wash removes permanent images from the screen N No ot te e An excessive permanent image may be impossible to clear entirely with White Wash O Or rb bi it te er r Orbiter may help prevent ghost images However...

Page 64: ...he G G button and then D D E E button to select On or Off Press the E EX XI IT T button to return to TV viewing or press the M ME EN NU U button to return to the previous menu 1 2 3 4 1 2 3 Special DE F G OK MENU On Off Language Child lock ISM Method Low Power Set ID Demo Special DE F G OK MENU Language Child lock ISM Method Low Power G Set ID Demo OK PIP PR PIP PR PIP INPUT EXIT VOL Q VIEW MUTE P...

Page 65: ... X XD D D De em mo o Press the G G button to begin X XD D D De em mo o To stop X XD D D De em mo o press the M ME EN NU U button 1 2 3 4 XD Demo XD Off XD On Exit Menu 1 2 3 Special DE F G OK MENU To start Language Child lock ISM Method Low Power Set ID Demo Special DE F G OK MENU Language Child lock ISM Method Low Power Set ID Demo G OK PIP PR PIP PR PIP INPUT EXIT VOL Q VIEW MUTE PR SLEEP LIST I...

Page 66: ...urn to the previous menu OK PIP PR PIP PR PIP INPUT EXIT VOL Q VIEW MUTE PR SLEEP LIST I II MENU TEXT PIP SIZE POSTION 1 2 3 4 5 6 7 8 9 Automatically adjusts picture position and minimizes image shaking After adjustment if the image is still not correct your set is functioning properly but needs further adjustment A Au ut to o c co on nf fi ig gu ur re e This function is for the automatic adjustm...

Page 67: ...o remove any horizontal noise and clear or sharpen the image of characters Press the M ME EN NU U button and then use D D E E button to select the Screen menu Press the G G button and then D D E E button to select Manual config Press the G G button and then D D E E button to select Phase Clock H Position or V Position Press the F F G G button to make appropriate adjustments Press the E EX XI IT T ...

Page 68: ...ire screen useful for viewing 4 3 formatted DVDs 1 14 4 9 9 You can enjoy the picture format of 14 9 or general TV programme through the 14 9 mode The screen 14 9 is viewed just like that the screen 4 3 is magnified to the left right OK INPUT TV TV INPUT PIP PR PIP PR PIP INPUT DVD ARC EXIT SLEEP LIST I II MENU TEXT PIP SIZE POSTION VCR POWER You can watch the screen in various picture formats S S...

Page 69: ...er the top and bottom portions of the picture will be cropped Z Zo oo om m2 2 Choose Z Zo oo om m2 2 when you want the picture to be altered both horizontally extended and vertically cropped The pic ture taking a halfway trade off between alteration and screen coverage Press the E EX XI IT T button to return to TV viewing or press the M ME EN NU U button to return to the previous menu 4 0323G_2 en...

Page 70: ...to select VGA Mode or XGA Mode Press the G G button and then use D D E E button to select the desired VGA XGA resolution Press the E EX XI IT T button to return to TV viewing or press the M ME EN NU U button to return to the previous menu OK PIP PR PIP PR PIP INPUT EXIT Q VIEW SLEEP LIST I II MENU TEXT PIP SIZE POSTION SELECTING WIDE VGA XGA MODE 1 2 3 4 1 2 3 Auto config Manual config VGA Mode AR...

Page 71: ...nfig Manual config VGA Mode ARC Reset Screen DE F G OK MENU Screen DE F G OK MENU To set Auto config Manual config VGA Mode ARC Reset G Press the M ME EN NU U button and then D D E E button to select the Screen menu Press the G G button and then D D E Ebutton to select Reset Press the G G button You can initialize Position PIP size PIP position PIP size and PIP position are available to work in PI...

Page 72: ...e code Enter a code number using the number buttons on the remote control Programming code numbers for the corresponding component can be found on the following pages Again if the code is correct the device will turn off Press the M ME EN NU U button to store the code Test the remote control functions to see if the component responds properly If not repeat from step 2 The remote is a multi brand o...

Page 73: ...LTA 013 020 MITSUBISHI 013 020 045 046 049 051 059 061 151 MTC 034 040 MULTITECH 024 034 NEC 012 023 039 043 048 NORDMENDE 043 OPTONICA 053 054 PANASONIC 066 070 074 083 133 140 145 PENTAX 013 020 031 033 063 PHILCO 031 034 067 PHILIPS 031 033 034 054 067 071 101 PILOT 101 PIONEER 013 021 048 PORTLAND 108 PULSAR 072 QUARTZ 01 1 014 QUASAR 033 066 075 145 RCA 013 020 033 034 040 041 062 063 107 109...

Page 74: ... outlet Check your antenna direction and or location Test the wall power outlet plug another product s power cord into the outlet where the product s power cord was plugged in This is normal the image is muted during the product startup process Please contact your service center if the picture has not appeared after five minutes Adjust Color in menu option Keep a sufficient distance between the pr...

Page 75: ... ke er rs s T Th he er re e i is s a a p pr ro ob bl le em m i in n P PC C m mo od de e O On nl ly y P PC C m mo od de e a ap pp pl li ie ed d Adjust resolution horizontal frequency or vertical frequency Check the input source Work the Auto configure or adjust clock phase or H V position Check the signal cable Reinstall the PC video card T Th he e s si ig gn na al l i is s o ou ut t o of f r ra an...

Page 76: ...ric softener or dish washing detergent Wring the cloth until it s almost dry and then use it to wipe the screen Make sure the excess water is off the screen and then let it air dry before you turn on your TV Cleaning the Cabinet To remove dirt or dust wipe the cabinet with a soft dry lint free cloth Please be sure not to use a wet cloth Extended Absence If you expect to leave your TV dormant for a...

Page 77: ...thout prior notice for quality improvement 68 1 0x54 2 0x1 7 2 0mm 2 6 8x2 1 3x6 8inches 68 1 0x490 8x1 1 9 0mm 2 6 8x1 9 3x4 6inches 1 8 5kg 40 8lbs 1 5 2kg 3 3 5lbs AC1 00 2 40V 50 60Hz1 3A 42PC1RV 42PC1RV TJ 42PC3RV 42PC3RV TJ 42PC3RVH TJ MODELS AC100 240V 50 60Hz 3 0A PAL SECAM B G D K PAL I II NTSC M VHF NZ1 E21 UHF E21 E69 CATV S1 S20 HYPER S21 S47 75 Ω 0 40 C 32 104 F Less than 80 20 60 C 4...

Page 78: ...ction cables are not supplied with the TV REMOTE CONTROLIN AUDIO IN RGB DVI RGB IN RGB IN PC DTV HDMI IN AUDIO OUT VARIABLE RS 232C IN RS 232C IN CONTR CONTROL SERVICE PC Type of Connector D Sub 9 Pin Male RGB IN PC DTV HDMI DVI IN UPGRADE MODULE AUDIO OUT VARIABLE RS 232C IN CONTROL SERVICE No Pin Name 1 No connection 2 RXD Receive data 3 TXD Transmit data 4 DTR DTE side ready 5 GND 6 DSR DCE sid...

Page 79: ...apping 1 See page 81 Press the M ME EN NU U button and then D D E E button to select the Special menu PresstheG GbuttonandthenuseD D E EbuttontoselectSetID Press the G G button and then use F F G G button to adjust Set ID to choose the desired monitor ID number The adjustment range of Set ID is 1 99 Press the E EX XI IT T button to return to normal TV viewing Language Child lock ISM Method Low Pow...

Page 80: ...on viable functions or communication errors Data1 Illegal Code Data2 Not supported function Data3 Wait more time C Co om mm ma an nd d1 1 C Co om mm ma an nd d2 2 S Se et t I ID D D Da at ta a C Cr r C Co om mm ma an nd d2 2 S Se et t I ID D O OK K D Da at ta a x x C Co om mm ma an nd d2 2 S Se et t I ID D N NG G D Da at ta a x x C CO OM MM MA AN ND D1 1 C CO OM MM MA AN ND D2 2 DATA Hexadecimal C...

Page 81: ...2 e e To control volume mute on off You can also adjust mute using the MUTE button on remote control Data 0 Volume mute off Volume on Data 1 Volume mute on Volume off Transmission k e Set ID Data Cr Acknowledgement e Set ID OK Data x 0 05 5 V Vo ollu um me e C Co on nt tr ro oll C Co om mm ma an nd d2 2 f f To adjust volume You can also adjust volume with the volume buttons on remote control Data ...

Page 82: ...Data x 1 15 5 B Ba alla an nc ce e C Co om mm ma an nd d2 2 t t To adjust balance You can also adjust balance in the SOUND menu Data Min 0 Max 64 Refer to Real data mapping 1 See page 81 Transmission k t Set ID Data Cr Acknowledgement t Set ID OK Data x 1 10 0 S Sh ha ar rp pn ne es ss s C Co om mm ma an nd d2 2 k k To adjust the screen sharpness You can also adjust sharpness in the PICTURE menu D...

Page 83: ... ng g C Co om mm ma an nd d1 1 jj C Co om mm ma an nd d2 2 r r To adjust orbiter operation time term This feature is not available for all models Data Min 1 Max FE Refer to Real data mapping 1 Transmission j r Set ID Data Cr Acknowledgement r Set ID OK Data x 2 24 4 O Or rb biit te er r P Piix xe ell S Se et tt tiin ng g C Co om mm ma an nd d1 1 jj C Co om mm ma an nd d2 2 s s To adjust pixel numb...

Page 84: ... 0 1 1 Input4 0 0 1 0 Input3 0 0 0 1 Input2 Acknowledgement y Set ID OK Data x 2 27 7 K Ke ey y C Co om mm ma an nd d1 1 m m C Co om mm ma an nd d2 2 c c To send IR remote key code Data Key code Refer to page 84 Transmission m c Set ID Data Cr Acknowledgement c Set ID OK Data x 2 28 8 I In np pu ut t s se elle ec ct t C Co om mm ma an nd d1 1 x x C Co om mm ma an nd d2 2 b b M Ma aiin n P Piic ct ...

Page 85: ...a code Data code C0 C1 C2 C3 C4 C5 C6 C7 D0 D1 D2 D3 D4 D5 D6 D7 D0 D1 D2 D3 D4 D5 D6 D7 Repeat code Tf 4 5 ms 9 ms 2 25 ms 9 ms 0 55 ms 0 56ms 1 12ms Tf Tf Tf 108ms 455KHz 0 56ms 2 24ms Bit 0 Bit 1 1 How to Connect Connect your wired remote control to the Remote Control port on the TV 2 Remote Control IR Codes Output waveform Single pulse modulated with 37 917KHz signal at 455KHz T1 Tc Carrier fr...

Page 86: ... 06 G G R C Button 40 D D R C Button 41 E E R C Button 44 OK R C Button 72 PIP PR R C Button 71 PIP PR R C Button 61 PIP INPUT R C Button 72 RED R C Button 71 GREEN R C Button 63 YELLOW R C Button 61 BLUE R C Button 02 VOL R C Button 03 VOL R C Button 00 PR R C Button 01 PR R C Button 09 MUTE R C Button 53 LIST R C Button 10 19 Number Key 0 9 R C Button 1E FAVOURITE R C Button 1A Q VIEW R C Button...

Page 87: ...0323G_3 en_rev04 6 5 06 3 37 PM Page 85 ...

Page 88: ...0323G_3 en_rev04 6 5 06 3 37 PM Page 86 ...

Reviews: