background image

20

ENG

ENGLISH

ASSEMBLING AND PREPARING

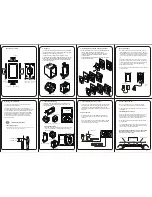
Using the Kensington security system 

y

y

ImageshownmaydifferfromyourtV.

y

y

thisfeatureisnotavailableforallmodels.

theKensingtonsecuritysystemconnectoris
locatedattherearofthetV.Formoreinformation
ofinstallationandusing,refertothemanual
providedwiththeKensingtonsecuritysystemor
visit

http://www.kensington.com.

connecttheKensingtonsecuritysystemcable
betweenthetVandatable.

Mountingonawall

attachawallmountbracketattherearofthetV
carefullyandinstallthewallmountbracketona
solidwallperpendiculartothefloor.whenyou
attachthetVtootherbuildingmaterials,please
contactqualifiedpersonnel.

lgrecommendsthatwallmountingbeperformed
byaqualifiedprofessionalinstaller.

10 cm

10 cm

10 cm

10 cm

Makesuretousescrewsandwallmount
bracketthatmeettheVesastandard.standard
dimensionsforthewallmountkitsaredescribedin
thefollowingtable.

Separate purchase(wall Mounting Bracket)

Model

22lK33**

19/22/26lV25**

22/26lV55**

22/26lV30**

26/32lK33**

32lK43**

32lK45**

32lV25**

32lV35**

32lV30**

32lV34**

32lw45**

VESA (A x B)

100x100

200x100

Standard screw

M4

M4

Number of screws

4

4

wall mount 

bracket

lsw100B,lsw100Bg

Model

42lK43**

37/42lK45**

42/47lK53**

37lV35**

42/47lV35**

42lV34**

42/47/55lw45**

55lK53**

VESA (A x B)

200x200

400x400

Standard screw

M6

M6

Number of screws

4

4

wall mount 

bracket 

lsw200B,

lsw200Bg

lsw400B,

lsw400Bg

y

y

disconnectthepowerfirst,andthen
moveorinstallthetV.otherwiseelectric
shockmayoccur.

y

y

IfyouinstallthetVonaceilingorslanted
wall,itmayfallandresultinsevereinjury.
useanauthorizedlgwallmountbracket
andcontactthelocaldealerorqualified
personnel.

y

y

donotovertightenthescrewsasthis
maycausedamagetothetVandvoid
yourwarranty.

y

y

usethescrewsandwallmountbracket
thatmeettheVesastandard.any
damagesorinjuriesbymisuseorusing
animproperaccessoryarenotcovered
bythewarranty.

CAUTION

Summary of Contents for 22LK33 Series

Page 1: ...al Instructions 3 Product Name AU 10 This part contain Eco hazardous substances Pb Cd Hg Cr6 PBB PBDE etc within LG standard level Details should be followed Eco SCM management standard LG 56 A 2524 Especially Part should be followed and controlled the following specification 1 Eco hazardous substances test report should be submitted when Part certification test and First Mass Production 2 Especia...

Page 2: ...Pagination sheet Pagination sheet P NO MFL62864990 Total pages 32 pages Front Cover EN P NO 2 Back Cover 31 ...

Page 3: ...P NO MFL62864990 1101 REV01 Printed in Korea www lg com OWNER S MANUAL LCD TV LED LCD TV Please read this manual carefully before operating the set and retain it for future reference ...

Page 4: ... move If you drop the product the damaged product can cause electric shock or fire Contact your nearest service center for repair Make sure to turn off the product Make sure to remove all cables before moving the product You may be electrocuted or the product can be damaged Precautions WHEN Using the Product Do not disassemble repair or modify the product at your own discretion Fire or electric sh...

Page 5: ...ct and item Remote control and batteries AAA Owner s manual Polishing cloth1 This item is not included for all models Ferrite core Depending on model This item is not included for all models Power Cord This item is not included for all models 1 Gently wipe the spots on the cabinet with the polishing cloth Only 22LK33 Cable Holder Protection cover M4x20 x 8 Only 26 32LK33 32 42LK43 42 47 55LK53 32 ...

Page 6: ...37LV35 32LV30 32LV34 M4 x 14 x 8 M4 x 12 x 8 Screw for assembly Cable holder DC Adapter Composite gender cable M4x16 x 2 or Only 19 22 26LV25 22 26LV55 Except for 32LV25 Only 32LV25 y y Do not use any pirated items to ensure the safety and product life span y y Any damages or injuries by using pirated items are not covered by the warranty Caution Only 32 42 47 55LW45 3D Glasses AG P110 AG F110 ...

Page 7: ... Except for 22 26 32LK33 32 42LK43 42 47 55LK53 B A A B A 10 mm B 18 mm to an External device Figure 1 to the TV Cross Section of Ferrite Core 2 Use the ferrite core to reduce the electromagnetic interference in the power cable Wind the power cable on the ferrite core once Place the ferrite core close to the TV to a wall plug to the TV Cross Section of Ferrite Core 3 Use the ferrite core to reduce...

Page 8: ...aced in standby mode in order to reduce the power consumption And TV should be turned off if it will not be watched for some time as this will reduce energy consumption y y The energy consumed during use can be significantly reduced if the level of brightness of the picture is reduced and this will reduce the overall running cost NOTE y y Do not step on the glass stand or subject it to any impact ...

Page 9: ...escription I Turns the power on or off INPUT Changes the input source HOME Accesses the main menus or saves your input and exits the menus OK Selects the highlighted menu option or confirms an input Adjusts the volume level v P Scrolls through the saved programmes Only 22LK33 Remote control Power Indicator Can be adjusted using the Power Indicator in the OP TION menu Headphone Socket USB input y y...

Page 10: ...the power on or off INPUT Changes the input source HOME Accesses the main menus or saves your input and exits the menus OK Selects the highlighted menu option or confirms an input Adjusts the volume level v P Scrolls through the saved programmes Only 26 32LK33 32 42LK43 Remote control Power Indicator Can be adjusted using the Power Indicator in the OP TION menu y y Image shown may differ from your...

Page 11: ...lume level v P Scrolls through the saved programmes Only 42 47 55LK53 y y Image shown may differ from your TV INPUT HOME OK P R IN 3 USB IN AV IN 2 L MONO R AUDIO VIDEO 1 2 COMPONENT IN Y P B P R R L VIDEO AUDIO R AV IN 1 L MONO ANTENNA CABLE IN RS 232CIN CONTROL SERVICE RGB IN PC OPTICALDIGITAL AUDIOOUT RGB DVI AUDIOIN DVI IN 2 1 VIDEO AUDIO Headphone Socket HDMI IN USB input AV Audio and Video I...

Page 12: ...tion by touching Button Description I Turns the power on or off INPUT Changes the input source HOME Accesses the main menus or saves your input and exits the menus OK Selects the highlighted menu option or confirms an input Adjusts the volume level v P Scrolls through the saved programmes Only 32 37 42LK45 Headphone Socket HDMI IN USB input y y Image shown may differ from your TV AV Audio and Vide...

Page 13: ...on You can use the desired button function by touching Button Description v P Scrolls through the saved programmes Adjusts the volume level OK Selects the highlighted menu option or confirms an input HOME Accesses the main menus or saves your input and exits the menus INPUT Changes the input source I Turns the power on or off Only 19 22 26LV25 Remote control and intelligent1 sensors Power Indicato...

Page 14: ...g Button Description v P Scrolls through the saved programmes Adjusts the volume level OK Selects the highlighted menu option or confirms an input HOME Accesses the main menus or saves your input and exits the menus INPUT Changes the input source I Turns the power on or off Only 32LV25 32 37 42 47LV35 22 26 32LV30 32 42LV34 32 42 47 55LW45 Remote control and intelligent1 sensors Power Indicator Ca...

Page 15: ... option or confirms an input Accesses the main menus or saves your input and exits the menus Changes the input source I Turns the power on or off Remote control and intelligent1 sensors Power Indicator Can be adjusted using the Power Indicator in the OPTION menu OPTICAL DIGITAL AUDIO OUT AUDIO IN RGB DVI DC IN RGB IN PC RS 232C IN CONTROL SERVICE L MONO R AUDIO VIDEO 2 1 USB IN VIDEO AUDIO AV IN 2...

Page 16: ...ze y y It is recommended to move the TV in the box or packing material that the TV originally came in y y Before moving or lifting the TV disconnect the power cord and all cables y y When holding the TV the screen should face away from you to avoid damage y y Hold the top and bottom of the TV frame firmly Make sure not to hold the transparent part speaker or speaker grill area y y When transportin...

Page 17: ... 2 Assemble the TV as shown Only 26 32LK33 32 42LK43 42 47 55LK53 1 Lay the TV with the screen side down on a flat surface y y Lay a foam mat or soft protective cloth on the surface to protect the screen from damage Caution 2 Assemble the parts of the Stand Body with the Stand Base of the TV Stand Body Stand Base 3 Secure the TV and the stand with the 4 screws y y Tighten the screws firmly to prev...

Page 18: ... with the 4 screws Stand Body y y Tighten the screws firmly to prevent the TV from tilting forward Do not over tighten Caution Only 19 22 26LV25 22 26LV55 1 Lay the TV with the screen side down on a flat surface y y Lay a foam mat or soft protective cloth on the surface to protect the screen from damage Caution 2 Assemble the parts of the Stand Body with the Stand Base of the TV 3 Secure the TV an...

Page 19: ...y y Tighten the screws firmly to prevent the TV from tilting forward Do not over tighten Caution Only 32 37 42 47LV35 22 26 32LV30 32 42LV34 32 42 47 55LW45 1 Lay the TV with the screen side down on a flat surface y y Lay a foam mat or soft protective cloth on the surface to protect the screen from damage Caution 2 Assemble the parts of the Stand Body with the Stand Base of the TV Stand Body Stand...

Page 20: ...ver into the opening at the bottom of the TV until it locks in place This will protect the opening from accumulating dust and dirt Protection cover Mounting on a table y y Image shown may differ from your TV 1 Lift and tilt the TV into its upright position on a table Leave a 10 cm minimum space from the wall for proper ventilation 10 cm 10 cm 10 cm 10 cm 2 Connect the power cord to a wall outlet y...

Page 21: ...ng or rocking the TV may cause injury warning Securing the TV to a wall y y Image shown may differ from your TV y y This feature is not available for all models 1 Insert and tighten the eye bolts or TV brackets and bolts on the back of the TV If there are bolts inserted at the eye bolts position remove the bolts first 2 Mount the wall brackets with the bolts to the wall Match the location of the w...

Page 22: ...ndard dimensions for the wall mount kits are described in the following table Separate purchase Wall Mounting Bracket Model 22LK33 19 22 26LV25 22 26LV55 22 26LV30 26 32LK33 32LK43 32LK45 32LV25 32LV35 32LV30 32LV34 32LW45 VESA A x B 100 x 100 200 x 100 Standard screw M4 M4 Number of screws 4 4 Wall mount bracket LSW100B LSW100BG Model 42LK43 37 42LK45 42 47LK53 37LV35 42 47LV35 42LV34 42 47 55LW4...

Page 23: ...e holder y y Use the screws that are listed on the VESA standard screw specifications y y The wall mount kit includes an installation manual and necessary parts y y The length of screws may differ depending on the wall mount Make sure to use the proper length y y For more information refer to the manual supplied with the wall mount bracket NOTE 2 After connecting the cables as necessary install Ca...

Page 24: ...s for maximum comfort Tilt range 12 0 3 0 Connection of TV DC Adapter 1 Connect the antenna cable to the antenna input port on the TV 2 Connect the DC adapter plug to the power input jack on the TV 3 Connect the power cord to the DC adapter first then plug the power cord into the wall power outlet Only 19 22 26LV25 22 26LV55 y y Image shown may differ from your TV ...

Page 25: ... main menus or saves your input and exit the menus Q MENU Accesses the quick menus 3D OPTION Only 3D Models Uses for viewing 3D video Navigation buttons up down left right Scrolls through menus or options OK Selects menus or options and confirms your input BACK Returns to the previous level INFO Views the information of the current programme the screen EXIT Clears all on screen displays and return...

Page 26: ...can also access Factory Reset by accessing OPTION in the main menus NOTE 4 When the basic settings are complete press OK y y If you do not complete the Initial setting it will appear whenever the TV turns on y y Disconnect the power cord from the power outlet when you do not use the TV for a long period of time NOTE 5 To turn the TV off press POWER 3 Follow the on screen instructions to customize ...

Page 27: ...es y y The external device connection may differ from the model y y Connect external devices to the TV regardless of the order of the TV port NOTE Connecting your Unit y y Image shown may differ from your TV y y To connect an additional equipment see the External equipment Setup section in CD Manual OPTICAL DIGITAL AUDIO OUT AUDIO IN RGB DVI RGB IN PC RS 232C IN CONTROL SERVICE L MONO R AUDIO VIDE...

Page 28: ...n seizure Some viewers may experience a seizure or epilepsy when exposed to certain fac tors including flashing lights or images in TV or video games If you or anybody WARNING from your family has a history of epilepsy or seizure please consult with your doctor before watching 3D TV Also certain symptoms can occur in unspecified conditions without any previ ous history If you experience any of the...

Page 29: ...o not use the TV in close proximity to other electronic equipments and RF equipments y y In Analogue TV 3D Imaging does not work y y When watching 2D images it is recom mended to take off the 3D glasses If you watch 2D images with the 3D glasses on you may see distorted images NOTE When Using 3D Glasses y y 3D glasses are sold separately Refer to the 3D glasses manual for operating instructions y ...

Page 30: ...re in 3D mode 3D Picture Correction Changes the order of images in the right and left sides of the picture in 3D mode Image View Mode Select 2D 3D or 3D 2D Depending on model Watching 3D images View 3D mode for 3D images 1 Play the 3D video or select 3D channel 2D to 3D mode is available with all contents 2 Press 3D and select same type in your dis played picture on the screen Select type on 3D Vi...

Page 31: ...ch isn t mpo file 3D camera file y y Picture mode is set as Standard Energy Saving Off if entering to 3D mode CAUTION y y Some menus may not work while watching the TV in 3D y y If used 3D effect on the 2D source 3D may not work y y The 3D imaging mode is disabled automatically when switching DTV channe ls input source y y The screen may not be displayed properly if you view 2D DTV images in 3D im...

Page 32: ...ff y y There is no problem with your product Video Problem Resolution An image displays in black and white or the colour quality is poor y y Adjust the colour setting in the Picture menu y y Keep a sufficient distance between this product and other electronic products y y Scroll to other channels There may a problem with the broadcast Horizontal or vertical bars appears or images blur y y Check if...

Page 33: ...tain the source code under GPL LGPL MPL and other open source licenses that is con tained in this product please visit http opensource lge com In addition to the source code all referred license terms warranty disclaimers and copyright notices are available for download ...

Page 34: ...service Model Serial No Trade Mark of the DVB Digital Video Broadcasting Project 1991 to 1996 An extended Owner s Manual that contains information on the advanced features of these LG TV sets is located on the CD ROM provided in an electronic version To read these files you will need to use a Personal Computer PC equipped with a CD ROM drive Only DTV ...

Reviews: