background image

SOUND & LANGU

A

GE CONTR

OL

43

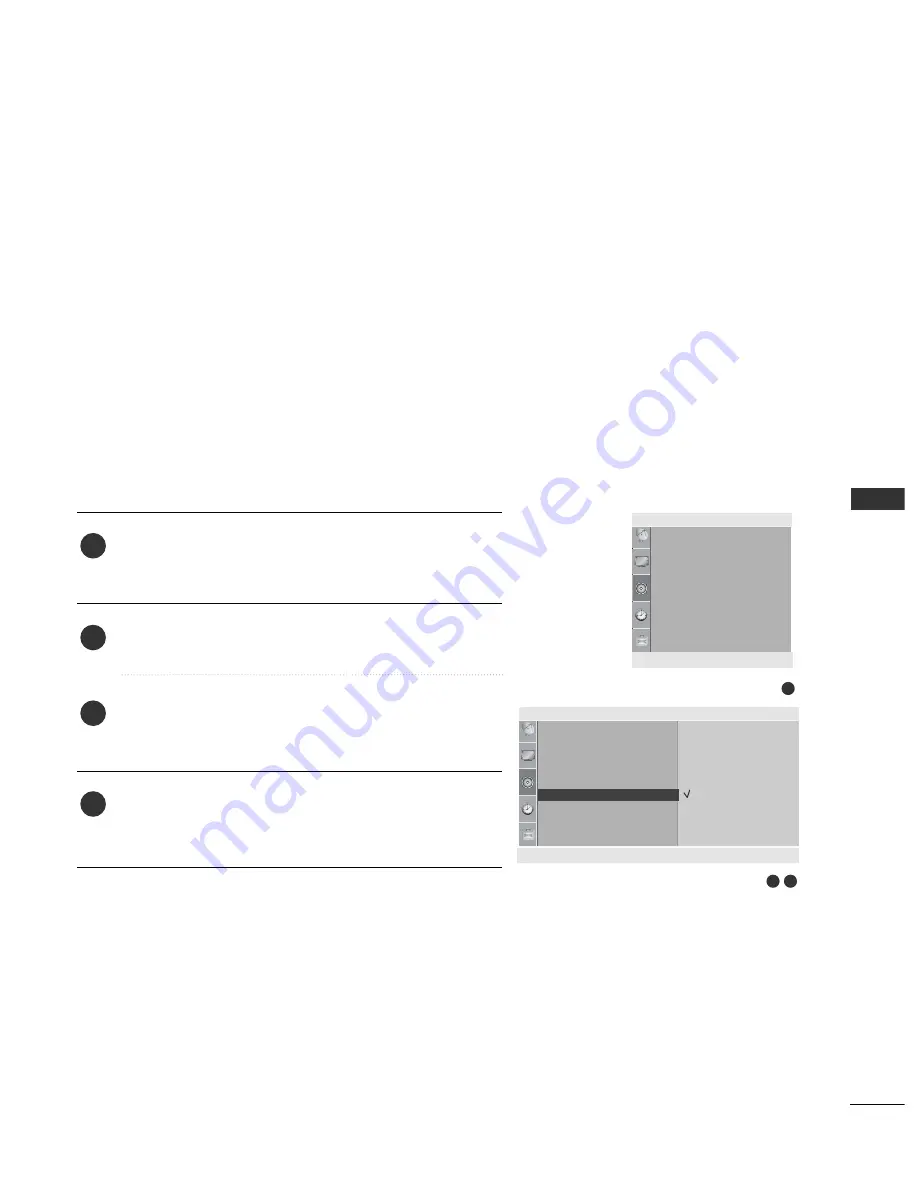
1

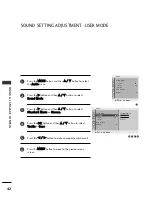
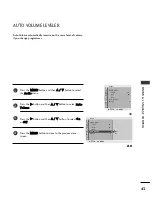
AUTO VOLUME LEVELER 

Press the M

M E

E N

N U

U button and then 

D

D

//   

E

E

button to select

the A

Au

ud

diio

o menu.

Press the

G

G

button and then 

D

D

//   

E

E

button to select A

A u

u tt o

o

V

Vo

ollu

um

mee. 

Press the

G

G

button and then 

D

D

//   

E

E

button to select O

O n

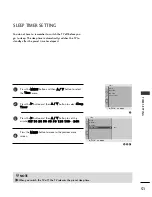
n

or O

O ff ff.

Press the M

ME

EN

NU

U  button to move to the previous menu

screen.

Auto Volume automatically remains on the same level of volume
if you change programmes.

1

2

3

4

3

2

Audio

Sound Mode

• Treble                               50

• Bass                                  50

• Reset                               

Auto Volume

Balance                                0

Auto Volume

G

Off
On

Sound Mode

• Treble                               50

• Bass                                  50

• Reset                               

Auto Volume

Balance                                0

Audio

DEF G

OK  MENU

DEF G

OK  MENU

Summary of Contents for 19LD310

Page 1: ...www lg com OWNER S MANUAL LCD TV Please read this manual carefully before operating your set and retain it for future reference ...

Page 2: ...HDMI the HDMI logo and High Definition Multimedia Interface are trade marks or registered trademarks of HDMI Licensing LLC ...

Page 3: ...not available for all models Lightly wipe any stains or fingerprints on the surface of the TV with the polishing cloth Do not use excessive force This may cause scratching or discolouration Bolts for stand assembly Refer to p 6 Only 26 32LD310 x 4 1 Screw for stand fixing Refer to p 8 Only 26 32LD310 ACCESSORIES RA TIO Remote Control Cable Management Clip Refer to p 7 Only 19 22LD310 Protection Co...

Page 4: ... CE ES SS SO OR RI IE ES S 1 2 CONTENTS CONTENTS Front Panel Controls 4 Back Panel Information 5 Stand Installation 6 Back Cover for Wire Arrangement 7 Attaching the TV to a desk 8 Positioning your display 8 Swivel Stand 8 Not using the desk type stand 9 Kensington Security System 10 Careful Installation Advice 10 Desktop Pedestal Installation 1 1 Wall Mount Horizontal installation 1 1 Antenna Con...

Page 5: ...ception 46 NICAM Reception 47 Speaker Sound Output Selection 47 On Screen Menu Language Selection 48 3 CONTENTS APPENDIX Troubleshooting 55 Maintenance 57 Product Specifications 58 IR Codes 59 TIME SETTING Clock Setup 49 Auto On Off Timer Setting 50 Sleep Timer Setting 51 TELETEXT Switch On Off 52 SIMPLE Text 52 TOP Text 53 FASTEXT 53 Special Teletext Functions 54 ...

Page 6: ...e shown may differ from your TV Only32LD31 0 INPUT MENU P OK PROGRAMME VOLUME Only 19 22 26LD310 INPUT MENU OK P PROGRAMME VOLUME OK MENU INPUT POWER OK INPUT POWER MENU Remote Control Sensor Power Standby Indicator Illuminates red in standby mode Illuminates blue when the TV is switched on 19 22 26 32LD310 ...

Page 7: ...nal to HDMI IN This TV does not support DVI VIDEO signal using DVI to HDMI cable Audio Output Connect an external amplifier or add a subwoofer to your surround sound system Audio Video Input AV IN Connect audio video output from an external device to these jacks SERVICE ONLY PORT Component Input Connect a component video audio device to these jacks Antenna Input Connect RF antenna to this jack 1 2...

Page 8: ...ten the bolt with excessive force the bolt can deviate from abrasion of the tightening part of the bolt 1 Carefully place the TV screen side down on a cush ioned surface to protect the screen from damage 2 Assemble the TV as shown Only 19 22LD310 Cover Base 1 2 3 CarefullyplacetheTVscreensidedownonacushioned surface to protect the screen from damage Assemble the TV as shown Fix the 4 bolts securel...

Page 9: ...les as necessary To connect additional equipment see the External Equipment Setup section of the manual 1 Install the C CA AB BL LE E M MA AN NA AG GE EM ME EN NT T C CL LI IP P as shown 2 CABLE MANAGEMENT CLIP Fit the CABLE MANAGEMENT CLIP as shown 3 Connect the cables as necessary To connect additional equipment see the External Equipment Setup section of the manual 1 Open the C CA AB BL LE E M ...

Page 10: ...prevent TV from falling over the TV should be securely attached to the floor wall per installation instructions Tipping shaking or rocking the machine may cause injury POSITIONING YOUR DISPLAY Only 19 22LD310 Image shown may differ from your TV Adjust the position of the panel in various ways for maximum comfort Tilt range 12 0 3 0 SWIVEL STAND Only 26 32LD310 Image shown may differ from your TV A...

Page 11: ...on a cushioned surface to protect the screen from damage 2 Loose the bolts from TV Detach the stand from TV Insert the P Pr ro ot te ec ct ti io on n C Co ov ve er r into the TV PROTECTION COVER Only 26 32LD310 1 Carefully place the TV screen side down on a cushioned surface to protect the screen from damage 2 Loose the bolts from TV 3 Detach the stand from TV PROTECTION COVER 4 Insert the P PR RO...

Page 12: ... bracket that is mounted on the wall 3 Use a sturdy rope to tie the product for alignment It is safer to tie the rope so it becomes horizontal between the wall and the product 2 1 2 1 KENSINGTONSECURITYSYSTEM This feature is not available for all models Image shown may differ from your TV The TV is equipped with a Kensington Security System connector on the back panel Connect the Kensington Securi...

Page 13: ...SA standard A LG recommends that wall mounting be performed by a qualified professional installer NOTE G Should Install wall mount on a solid wall perpen dicular to the floor G Should use a special wall mount if you want to install it to ceiling or slanted wall G The surface that wall mount is to be mounted on should be of sufficient strength to support the weight of TV set e g concrete natural ro...

Page 14: ...s HDMI IN HDMI DVI IN 1 1 2 2 RGB IN COMPONENT IN AUDIO ANTENNA IN AV VIDEO VARIABLE AUDIO OUT Multi family Dwellings Apartments Connect to wall antenna socket Single family Dwellings Houses Connect to wall jack for outdoor antenna Outdoor Antenna Wall Antenna Socket RF Coaxial Wire 75 ohm Antenna UHF Signal Amplifier VHF In poor signal areas to achieve better picture quality it may be necessary t...

Page 15: ... a component cable Connect the video outputs Y PB PR of the digi tal set top box to the C CO OM MP PO ON NE EN NT T I IN N V VI ID DE EO O jacks on the TV Connect the audio output of the digital set top box to the C CO OM MP PO ON NE EN NT T I IN N A AU UD DI IO O jacks on the TV Turn on the digital set top box Refer to the owner s manual for the digital set top box Select C Co om mp po on ne en n...

Page 16: ...audio signal simultaneously with using a HDMI cable G G If the digital set top box supports Auto HDMI function the output resolution of the source device will be auto matically TV to 1280x720p G G If the digital set top box player does not support Auto HDMI you need to TV the output resolution appropri ately To get the best picture quality adjust the output resolu tion of the source device to 1280...

Page 17: ...s Y PB PR of the DVD to the C CO OM MP PO ON NE EN NT T I IN N V VI ID DE EO O jacks on the TV Connect the audio outputs of the DVD to the C CO OM MP PO ON NE EN NT T I IN N A AU UD DI IO O jacks on the TV Turn on the DVD player insert a DVD Select C Co om mp po on ne en nt t input source using the I IN NP PU UT T button on the remote control Refer to the DVD player s manual for operating instruct...

Page 18: ...ideo and audio signals simultane ously when using a HDMI cable G G If the DVD player supports Auto HDMI function the output resolution of the source device will be automati cally TV to 1280x720p G G If the DVD player does not support Auto HDMI you must TV the output resolution appropriately To get the best picture quality adjust the output resolu tion of the source device to 1280x720p G G We recom...

Page 19: ...UTPUT SWITCH ANT IN R S VIDEO VIDEO ANT OUT L Wall Jack Antenna 1 2 Connecting with a RCA cable Connect the A AU UD DI IO O V VI ID DE EO O jacks between TV and VCR Match the jack colours Video yellow Audio Left white and Audio Right red Insert a video tape into the VCR and press PLAY on the VCR Refer to the VCR owner s manual Select A AV V input source using the I IN NP PU UT T button on the remo...

Page 20: ...IN 1 1 EXTERNAL EQUIPMENT SETUP OTHER A V SOURCE SETUP Connect the A AU UD DI IO O V VI ID DE EO O jacks between TV and external equipment Match the jack colours Video yellow Audio Left white and Audio Right red Select A AV V input source using the I IN NP PU UT T button on the remote control If connected to A AV V I IN N select A AV V input source Operate the corresponding external equipment Refe...

Page 21: ...Resolution 720x480 720x576 1280x720 Horizontal Vertical Frequency kHz Frequency Hz G G HDMI mode supports PCM audio format only G G If the Audio setting is set to Dolby DTS Bitstream in some DVDP STB make sure to change the setting to PCM G G If the resolution of external equipment is over 1280x720p there will be no picture on the TV NOTE ...

Page 22: ...e If you press the button once the input source OSD will appear on screen as shown Press the D D E E button and then OK button to select the desired input source MUTE PSM SSM I II Switches the sound on or off Recalls your preferred picture setting Recalls your preferred sound setting Selects the sound output G G p p 4 46 6 0 9 number button Selects a programme Selects numbered items in a menu LIST...

Page 23: ... Selects your desired picture format G G p p 3 33 3 Coloured buttons TELETEXT BUTTONS These buttons are used for teletext on T TE EL LE ET TE EX XT T models only or P Pr ro og gr ra am mm me e e ed di it t These buttons are used for teletext For further details see the Teletext section G G p p 5 52 2 Installing Batteries Open the battery compartment cover on the back side and install the batteries...

Page 24: ...standby mode to turn TV on press the button on the TV or press the P PO OW WE ER R buttons on the remote control and the TV will switch on 1 VOLUME ADJUSTMENT Press the D D E E or N NU UM MB BE ER R buttons to select a programme number 2 3 1 1 1 Installation Guide Note a It will automatically disappear after approx 40 seconds unless a button is pressed b If you close without completing the initial...

Page 25: ...o adjust the screen status conveniently since it provides graphical presentation b In this manual the OSD On Screen Display may be different from your TV s because it is just example to help the TV operation c In the teletext mode menus are not displayed Setup MENU Picture MENU Audio MENU Time MENU Option MENU 1 2 3 Clock Off Time On Time Sleep Timer Time Auto Tuning Manual Tuning Programme Edit F...

Page 26: ...ns are stored To stop auto tuning press the M ME EN NU U button When auto tuning is complete the Programme edit menu appears on the screen See the Programme edit section to edit the stored programme Press the M ME EN NU U button to move to the previous menu screen 1 2 3 4 5 6 7 8 9 Up to 200 TV stations can be stored by programme numbers 0 to 199 Once you have preset the stations you will be able ...

Page 27: ... C Ca ab bl le e Press the D D E E button to select C Ch ha an nn ne el l Press the G G button and then You can select the desired pro gramme number with the F F G G button or NUMBER but tons If possible select the programme number directly with the number buttons Press the D D E E button to select S Se ea ar rc ch h Press the F F G G button to commence searching If a sta tion is found the search ...

Page 28: ...he G G button and then F F G G button to fine tune for the best picture and sound Press the O OK K button to store it Press the M ME EN NU U button to move to the previous menu screen 1 2 3 4 5 6 Normally fine tuning is only necessary if reception is poor 3 4 5 1 Auto Tuning Manual Tuning Programme Edit Favourite Programme Setup 2 Setup Auto Tuning Manual Tuning Programme Edit Favourite Programme ...

Page 29: ...G button and then D D E E button You can use a blank the number 0 0 to 9 9 and the alphabet A A to Z Z Press the F F G G button to select the position and make your choice of the second character and so on Press the O OK K button to store it Press the M ME EN NU U button to move to the previous menu screen 1 2 3 4 5 6 7 3 4 5 6 1 Auto Tuning Manual Tuning Programme Edit Favourite Programme Setup 2...

Page 30: ...e desired programme number with the D D E E F F G G button 4 Press the Green button again to release this function A A S Sk ki ip pp pi in ng g a a p pr ro og gr ra am mm me e n nu um mb be er r 1 Select a programme number to be skipped with the D D E E F F G G button 2 Press the BLUE button The skipped programme turns to blue 3 Press the BLUE button again to release the skipped pro gramme When a ...

Page 31: ...with the F F G G button or NUM BER buttons To store another programme repeat steps 4 4 to 5 5 You can store up to 8 programmes Press the M ME EN NU U button to move to the previous menu screen This function lets you select your favourite programmes directly Repeatedly press the YELLOW button to select stored favourite programmes 1 2 3 4 5 6 7 1 2 3 4 5 Auto Tuning Manual Tuning Programme Edit Favo...

Page 32: ...li is st t Select a programme with the D D E E F F G G button Then press the O OK K button The TV switches to the chosen programme number A A P Pa ag gi in ng g t th hr ro ou ug gh h a a p pr ro og gr ra am mm me e l li is st t There are 20 programme table pages in which contain 200 pro grammes Pressing the D D E E F F G G button repeatedly turns the pages Press the L LI IS ST T button to return t...

Page 33: ...t This feature can be used to prevent unauthorized viewing This TV is programmed to remember which option it was last set to even if you turn the TV off Press the M ME EN NU U button and then D D E E button to select the O Op pt ti io on n menu Press the G G button and then D D E E button to select K Ke ey y L Lo oc ck k Press the G G button and then D D E E button to select O On n or O Of ff f Pr...

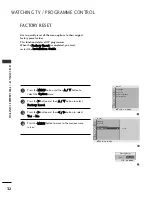
Page 34: ...nguage Key Lock Power Indicator Factory Reset Factory Reset G 1 To set FACTORY RESET Press the M ME EN NU U button and then D D E E button to select the O Op pt ti io on n menu Press the G G button and then D D E E button to select F Fa ac ct to or ry y R Re es se et t Press the G G button and then F F G G button to select Y Ye es s or N No o Press the M ME EN NU U button to move to the previous m...

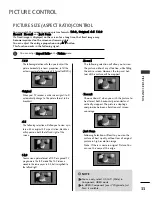
Page 35: ... both the left and right of the screen 1 14 4 9 9 You can view a picture format of 14 9 or a general TV programme in the 14 9 mode The 14 9 screen is viewed in the same way as in 4 3 but is magnified to the left and right Z Zo oo om m1 1 The following selection will allow you to view the picture without any alteration while filling the entire screen However the top and bot tom of the picture will ...

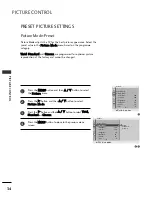
Page 36: ...to select the P Pi ic ct tu ur re e menu Press the G G button and then D D E E button to select P Pi ic ct tu ur re e M Mo od de e Press the G G button and then D D E E button to select V Vi iv vi id d S St ta an nd da ar rd d or C Ci in ne em ma a Press the M ME EN NU U button to move to the previous menu screen Picture Mode Preset 1 2 3 4 1 3 2 Picture Aspect Ratio Picture Mode Backlight 100 Con...

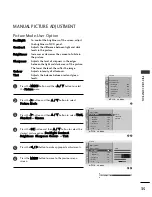
Page 37: ...htness of the screen adjust the brightness of LCD panel C Co on nt tr ra as st t Adjusts the difference between light and dark levels in the picture B Br ri ig gh ht tn ne es ss s Increases or decreases the amount of white in the picture S Sh ha ar rp pn ne es ss s Adjusts the level of crispness in the edges between the light and dark areas of the picture The lower the level the softer the image C...

Page 38: ...ove to the previous menu screen You can calibrate the screen for each Picture Mode or set the video value according to the special video screen You can set the video value differently for each input To reset to the factory default screen after making adjustments to each video mode execute the Picture Reset function for each Picture Mode 1 2 3 4 1 3 2 Picture Mode Backlight 100 Contrast 100 Brightn...

Page 39: ...reen noise without compromising video quality B Bl la ac ck k L Le ev ve el l L Lo ow w H Hi ig gh h Low The reflection of the screen gets darker High The reflection of the screen gets brighter Set black level of the screen to proper level This function enables to select Low or High in the following mode RF AV Component or HDMI F Fi il lm m M Mo od de e O On n O Of ff f Makes video clips recorded ...

Page 40: ...Tint 0 Advanced Picture Reset Picture DEF G OK MENU E E E E POWER INDICATOR It is function to control of IR LED turn on off Press the M ME EN NU U button and then D D E E button to select the O Op pt ti io on n menu Press the G G button and then D D E E button to select P Po ow we er r I In nd di ic ca at to or r Press the G G button and then D D E E button to select either S St ta an nd db by y L...

Page 41: ...n use D D E E button to select H H P Po os si it ti io on n or V V P Po os si it ti io on n When the H Position and V Position be changed Value may differ from the aspect ratio Press the F F G G button to make appropriate adjustments Press the M ME EN NU U button to move to the previous menu screen 1 2 3 4 5 6 Manual Configure Adjustment for screen Position 3 4 5 SCREEN SETUP 1 Aspect Ratio Pictur...

Page 42: ...cr re ee en n Press the G G button and then use D D E E button to select R Re es se et t Press the G G button Press the M ME EN NU U button to move to the previous menu screen 1 2 3 4 5 Initializing Reset to original factory settings 3 4 1 Aspect Ratio Picture Mode Backlight 100 Contrast 100 Brightness 50 Sharpness 70 Colour 70 Tint 0 Picture 2 Screen Manual Config Reset To Set Reset G DEF G OK ME...

Page 43: ...y at the factory and are not adjustable Press the M ME EN NU U button and then D D E E button to select the A Au ud di io o menu Press the G G button and then D D E E button to select S So ou un nd d M Mo od de e Press the G G button and then D D E E button to select S St ta an nd da ar rd d M Mu us si ic c or C Ci in ne em ma a Press the M ME EN NU U button to move to the previous menu screen 1 2...

Page 44: ... then D D E E button to select the A Au ud di io o menu Press the G G button and then D D E E button to select S So ou un nd d M Mo od de e Press the G G button and then D D E E button to select S St ta an nd da ar rd d M Mu us si ic c or C Ci in ne em ma a Press the O OK K button and then D D E E button to select T Tr re eb bl le e or B Ba as ss s Press the F F G G button to make appropriate adju...

Page 45: ... me e Press the G G button and then D D E E button to select O On n or O Of ff f Press the M ME EN NU U button to move to the previous menu screen Auto Volume automatically remains on the same level of volume if you change programmes 1 2 3 4 3 2 Audio Sound Mode Treble 50 Bass 50 Reset Auto Volume Balance 0 Auto Volume G Off On Sound Mode Treble 50 Bass 50 Reset Auto Volume Balance 0 Audio DEF G O...

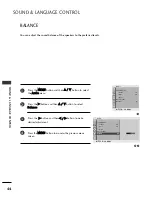
Page 46: ...G G button and then D D E E button to select B Ba al la an nc ce e Press the G G button and then F F G G button to make desired adjustment Press the M ME EN NU U button to move to the previous menu screen 1 2 3 4 1 3 2 Audio Sound Mode Treble 50 Bass 50 Reset Auto Volume Balance 0 Balance 0 G Sound Mode Treble 50 Bass 50 Reset Auto Volume Balance 0 Audio DEF G OK MENU DEF G OK MENU SOUND LANGUAGE ...
Page 47: ...ud di io o menu Press the G G button and then D D E E button to select R Re es se et t Press the G G button and then O OK K button Press the M ME EN NU U button to move to the previous menu screen 1 2 3 1 3 2 Audio Sound Mode Treble 50 Bass 50 Reset Auto Volume Balance 0 Reset G Sound Mode Treble 50 Bass 50 Reset Auto Volume Balance 0 Audio DEF G OK MENU DEF G OK MENU Standard To Set 4 ...

Page 48: ...I or DUAL I II D DU UA AL L I I Sends the primary broadcast language to the loudspeakers D DU UA AL L I II I Sends the secondary broadcast language to the loudspeakers D DU UA AL L I I I II I Sends a separate language to each loudspeaker B Br ro oa ad dc ca as st t Mono Stereo Dual O On n S Sc cr re ee en n D Di is sp pl la ay y M MO ON NO O S ST TE ER RE EO O D DU UA AL L I I D DU UA AL L I II I ...

Page 49: ...f the TV is equipped with a receiver for NICAM reception high quality NICAM Near Instantaneous Companding Audio Multiplex digital sound can be received Sound output can be selected according to the type of broadcast received Speaker Sound Output Selection In AV Component and HDMI mode you can select output sound for the left and right loud speakers Select the sound output L L R R Audio signal from...

Page 50: ...then use D D E E button to select the O Op pt ti io on n menu Press the G G button and then use D D E E button to select L La an ng gu ua ag ge e Press the G G button and then use D D E E F F G G button to select your desired language Press the O OK K button Press the M ME EN NU U button to move to the previous menu screen 1 2 3 4 5 SOUND LANGUAGE CONTROL ...

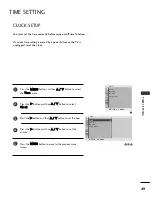
Page 51: ...ton to set the hour Press the G G button and then D D E E button to set the minute Press the M ME EN NU U button to move to the previous menu screen You must set the time correctly before using on off time function If current time setting is erased by a power failure or the TV is unplugged reset the clock 1 2 3 4 5 1 3 4 2 Time Clock Off Time On Time Sleep Timer Clock G Clock Off Time On Time Slee...

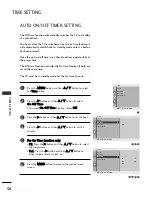
Page 52: ...hen D D E E button to adjust volume level at switch on Press the M ME EN NU U button to move to the previous menu screen The Off time function automatically switches the TV to standby at a preset time Two hours after the TV is switched on by the on time function it will automatically switch back to standby mode unless a button has been pressed Once the on time off time is set these functions opera...

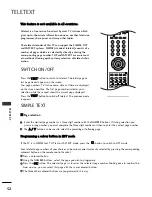
Page 53: ...EN NU U button and then D D E E button to select the T Ti im me e menu Press the G G button and then D D E E button to select S Sl le ee ep p T Ti im me er r Press the G G button and then D D E E button to set the minute O Of ff f 1 10 0 2 20 0 3 30 0 6 60 0 9 90 0 1 12 20 0 1 18 80 0 or 2 24 40 0 Press the M ME EN NU U button to move to the previous menu screen 1 2 3 4 Clock Off Time On Time Slee...

Page 54: ...ur teletext page numbers of your choice can be colour coded and easily selected by pressing the corresponding coloured button on the remote control handset Press a coloured button Using the NUMBER buttons select the page you wish to programme Press the O OK K button The selected page is stored as the selected page number blinking once to confirm this From now on you can select this page with the s...

Page 55: ... the previous selection Alternatively the E E button can be used A A Direct page selection As with SIMPLE teletext mode you can select a page by entering it as a three digit number using the NUMBER buttons in TOP mode 4 4 1 2 3 FASTEXT The teletext pages are colour coded along the bottom of the screen and are selected by pressing the correspond ing coloured button A A Page selection Press the butt...

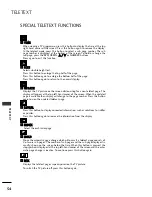
Page 56: ...eletext page The display will appear at the top left hand corner of the screen When the updated page is available then display will change to the page number Press this button again to view the updated teletext page A A R RE EV VE EA AL L Press this button to display concealed information such as solutions to riddles or puzzles Press this button again to remove the information from the display A A...

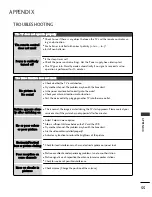
Page 57: ...cture has not appeared after five minutes Adjust Colour in menu option Allow a sufficient distance between the TV and the VCR Try another channel The problem may be with the broadcast Are the video cables installed properly Activate any function to restore the brightness of the picture Check for local interference such as an electrical appliance or power tool Station or cable channel experiencing ...

Page 58: ...s s T Th he e a au ud di io o f fu un nc ct ti io on n d do oe es s n no ot t w wo or rk k Press the V VO OL L F F or G G or button Sound muted Press M MU UT TE E button Try another channel The problem may be with the broadcast Are the audio cables installed properly Adjust Balance in menu option A change in ambient humidity or temperature may result in an unusual noise when the TV is switched on ...

Page 59: ...nd a little fabric softener or dish washing detergent Wring the cloth until it s almost dry and then use it to wipe the screen Ensure there is no excess water on the screen Allow any water or dampness to evaporate before switching on Cleaning the Cabinet To remove dirt or dust wipe the cabinet with a soft dry lint free cloth Do not to use a wet cloth Extended Absence G G If you expect to leave you...

Page 60: ...ight Power requirement with stand without stand with stand without stand 462 4 x 353 0 x 171 0 mm 18 2 x 13 9 x 6 8 inches 462 4 x 308 0 x 65 0 mm 18 2 x 12 2 x 2 6 inches 3 8 kg 8 4 lbs 3 6 kg 8 0 lbs AC100 240V 50 60Hz 19LD310 TA 19LD310 LA 533 4 x 397 0 x 171 0 mm 21 0 x 15 6 x 6 7 inches 533 4 x 351 7 x 65 0 mm 21 0 x 13 8 x 2 6 inches 4 8 kg 10 6 lbs 4 6 kg 10 1 lbs AC100 240V 50 60Hz 22LD310...

Page 61: ...C Button 03 VOL F R C Button 00 PR D D R C Button 01 PR E E R C Button 4D PSM R C Button 52 SSM R C Button 0A I II R C Button 0E SLEEP R C Button 22 MODE R C Button 24 MIX R C Button 26 TIME R C Button 2A REVEAL R C Button 62 UPDATE R C Button 64 SIZE R C Button 65 HOLD R C Button 70 INDEX R C Button 0F TV R C Button 09 MUTE R C Button 53 LIST R C Button 10 19 Number Key 0 9 R C Button 1A Q VIEW R...

Page 62: ...Record the model number and serial number of the TV Refer to the label on the back cover and quote this information to your dealer when requiring any service Model Serial No ...

Reviews: