background image

5

Insert the tray.

If necessary, set the paper size and paper type from the control
panel to match the paper loaded.

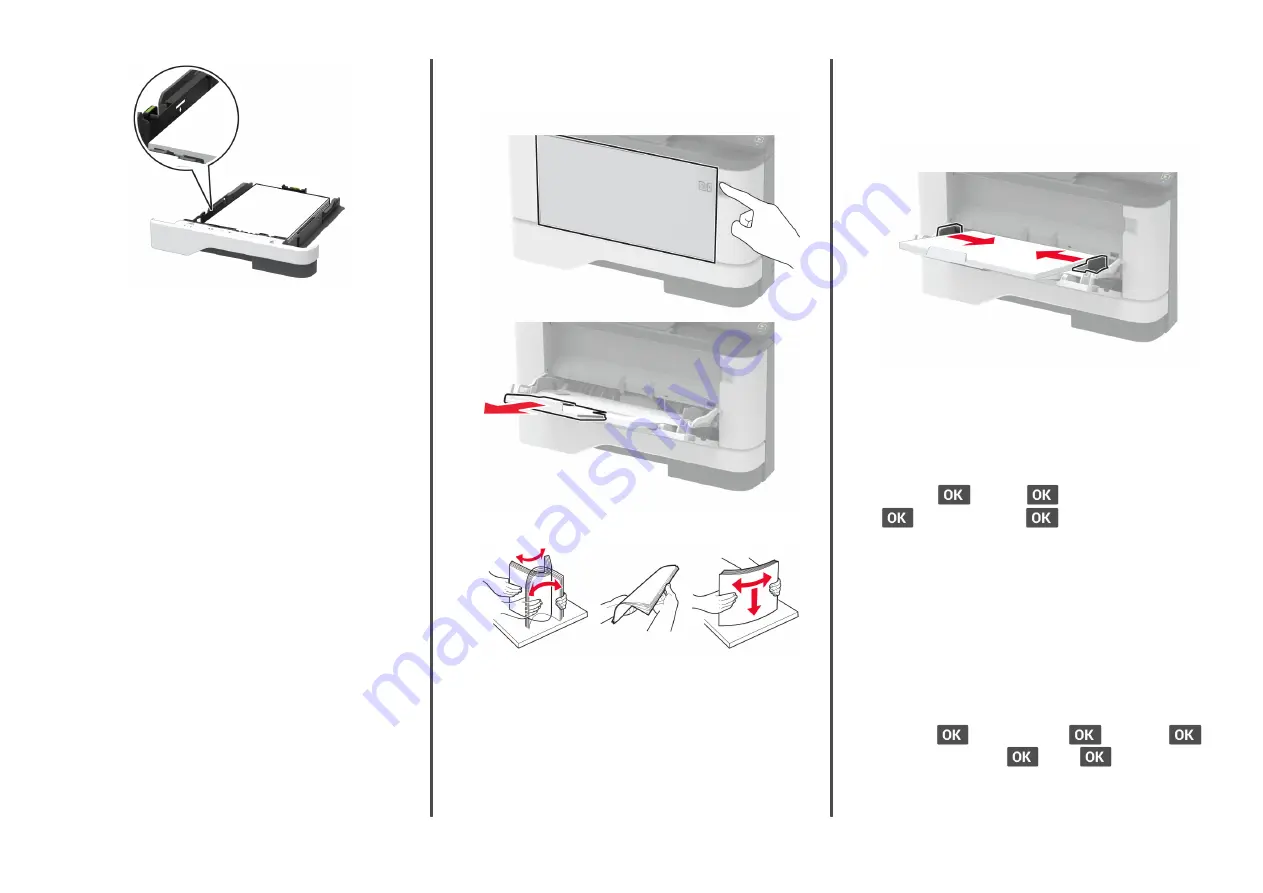
Loading the multipurpose feeder

1

Open the multipurpose feeder.

2

Flex, fan, and align the paper edges before loading.

3

Load paper with the printable side faceup.

Notes:

Load letterhead faceup with the header toward the rear
of the printer for one

sided printing.

Load letterhead facedown with the header toward the
front of the printer for two

sided printing.

Load envelopes with the flap facedown on the left side.

Warning—Potential Damage: 

Do not use envelopes with

stamps, clasps, snaps, windows, coated linings, or self

stick

adhesives.

4

Adjust the guide to match the size of the paper that you are
loading.

5

From the control panel, set the paper size and paper type to
match the paper loaded.

Setting the paper size and type

1

From the control panel, navigate to:

Settings

 > 

 > 

Paper

 > 

 > 

Tray Configuration

 >

 > 

Paper Size/Type

 > 

 > select a paper source

2

Set the paper size and type.

Connecting a mobile device to the
printer

Note: 

This feature is available only in some printer models.

Before connecting your mobile device, make sure to do the
following:

Enable Wi

Fi Direct in the printer. From the control panel,

navigate to:

Settings

 > 

 > 

Network/Ports

 > 

 > 

Wireless

 > 

Enable Wi

Fi Direct

 > 

 > 

On

 > 

View the Wi

Fi Direct SSID. From the control panel, navigate

to:


4

Summary of Contents for 29S0250

Page 1: ...This application is supported only in some Apple devices 1 From your mobile device select a document from your file manager or launch a compatible application 2 Tap Print 3 Select a printer and then adjust the settings if necessary 4 Print the document Printing from a mobile device using Wi Fi Direct Wi Fi Direct is a printing service that lets you print to any Wi Fi Direct ready printer Note Make ...

Page 2: ...lectrostatic discharge touch any exposed metal frame of the printer before accessing or touching interior areas of the printer 2 Remove the imaging unit 3 Twist the blue latch and then remove the used toner cartridge from the imaging unit Warning Potential Damage Do not expose the imaging unit to direct light for more than 10 minutes Extended exposure to light may cause print quality problems Warn...

Page 3: ...e of the paper that you are loading 3 Flex fan and align the paper edges before loading 4 Load the paper stack with the printable side facedown and then make sure that the guides fit snugly against the paper Notes Load letterhead facedown with the header toward the front of the tray for one sided printing Load letterhead faceup with the header toward the back of the tray for two sided printing Do n...

Page 4: ...velopes with stamps clasps snaps windows coated linings or self stick adhesives 4 Adjust the guide to match the size of the paper that you are loading 5 From the control panel set the paper size and paper type to match the paper loaded Setting the paper size and type 1 From the control panel navigate to Settings Paper Tray Configuration Paper Size Type select a paper source 2 Set the paper size and...

Page 5: ...aper Make sure that the stack height is below the maximum paper fill indicator Do not slide paper into the tray Load paper as shown in the illustration Make sure that the paper guides are positioned correctly and are not pressing tightly against the paper or envelopes Push the tray firmly into the printer after loading paper Use recommended paper Use only recommended paper or specialty media Do not ...

Page 6: ...the jammed paper Note Make sure that all paper fragments are removed 3 Close the multipurpose feeder 4 Open the front door Warning Potential Damage To prevent damage from electrostatic discharge touch any exposed metal frame of the printer before accessing or touching interior areas of the printer 5 Remove the imaging unit Warning Potential Damage Do not expose the imaging unit to direct light for...

Page 7: ...rface to cool before touching it Note Make sure that all paper fragments are removed 7 Insert the imaging unit 8 Close the door 9 Open the multipurpose feeder 10 Flex fan and align the paper edges before loading 11 Reload paper Paper jam in trays 1 Remove the tray 2 Open the front door Warning Potential Damage To prevent damage from electrostatic discharge touch any exposed metal frame of the prin...

Page 8: ...the risk of injury from a hot component allow the surface to cool before touching it Note Make sure that all paper fragments are removed 5 Insert the imaging unit 6 Close the front door and then insert the tray 7 Open the rear door CAUTION HOT SURFACE The inside of the printer might be hot To reduce the risk of injury from a hot component allow the surface to cool before touching it 8 Remove the j...

Page 9: ...e the imaging unit to direct light for more than 10 minutes Extended exposure to light may cause print quality problems Warning Potential Damage Do not touch the photoconductor drum Doing so may affect the quality of future print jobs 3 Remove the jammed paper CAUTION HOT SURFACE The inside of the printer might be hot To reduce the risk of injury from a hot component allow the surface to cool befo...

Page 10: ... areas of the printer 2 Remove the imaging unit Warning Potential Damage Do not expose the imaging unit to direct light for more than 10 minutes Extended exposure to light may cause print quality problems Warning Potential Damage Do not touch the photoconductor drum Doing so may affect the quality of future print jobs 3 Open the rear door CAUTION HOT SURFACE The inside of the printer might be hot ...

Page 11: ...6 Insert the imaging unit 7 Close the front door 11 ...

Reviews: