background image

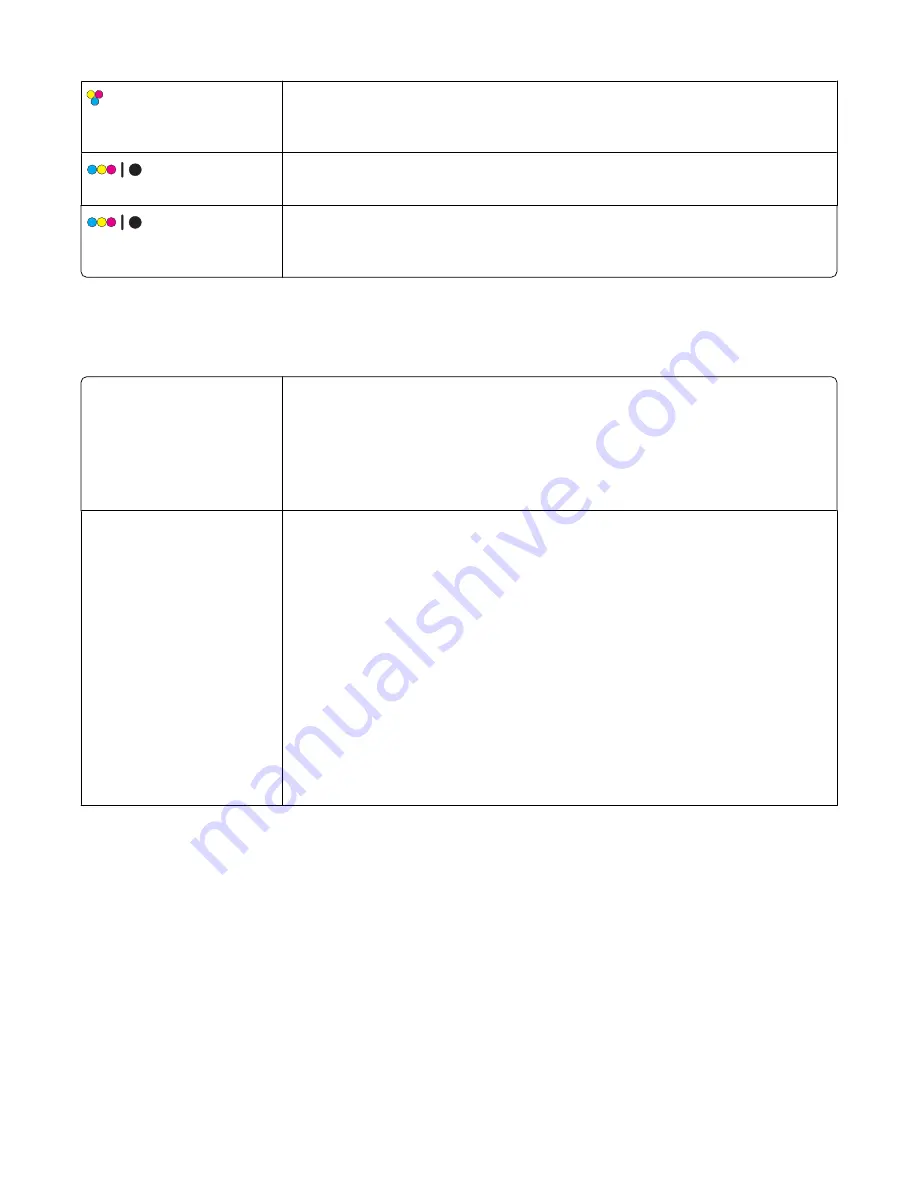
 light is on

The color print cartridge needs to be replaced immediately.

Replace the color print cartridge with a new one. For more information, see
“Changing print cartridges” on page 50.

 light is blinking

The black (or photo) print cartridge needs to be replaced soon.

To order supplies, see “Ordering paper and other supplies” on page 56.

 light is on

The black (or photo) print cartridge needs to be replaced immediately.

Replace the black (or photo) print cartridge with a new one. For more information,
see “Changing print cartridges” on page 50.

Error messages

These messages appear on your computer screen.

Cartridge Alert

One of the print cartridges needs to be replaced soon.

Replace the print cartridge with a new cartridge. For more information, see
“Removing a used print cartridge” on page 50 and “Installing print cartridges” on
page 50.

To order supplies, click 

Order Ink

 on your computer screen. You can also see

“Ordering paper and other supplies” on page 56.

Black cartridge

replacement required

A new black (or photo) print cartridge needs to be installed.

If available, click the 

Continue

 button on your computer screen to print using the

color print cartridge. (The Continue button is available only at the beginning of a
print job.)

Note: 

A variable amount of ink remains in the black (or photo) print cartridge.

Follow these steps to replace the black (or photo) print cartridge in your printer:

1

Cancel the print job if not already canceled.

2

Replace the black (or photo) print cartridge with a new cartridge. For more
information, see “Removing a used print cartridge” on page 50 and “Installing
print cartridges” on page 50.

3

Print again.

To order supplies, click 

Order Ink

 on your computer screen. You can also see

“Ordering paper and other supplies” on page 56 in this guide.

Troubleshooting

71

Summary of Contents for 2500 - X Color Inkjet

Page 1: ...with diamond design are trademarks of Lexmark International Inc registered in the United States and or other countries All other trademarks are the property of their respective owners 2007 Lexmark In...

Page 2: ...safety features of some parts may not always be obvious Lexmark is not responsible for the use of other replacement parts CAUTION SHOCK HAZARD Do not use the fax feature during a lightning storm Do no...

Page 3: ...s menu 18 Using the I Want To menu 18 Using the Options menu 18 Using the Print Properties tabs 19 Using the Toolbar 19 Resetting printer software settings to defaults 20 Loading paper and original do...

Page 4: ...34 Creating and viewing a slideshow 35 Printing an image as a multiple page poster 35 Copying 37 Copying using the control panel 37 Making a copy 37 Copying 4 x 6 photos 37 Copying using the computer...

Page 5: ...ity 52 Aligning the print cartridges 52 Cleaning the print cartridge nozzles 53 Wiping the print cartridge nozzles and contacts 54 Preserving the print cartridges 55 Cleaning the scanner glass 55 Orde...

Page 6: ...Fax troubleshooting 66 Cannot send or receive a fax 66 Can send but not receive faxes 67 Can receive but not send faxes 67 Printer receives a blank fax 67 Received fax has poor print quality 68 Jams...

Page 7: ...perating systems and some basic instructions for using the printer Note If your printer supports Macintosh operating systems see the Mac Help 1 From the Finder desktop double click the Lexmark 2500 Se...

Page 8: ...00 Series 2 Click User s Guide IfthelinktotheUser sGuideisnotonyourdesktop follow these instructions 1 Insert the CD The installation screen appears Note If necessary click Start Run and then type D s...

Page 9: ...5 From the Support Tools section click e Mail Support 6 Completetheform andthen click Submit Request E mail support varies by country or region and may not be available in some instances Visit our We...

Page 10: ...ated on the store receipt and the back of the printer and have it ready when you contact us so that we may serve you faster Machine Type number Serial number Date purchased Store where purchased Findi...

Page 11: ...different from the one shown 4 Installation software CD Installation software for the printer Help User s Guide in electronic format 5 Setup sheet Instructions on setting up printer hardware and softw...

Page 12: ...he printer For more information see Using the control panel buttons on page 14 3 Paper exit tray Hold paper as it exits 4 Top cover Access the scanner glass 5 Paper feed guard Prevent small objects fr...

Page 13: ...Scanner support Hold up the scanner unit 3 Print cartridge carrier Install replace or remove a print cartridge 4 Power supply with port Connect the printer to a power source 5 USB port Connect the pri...

Page 14: ...ck and white copy of a document or photo 7 Turn the printer on or off Cancel a print copy or scan job in progress Reset the printer Check To The light Determine if the color print cartridge needs to b...

Page 15: ...or the document you are printing The Toolbar Create printer friendly versions of an active Web page Using the Lexmark Imaging Studio To open the Lexmark Imaging Studio Welcome screen use one of these...

Page 16: ...iew your photos in motion Poster Print your photos as a multiple page poster From the bottom left corner of the Welcome screen Click To Setup and diagnose printer Check ink levels Order print cartridg...

Page 17: ...iew the status of the printer For example while printing the status of the printer is Busy Printing View ink levels and order new print cartridges How To Learn how to Print Use basic features Print pr...

Page 18: ...n open Print Properties from almost any program 1 With a document open click File Print 2 From the Print dialog click Properties Preferences Options or Setup Using the Save Settings menu From the Save...

Page 19: ...on of the document on the printed page portrait or landscape Print Layout Select the layout you want to print Choose to print on both sides of the paper and select a duplexing preference Note For more...

Page 20: ...inting appears next to Photos Preview Preview a Web page before printing Resetting printer software settings to defaults Windows 2000 Windows XP or Windows Vista users 1 Click Start Settings Printers...

Page 21: ...to rest against the edges of the paper Note To avoid paper jams make sure the paper does not buckle when you adjust the paper guides Loading various paper types Load up to Make sure 100 sheets of pla...

Page 22: ...adhesive on the labels does not extend to within 1 mm of the edge of the label Youusefulllabelsheets Partialsheets withareasexposedbymissing labels maycauselabelstopeeloffduringprinting resultinginapa...

Page 23: ...nt side of the cards faces you The cards are loaded in the center of the paper support The paper guides rest against the edges of the cards Note Photo cards require more drying time Remove each photo...

Page 24: ...is loaded in the center of the paper support The paper guides rest against the edges of the paper You have selected the correct paper size for the banner in Print Properties For more information see...

Page 25: ...nal document or item facedown on the scanner glass in the lower right corner Note Photos should be loaded as shown 3 Close the top cover to avoid dark edges on the scanned image Loading paper and orig...

Page 26: ...loading 5 Click OK 6 Click OK or Print Printing a document 1 Load paper 2 With a document open click File Print 3 Click Properties Preferences Options or Setup 4 Adjust the settings 5 Click OK 6 Clic...

Page 27: ...rom the Paper Type section select the paper type loaded in the printer 7 Click OK 8 Click OK or Print Printing photos or images from a Web page 1 Load paper For best results use photo or heavyweight m...

Page 28: ...the number of copies 7 Click Print Now Printing collated copies If you print multiple copies of a document you can choose to print each copy as a set collated or to print the copies as groups of page...

Page 29: ...any printer software dialogs that are open 8 Print the document Notes The instruction sheet for two sided printing will not print completely on paper smaller than A4 or letter size To return to single...

Page 30: ...e image 5 Click OK to close any printer software dialogs that are open 6 Print the iron on transfers Note Do not force iron on transfers into the printer Printing cards 1 Load greeting cards index car...

Page 31: ...File Print 3 Click Properties Preferences Options or Setup 4 From the Print Layout tab select N up 5 Select the number of pages to print on each page 6 If you want each page image to be surrounded by...

Page 32: ...res 4 Remove the CD to view your transferred photos in the Photo Library Transferring selected photos from a media device using the computer 1 Insert your CD or any photo storage device into the compu...

Page 33: ...paper on page 21 2 Insert your CD or any photo storage device into the computer 3 If you are using Windows XP or Windows Vista a What do you want Windows to do screen appears Click Transfer Photos to...

Page 34: ...y drop down list select a copy quality 6 From the Paper Size in Printer drop down list select the paper size 7 To select multiple prints of a photo or to select photo sizes other than 4 x 6 in 10 x 15...

Page 35: ...deshow to the Photos in Your Slideshow area If you want the photos to appear in a specific order click the photos in the order you want them to show Notes If you want to change the slideshow settings...

Page 36: ...drop down list select the poster size 11 If you want to rotate the poster so that it fits better on the printed pages click Rotate 90 degrees 12 Click Print Now in the bottom right corner of the scree...

Page 37: ...nd white copy Copying 4 x 6 photos 1 Load a 4 x 6 10 x 15 cm photo card with the glossy or printable side facing you If you are not sure which side is the printable side see the instructions that came...

Page 38: ...m the Copies drop down list select the number of copies 7 From the Quality drop down list select the copy quality 8 From the Paper Size in Printer drop down list select the paper size 9 Selectwhethery...

Page 39: ...oto appears in the right pane 6 From the Quality drop down list select the copy quality 7 From the Paper Size in Printer drop down list select the paper size 8 To select multiple prints of a photo or...

Page 40: ...trol panel 1 Load an original document facedown on the scanner glass 2 Press to begin scanning The Save Photo dialog appears on your computer screen 3 If you want to save the scan click Browse then se...

Page 41: ...n 5 Click Start The scanned document is loaded into your default word processing application You can edit your scanned document Scanning a photo to the Photo Library 1 From the desktop double click th...

Page 42: ...ick Scan 5 Select the Several Photos option 6 Click Start Scanning multiple photos using the computer You can scan photos from the scanner glass and add photos stored in the Photo Library 1 Load the p...

Page 43: ...n e Click Start 7 If you want to add a photo s stored on your computer a Click Add Another on the right side of the screen b Click Photo from Photo Library c Select the photo s you want to add d Click...

Page 44: ...me in the File Name area To assign the name as a prefix to all of your photos select the Start all photos with File Name check box 10 To save the photo as another file type select the file type from t...

Page 45: ...ou can select the area to be scanned by choosing a paper size from the drop down list Convert the image to text with OCR Select this to convert your image to text Always use these settings when scanni...

Page 46: ...om the left pane of the Welcome screen click Fax 4 Select the Document option 5 Click Start 6 Enter the recipient information and then click Next Note A fax number can include up to 64 numbers commas...

Page 47: ...he Lexmark Imaging Studio icon 2 From the left pane of the Welcome screen click Fax The Fax Solution Software appears 3 Click Tools Phonebook 4 To modify the Phone Book select an option enter the new...

Page 48: ...umber A fax number can include up to 64 numbers commas periods and or these symbols You can block faxes from up to 50 phone numbers 7 Click OK to save the setting Customizing fax settings Customizing...

Page 49: ...ose whether to delete old faxes automatically and set the time frame for keeping faxes before deleting them Choose a default phone book 5 Click OK after you finish customizing the settings 6 Close the...

Page 50: ...r lever to raise the cartridge carrier lid 4 Remove the used print cartridge Note If you are removing both cartridges repeat step 3 and step 4 for the second cartridge Installing print cartridges 1 If...

Page 51: ...dge or the photo cartridge in the left carrier Insert the color cartridge in the right carrier 4 Close the lids 5 Lift the scanner unit gently push the scanner support towards the cartridge carriers a...

Page 52: ...these steps 1 Align the print cartridges For more information see Aligning the print cartridges on page 52 If print quality has not improved continue to step 2 2 Clean the print cartridge nozzles For...

Page 53: ...quality print your document again If print quality has not improved clean the print cartridge nozzles Cleaning the print cartridge nozzles 1 Load plain paper 2 Open the Solution Center See Using the S...

Page 54: ...s for about three seconds and then wipe in the direction shown 5 With another clean section of the cloth repeat step 3 and step 4 6 Let the nozzles and contacts dry completely 7 Reinsert the print car...

Page 55: ...Make sure all ink or corrective fluid on a document is dry before placing the document on the scanner glass Ordering print cartridges Lexmark 2500 series models except 2580 Item Part number Average ca...

Page 56: ...4 4 x 6 in 10 x 15 cm L Note Availability may vary by country or region For information on how to purchase Lexmark Premium Photo Paper Lexmark Photo Paper or Lexmark PerfectFinish Photo Paper in your...

Page 57: ...r damage caused by non Lexmark ink or print cartridges Refilling a print cartridge Thewarrantydoesnotcoverrepairoffailuresordamagecausedbyarefilledcartridge Lexmarkdoesnotrecommend use of a refilled c...

Page 58: ...lit Check power connection 1 Disconnect the power cord from the wall outlet and then from the printer 2 Plug the cord all the way into the power supply on the printer 2 1 3 Plug the cord into an elec...

Page 59: ...icon In Windows XP click Start to access the My Computer icon 4 Double click the CD ROM drive icon 5 If necessary double click setup exe 6 Follow the instructions on the computer screen to install th...

Page 60: ...rom the wall outlet 3 Gently remove the power supply from the printer 4 Reconnect the power supply to the printer 5 Plug the power cord into the wall outlet 6 Press to turn the printer on Software may...

Page 61: ...ridge nozzles on page 53 If print quality has not improved continue to step 3 3 Remove and reinsert the print cartridges For more information see Removing a used print cartridge on page 50 and Install...

Page 62: ...edges of the page Check minimum print settings Unless you are using the borderless feature use these minimum print margin settings Left and right margins 6 35 mm 0 25 in for letter size paper 3 37 mm...

Page 63: ...to For best results remove each printed sheet individually from the paper exit tray and allow the prints to dry at least 24 hours before stacking displaying or storing Copy troubleshooting Copier does...

Page 64: ...try using a clearer version of the document or image Are you scanning from photo or glossy paper a magazine or a newspaper If you are copying or scanning from photo or glossy paper a magazine or a new...

Page 65: ...e installed correctly on page 60 Scan was not successful USB cable may not be connected 1 Check the USB cable for any obvious damage 2 Firmly plug the square end of the USB cable into the back of the...

Page 66: ...agazines or newspapers on page 44 Check quality of original document If the quality of the original document is not satisfactory try using a clearer version of the document or image Check document pla...

Page 67: ...iving afax Callyourtelephonecompanytoobtainthekeypadsequencefortemporarilydisabling Call Waiting Can send but not receive faxes Load paper Load paper to print any faxes that have been stored in the co...

Page 68: ...nter To automatically eject the paper 1 Press to turn off the printer 2 Press again to turn the printer back on The paper automatically ejects from the printer To manually remove the paper 1 Press to...

Page 69: ...ed correctly For more information see Loading various paper types on page 21 Try loading one page envelope or sheet of specialty media at a time Makesuretheprinteris set as the default printer and is...

Page 70: ...Press to continue printing or copying have a paper jam 1 Clear the paper jam For more information see Jams and misfeeds troubleshooting on page 68 2 Press blinks slowly The print cartridge carriers a...

Page 71: ...d Installing print cartridges on page 50 To order supplies click Order Ink on your computer screen You can also see Ordering paper and other supplies on page 56 Black cartridge replacement required A...

Page 72: ...n the black or photo and color print cartridges 1 Replace the print cartridges with new cartridges For more information see Removing a used print cartridge on page 50 and Installing print cartridges o...

Page 73: ...s do not imply that the manufacturer intends to make these available in all countries in which it operates Any reference to a product program or service is not intended to state or imply that only tha...

Page 74: ...erence when the equipment is operated in a residential installation This equipment generates uses and can radiate radio frequency energy and if not installed and used in accordance with the instructio...

Page 75: ...directives 89 336 EEC 73 23 EEC and 1999 5 EC on the approximation and harmonization of the laws of the Member States relating to electromagnetic compatibilityandsafetyofelectricalequipmentdesignedfor...

Page 76: ...ive 5 0 To be certain of the number of devices thatmaybeconnectedtoaline asdeterminedbythetotalRENs contactyourlocaltelephonecompany Forproducts approved after July 23 2001 the REN for this product is...

Page 77: ...ocumentation in order to program this information into your fax machine Notice to users of the Canadian telephone network This product meets the applicable Industry Canada technical specifications The...

Page 78: ...mergency Service This equipment may not provide for the effective hand over of a call to another device connected to the same line This equipment should not be used under any circumstances that may co...

Page 79: ...The product is generating hard copy output from hard copy original documents 15 Scanning The product is scanning hard copy documents 8 Ready The product is waiting for a print job 6 Power Saver The pr...

Page 80: ...ering a fixed amount of ink A variable amount of ink will remain in the cartridge when replacement is required After this single use the license to use the print cartridge terminates and the used cart...

Page 81: ...omputer 32 cleaning print cartridge nozzles 53 collating copies 28 Color cartridge replacement required 71 color ink light blinking 70 on 70 color ink light is blinking 70 color ink light is on 70 Con...

Page 82: ...15 E mail 15 Fax 15 Photo Greeting Cards 15 Photo Packages 15 Scan 15 Slideshow 15 Transfer Photos 15 using 15 View Print Photo Library 15 Lexmark Imaging Studio using 15 loading banner paper 24 custo...

Page 83: ...55 removing 50 wiping 54 print cartridges ordering 17 Print Layout tab changing document type 19 duplexing 19 Print Properties I Want To menu 18 opening 18 Options menu 18 Paper Setup tab 19 Print Lay...

Page 84: ...es 76 77 78 Toolbar printing a Web page 26 printing only the photos from a Web page 27 using 19 top cover 12 Transfer Photos button 15 transferring photos from CD using the computer 32 transparencies...

Reviews: