background image

14

INSTALLATION • INSTALLING TERMINATOR BLOCK

Installing the NE600 Terminator Block

Remember that the terminator block must be installed as the first and last nodes if the network’s total
wire length (including drop lengths) is greater than ten feet.

CAUTION: Do not terminate additional nodes because that may degrade network performance and

interrupt communications.

Installation Instructions

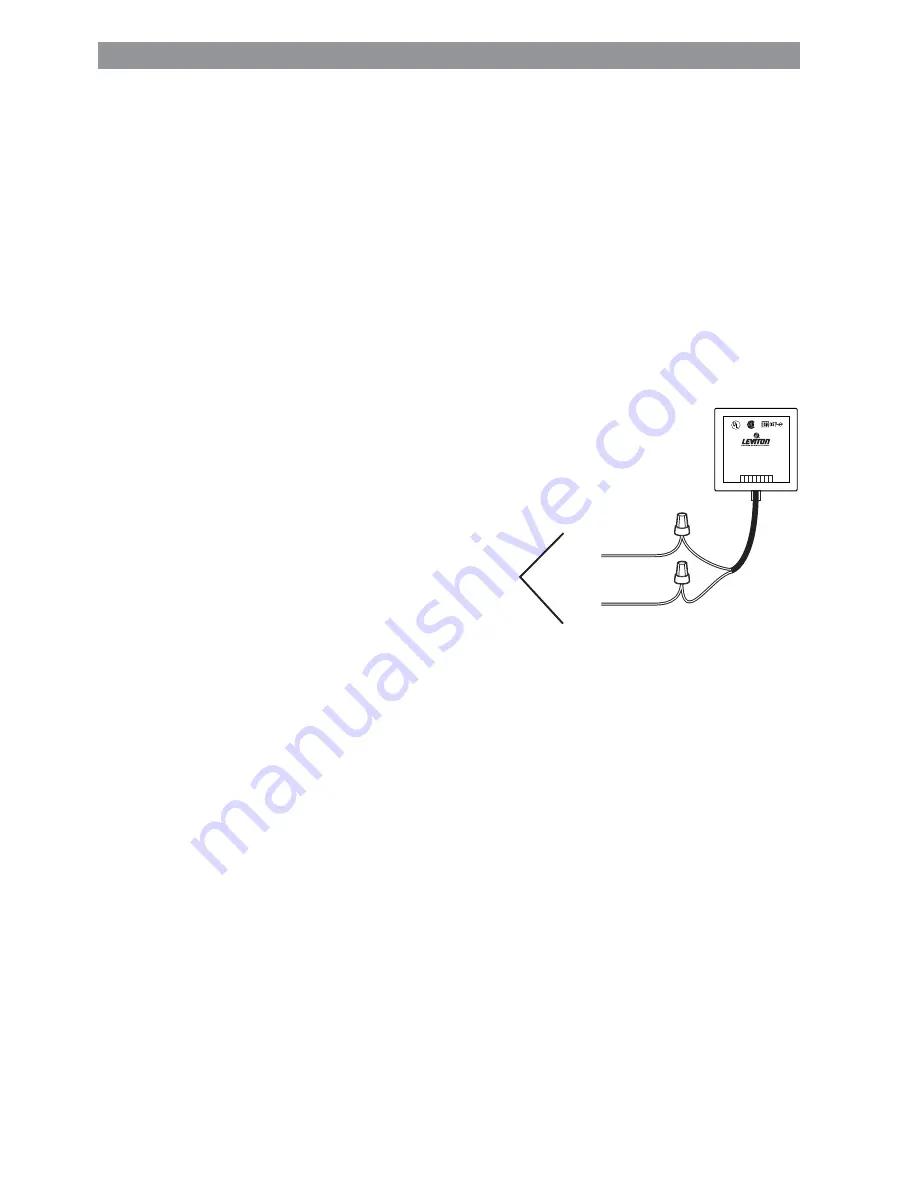
1a. USING IDC CONNECTORS: Connect per wiring diagram (Figure 2-10) as follows: Insert the wires

from the pluggable wiring harness into one side of the IDC connector, and the wires from the LCnet
into the other end of the connector. Using a set of pliers, crimp the connector. Connect the RJ45
connector into the Terminator Block.

1b. USING WIRE NUTS: Make sure to use appropriately

sized wire connectors and connect per wiring diagram
as follows: Remove 3/4in. insulation from each circuit
conductor. Connect wires from the pluggable wiring
harness and the LCnet by twisting on a wire connector.
Twist connector on clockwise making sure that no bare
wire shows below the wire connector. Secure each wire
connector with electrical tape. Connect the RJ45
connector into the Terminator Block.

2. Mount the Terminator Box into a wallbox or in the

ceiling using the double-sided tape provided.

3. Make sure the pluggable wiring harness is 

connected to the Terminator Block. TERMINATOR 
BLOCK INSTALLATION IS COMPLETE.

Installing the NE100 SmartJack

The SmartJack must be installed in any location from which you want to use Leviton software for system
setup and/or customization via a personal computer or laptop.

Installation Instructions

1. If you would like to change the color of the jack and need instructions, see Page 16; otherwise

proceed.

2. Connect per wiring diagram (Figure 2-9) as follows: Insert each lead into appropriate plug location by

pushing firmly. If using stranded wire, twist strands of each lead tightly (making sure that there are no
stray strands) and push firmly into appropriate plug location. Tighten the screws on the plug, making
sure that no bare conductor shows. Connect plug into connector on the back of the SmartJack.

®

®

LISTED 9D34

ENERGY MGMT EQUIP

CAT.  NO.   NE600

FOR USE WITH LEVITON
CONTROL NET PRODUCTS

CONCU POUR LES PRODUITS
CONTROL NET DE LEVITON

PARA USO CON PRODUCTOS
CONTROL NET DE LEVITON

N/C

N/C

N/C

N/C

N/C

N/C

CAN_H

CAN_H

IDC

Connector

IDC

Connector

CAN-L

(Blue/White)

CAN-H

 (Blue)

To

LCnet

NE600

Figure 2-10:
NE600 Wiring Diagram

Summary of Contents for Dimensions D3200

Page 1: ...Customizable Integrated Networkable Dimming and Scene Control System ...

Page 2: ...eripheral Limitations 9 INSTALLING COMPONENTS 10 Installing the Multizone Controller Dimmer 10 Installing the NE505 Scene Controller 13 Installing the NE600 Terminator Block 14 Installing the NE100 SmartJack 14 Installing the Setup Software 15 Power Extenders 15 Changing Insert Color for Scene Controller Jack 16 CHAPTER 3 PROGRAMMING MULTIZONE CONTROLLER NAVIGATION BASICS 18 ENTERING BASIC SETTING...

Page 3: ...Cable 6 2 1 Basic LCnet Wiring Diagram 7 2 2 Multiple Zone Controller System Diagram 8 2 3 Peripheral Input Current Chart 9 2 4 D3206 8 Multizone Controller Load Rating Verification Formula 9 2 5 Input Current Calculation 10 2 6 Multizone Controller Wiring Diagram 11 2 7 Physical Wiring Illustration Multizone Controller 12 2 8 Mounting Illustration Multizone Controller 13 2 9 NE505 NE100 Wiring Di...

Page 4: ...re comprehensive system might include a wall mounted scene controller a remote control two terminator blocks and setup software enabled through a Leviton jack The system which communicates over a Leviton Control Network LCnet bus is modular and can be expanded to meet new requirements The following components make up the Dimensions D3200 Architectural Lighting Control System The Multizone Controll...

Page 5: ...ing installation A series of intuitive Wizards menus walks you through basic system setup and can be used to customize the system with exact light levels fade rates etc The D3206 is compatible with incandescent tungsten magnetic low voltage transformer Advance Mark X electronic fluorescent dimming ballast neon and cold cathode fixtures Zone 4 Incandescent Wall Sconces Zone 3 Magnetic Low Voltage T...

Page 6: ...troller Figure 1 4 is a Decora style controller with four scene pushbuttons and an off button which is ideally suited for installation at secondary entranceways It provides a unique entry pad interface with a learning infrared receiver for use with a compatible Leviton remote control or a standard remote control The NE505 can be programmed so the user can select amongst four consecutive scenes in ...

Page 7: ...batteries Remote Control Specifications Input Voltage 6VDC Batteries Required 4AAA sold separately Size 6 79 x 2 0 x 84in 17 2 x 5 1 x 2 1cm TERMINATOR BLOCK The NE600 Terminator Block Figure 1 6 must be installed as the first and last nodes when the LCnet run combined with the length of all the wires running off the splices IS GREATER THAN 10 FEET This ensures consistent and reliable communicatio...

Page 8: ...nd more via a familiar interface The software is for use on an IBM compatible PC or laptop attached to a Leviton NE100 SmartJack NOTE Information on D3200 Setup Software including files for download can be found on www leviton com D3200 System Requirements for Leviton Software Operating System Windows 95 98 NT4 0 2000 See Website for latest OS compatibility Figure 1 7 D3200 Setup Software Panel Se...

Page 9: ...f the SmartJack indicate communication status SmartJack Specifications Connectivity RJ11 to DB9 cable Input Voltage 24VDC Input Current 40mA Power Consumption 1W Size 4 41 x 1 76 x 1 69in 11 2 x 4 5 x 4 3cm POWER EXTENDERS Leviton offers D3200 compatible power extenders that may be used when load requirements exceed the Multizone Controller s own capacity more than 1920W VA per controller 1000W VA...

Page 10: ... all you need to know to install the Dimensions D3200 Architectural Lighting Control System LCNET WIRING The D3200 System is based on a low voltage communication bus see Figure 2 1 called the Leviton Control Network LCnet which must be wired in accordance with a few basic principles Without the LCnet bus the Multizone Controller can control only those loads to which it is hardwired To control remo...

Page 11: ...e beginning before first node and one at the end after last node Step by step instructions for installing Termination Blocks appear on Page 14 WARNING Only the first and last nodes should be terminated Terminating additional nodes will degrade network performance and may interrupt communications and thus proper lighting functions Adding a New Node with a Tap 1 Splice the LCnet wire 2 Insert a thir...

Page 12: ...l messages as with SmartJacks there is a limit to what can be attached to a single D3206 D3208 This limit is based on the maximum input current of 150mA The chart below Figure 2 3 presents the input current of each component and the maximum number of any single peripheral component that may have its power wires connected to a single Multizone Controller when no other peripherals are attached This ...

Page 13: ...nents User Guide or Installation Instructions WARNING To avoid fire shock or death turn off power at circuit breaker or fuse and test that power is off before wiring WARNING Disconnect power when servicing fixture or changing lamps WARNING To be installed and or used in accordance with appropriate electrical codes and regulations WARNING If unsure about any part of these instructions consult a qua...

Page 14: ...of holding up to two 2 12 AWG wires Installation Instructions 1 Remove faceplate and insert conductors 2 Mount Controller in 4 gang box 107 16 in wide 21 2 in deep with 4 gang device cover 1011 16 in wide 1 2 in or 3 4 in deep 3 Line Voltage Wiring Remove 1 2in 95cm of insulation from each circuit conductor Connect lead wires per wiring diagram Figure 2 6 Insert straight wires into holes next to a...

Page 15: ...re that no bare conductor is showing Connect plug connector to jack on the back of the Multizone Controller NOTE LCnet must be wired using a twisted pair for the CAN_H and CAN_L wires Leviton recommends using CAT5 wire NOTE LCnet wires must also be dressed so they are separate from the high voltage Class I conductors Refer to local building codes for the appropriate installation requirements for t...

Page 16: ...otherwise proceed 2 Connect per wiring diagram Figure 2 9 as follows Insert each lead into appropriate plug connector location by pushing firmly If using stranded wire twist strands of each lead tightly making sure that there are no stray strands and push firmly into appropriate plug connector location Tighten the screws on the plug connector making sure that no bare conductor shows Connect plug c...

Page 17: ...Connect the RJ45 connector into the Terminator Block 2 Mount the Terminator Box into a wallbox or in the ceiling using the double sided tape provided 3 Make sure the pluggable wiring harness is connected to the Terminator Block TERMINATOR BLOCK INSTALLATION IS COMPLETE Installing the NE100 SmartJack The SmartJack must be installed in any location from which you want to use Leviton software for sys...

Page 18: ...ation Instructions Download the software from www leviton com D3200 and double click on the setup icon to begin installation Power Extenders Out of the box both Multizone Controllers can accommodate up to 1920W VA per unit 1000W VA per zone and 1200W VA per side Use a power extender with loads that would otherwise push you over capacity Install the power extender according to the instructions prov...

Page 19: ...frame has snaps on its sides Using a small screwdriver GENTLY remove the frame from the strap See Figure 2 12 3 Take the new frame and position it properly to the strap Line up the plastic snaps with the square holes in the strap Insert the snaps on one side of the frame into the strap 4 Firmly press sideways and down to slip the other snaps into place The frame snaps in with an audible click Ensu...

Page 20: ...may provide useful information If this is not the case you can find a blank form in Appendix A that you can copy and fill in yourself Job drawings Drawings of anticipated partition configurations If these have not been prepared you should sketch these out and use them as a basis to fill in the partition form Owner s representative who knows how the Owner wants the lighting system to operate NOTE C...

Page 21: ...navigate through the Wizards and perform all D3206 8 programming Only the first two sections Entering Basic Setting and Setting the Date Time must be done for every D3200 System Most programming is required to enable specific functions you may or may not need in your installation such as adjusting controllers to various partition configurations Whenever you want to skip a step you can press the Se...

Page 22: ...Select Next button to save entry and proceed Figure 3 2 Architectural vs Decora Device Style Operations 5 Press the Up or Down button to select the desired Beep Mode ON means that the unit will beep every time you depress a button and OFF means there will be no such sound Press the Select Next button to save entry and proceed 6 Press the Up or Down button to select the desired Security mode then p...

Page 23: ...If more than one Multizone Controller is installed on the LCnet all units will automatically synchronize when settings are stored on the Multizone Controller being programmed NOTE If you are NOT planning to start up the system within two weeks the length of time the unit will retain date and time settings skip these instructions for now but don t forget to set the date and time upon startup Instru...

Page 24: ... the SETUP WIZARD 3 Press the Up or Down button to select the PANELS screen and press Select Next 4 Press the Select Next button until you see a screen similar to Figure 3 3 Figure 3 3 ENTERING LOAD ZONE INFORMATION There are several types of information that you may or may not want or need to configure here If you have already defined all the panel numbers in the preceding section you can now pro...

Page 25: ...to the next screen You can define groups later 6 Press the Select Next button UNLESS YOU WANT TO MAP THE CHANNEL TO BE DIFFERENT THAN THE ZONE NUMBER as physically wired To change this mapping Press the Up or Down button to select the desired CHANNEL 1 to 6 or 8 or X Now press the Select Next button to save entry and proceed NOTE Two Channels cannot be mapped to the same Channel number so change t...

Page 26: ... by assigning a unique address reflecting the panel AND zone numbers to each Multizone Controller Programmed scenes are called for a particular group A CONFIGURATION IS a set of groups or group that is assigned a unique name or number so it may be controlled as a single unit A configuration includes all settings and parameters for zones groups and scenes This is especially useful in areas where te...

Page 27: ...med to select 4 scenes from Group 2 when the system is in Configuration 2 to enable the NE505 to control the desired lights In Configuration 3 the space is divided into four separate rooms to accommodate all partitions being closed In this case all D3208 s will operate independently of each other Each Multizone Controller will control solely the lights within the same room Technically speaking Con...

Page 28: ...expand the most basic grouping from only those loads hardwired to a single Multizone Controller to include a load hardwired to another Multizone Controller refer to Appendix C before you begin programming Instructions for Setting Up Configurations 1 Press the Wizards button and then the Up or Down button to select SETUP Press the Select Next button to access the SETUP WIZARD 2 Press the Up or Down...

Page 29: ...desired GROUP Number for the selected zone under the current configuration Press the Select Next button to save entry and proceed 15 Keep pressing Select Next until you see DONE 16 Then until you have assigned a group number to every zone press Select Next once more and return to Step 10 When you are done with all the zones in this configuration press WIZARDS and return to Step 1 of this section u...

Page 30: ...irst select the correct configuration You can do this from any Multizone Controller if you have already set up remote access otherwise you must set up these scenes from each individual Zone Controller 6 Press the Wizards button and then the Up or Down button to select the CONFIG WIZARD Press the Select Next button to access the CONFIG WIZARD 7 Press the Select Next button to access the Set Config ...

Page 31: ...e zone number you want to Exclude from the scene Press the Select Next button to save entry and proceed 5 Press the Select Next button again to exclude the zone 6 To exclude additional zones Press Select Next to Repeat Step 4 and 5 otherwise press the Wizards button to exit PROGRAMMING WALL CONTROLLERS TO WORK WITH A REMOTE Every D3200 System wall controller has a Learning Infrared Receiver This r...

Page 32: ...you want to work with a remote with the remote with which you want it to work NOTE To change an existing IR code you must first remove that code Use the IR Wizard off the main Wizards menu and the menus will lead you through this simple process PROGRAMMING THE NE505 TO SELECT SCENES If your installation incorporates NE505 Scene Controllers you must program each NE505 to a four scene set within a s...

Page 33: ...m Mode NOTE Pressing any button while the LED s are flashing in the Program Mode will exit the mode without storing programming 3 Call any scene within the desired range of scenes from the D3206 8 Scenes 1 to 4 5 to 8 9 to 12 etc Here s how it works If a scene between 1 and 4 is called on a Multizone Controller button 1 on the NE505 will be programmed for Scene 1 button 2 for Scene 2 button 3 for ...

Page 34: ... been solved BEFORE YOU START You must first restore power at the circuit breaker or fuse before you can test anything Power 1 Check for power to EACH Multizone Controller by verifying that the LCD on the front of each unit turns on If all are on THE CONTROLLER HAS PASSED THE TEST IF NOTHING ILLUMINATES there may be a problem with the power Check that the Controller is wired correctly IF THE LCD I...

Page 35: ...ller are within the limits rated by the device The D3206 and D3208 units are both rated for the following maximum capacity 1920W VA per unit 1000W VA per zone and 1200W VA per side Adding power extenders can increase this capacity Check that you have adequate voltage surge suppression for these lines Inadequate protection may cause shorts IF THE LIGHTS ARE FLICKERING the minimum level for that loa...

Page 36: ...programmed in the Scene Wizard See Page 27 steps 11 through 16 for instructions Infrared Receiver Check this only with Multizone Controllers to be used with a remote control No matter which remote you use an NE210 or any other standard infrared remote it must be programmed to every controller you want it to work with 1 Verify that the programmed buttons on the remote work as intended by pushing ea...

Page 37: ... time that your adjustment happens too slowly This can be checked and reprogrammed in the Scene Wizard See Page 27 Steps 11 through 16 for instructions Program the NE505 again In partitioning applications make sure the NE505 is programmed to one group for each configuration When programming the NE505 make sure the scene called from the D3206 8 is part of the desired group See Page 25 for instructi...

Page 38: ...ncorporate combine separate functionality 2 Press a scene button and make sure that the other Multizone Controller s go to that same scene The same scene button should light up on each unit If this works as expected the CONTROLLER HAS PASSED THE TEST If they are not behaving as a single unit Press the scene button again and check to see if the scene is locked If it reads LOCKED unlock it via the w...

Page 39: ... completed form use the blank form in Appendix A of this manual to record this test and to compare it against any documents or verbal instructions you may have been given regarding partitioning Make one copy for each configuration We suggest you run through every configuration and if you find a discrepancy after all configurations have been checked you should go to the instructions on Page 25 and ...

Page 40: ..._______ Group assigned to ___________________________ Controller Panel No _____________ Location of local zones ______________________ Controller Panel No _____________ Location of local zones ______________________ Controller Panel No _____________ Location of local zones ______________________ Controller Panel No _____________ Location of local zones ______________________ Controller Panel No __...

Page 41: ...rio in mind as you make your choices to define each configuration Note how the second illustration Figure B 2 shows the zones wired to the D3208 divided into two separate groups and how the NE505 Scene Controllers are programmed to those groups so they can select scenes that affect the lighting within their respective sides of the divided room ZONE 1 3 D3208 NE505 NE505 Z 1 Z 1 Z 2 Z 2 Z 5 Z 5 Z 5...

Page 42: ...d to it If you have more than six zones in one area and have spare unassigned zones on another Multizone Controller you can use those spare zones to accommodate the extra zones All you have to do is assign the same group number to a load hardwired to another D3208 Multizone Controller Note how in Figure C 1 one of the loads wired to the D3208 in Room B is assigned to Group A where the rest of the ...

Page 43: ...ne 1 800 323 8920 FAX 1 800 832 9538 Tech Line 8 30AM 6 00PM E S T Monday Friday 1 800 824 3005 Leviton Manufacturing of Canada Ltd 165 Hymus Boulevard Pointe Claire Quebec H9R 1E9 Telephone 1 800 469 7890 FAX 1 800 563 1853 Leviton S A de C V General Arista 54 A Col Argentina Mexico D F C P 11270 Telephone 011 525 386 1131 011 525 386 2052 FAX 011 525 386 1797 Visit Leviton s Website at www levit...

Reviews: