LevelOne FCS-1040 User Manual Download Page 29


User's Manual - 29  

Main Page

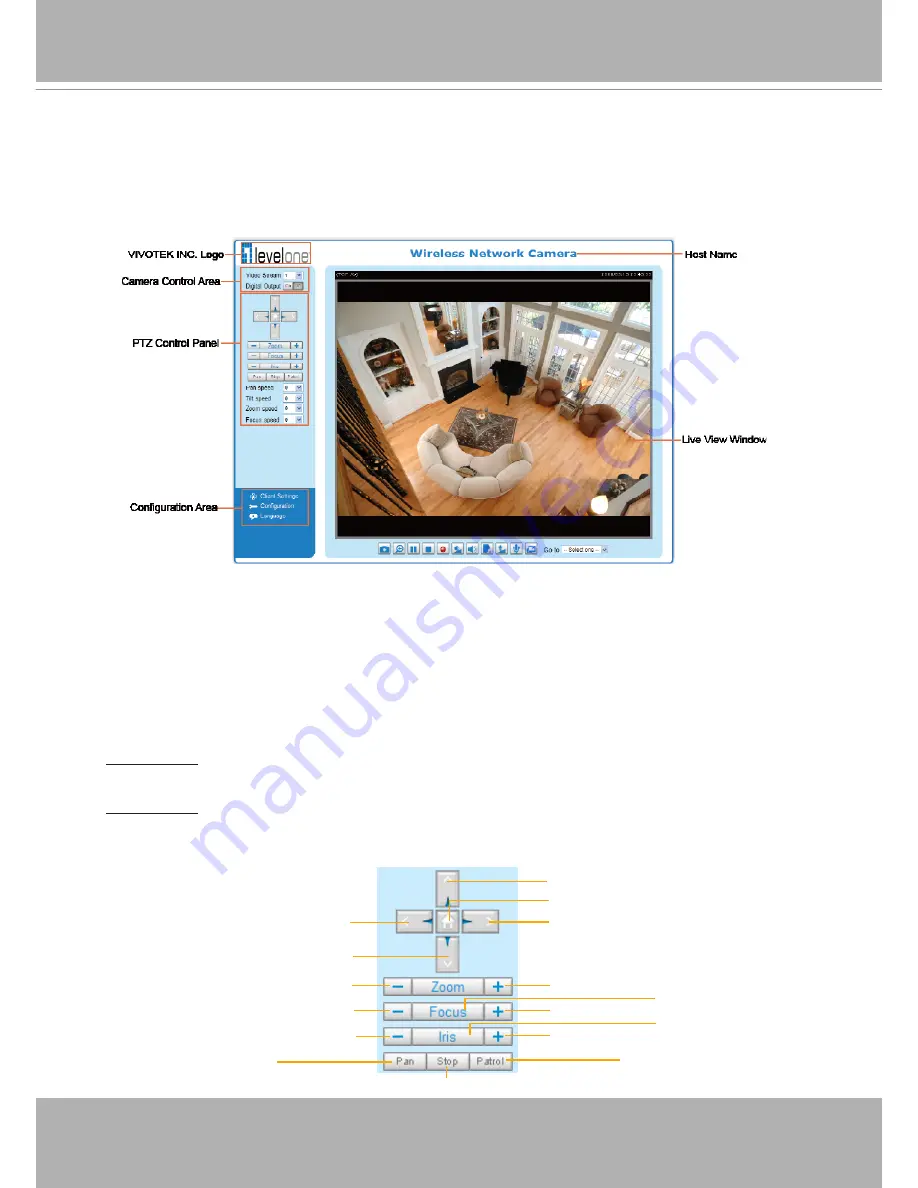
This chapter explains the layout of the main page. It is composed of the following sections: 

LevelOne INC. Logo, Host Name, Camera Control Area, PTZ Control Panel, Configuration Area, 

and Live video window.

LevelOne INC. Logo

Click this logo to visit the LevelOne website.

Host Name

The host name can be customized to fit your needs. For more information, 

please refer to System on page 24.

Camera Control Area

Video Stream: This Network Camera supports MJPEG or MPEG-4 dual streams simultaneously. You can 

select either one for live viewing.

Digital Output: Click to turn the digital output device on or off.

PTZ Control Panel

Return to Home Position

Right

Left

Down

Up

Zoom In

Zoom Out

Focus Far
Open

Focus Near

Close

Auto Focus
Auto Iris

Start to Auto Patrol

Start to Auto Pan

Stop Auto Panning/patrolling

Summary of Contents for FCS-1040

Page 1: ...FCS 1040 WCS 2040 IP Camera User s Manual V3 0...

Page 2: ...ing RTSP Players 26 Using 3GPP compatible Mobile Devices 27 Using LevelOne Recording Software 28 Main Page 29 Client Settings 33 Configuration 35 System 36 Security 38 HTTPS Hypertext Transfer Protoco...

Page 3: ...may be prohibited by law in your country The Network Camera is not only a high performance web ready camera but can also be part of a flexible surveillance system It is the user s responsibility to en...

Page 4: ...2 Digital output 3 Digital input 4 Ground Built in Microphone Status LED Lens Recessed Reset Button Ethernet 10 100 RJ45 Socket External Internal Microphone Switch General I O Terminal Block AV Out Mi...

Page 5: ...escription Blinking red Power is being supplied to the Network Camera Solid green The Network Camera is booting up Steady green with blinking red The Network Camera is trying to obtain an IP address S...

Page 6: ...If the system problems remain after rebooting restore the factory settings and install again Reset Press and release the recessed reset button with a paper clip or thin object Wait for the Network Ca...

Page 7: ...mer the plastic anchors into the holes 3 Fasten ceiling mount bracket B to the ceiling with three screws 4 Slide the Network Camera into ceiling mount bracket B 5 Secure the ceiling mount bracket A an...

Page 8: ...are several ways to set up the Network Camera over the Internet The first way is to set up the Network Camera behind a router The second way is to utilize a static IP The third way is to use PPPoE Int...

Page 9: ...r please refer to your router s user s manual 3 Find out the public IP address of your router provided by your ISP Internet Service Provider Use the public IP and the secondary HTTP port to access the...

Page 10: ...hen using a PoE enabled switch The Network Camera is PoE compliant which allows it to be powered via a single Ethernet cable If your switch router supports PoE refer to the following illustration to c...

Page 11: ...1 Non PoE Switch PoE Power Injector optional When using a non PoE switch If your switch router does not support PoE use a PoE power injector optional to connect between the Network Camera and a non Po...

Page 12: ...If the installation does not start click on Start on the lower left corner of your screen open My Computer and double click on the CD ROM icon The Installation Wizard Installation Window will appear S...

Page 13: ...Refresh Devices button and an arrow button on the left panel of your user interface When you click on the arrow button you will see more advanced functional buttons Firmware Upgrade Restore Default a...

Page 14: ...more detail please refer to 0 Upgrade Click on this button to reset the selected devices to default settings Click on this button to get information about the Installation Wizard Manual Setup When yo...

Page 15: ...User s Manual 15 Authentication error System Setting After connected to the selected device the Installation Wizard will switch to system setting page as below System setting page...

Page 16: ...strator s password type the new password in both Password and Confirm Password text boxes identically What is typed will be displayed as asterisks for security purposes The maximum password depends on...

Page 17: ...s or click on No to invoke the LAN setting Choosing the network type PPPoE Setting Network setting for PPPoE If you click on Yes in the Network Type dialog window you will be led to the PPPoE setting...

Page 18: ...ork configuration is provided by the DHCP server 2 Fixed IP If you want the device to use a fixed IP please uncheck the Get IP by DHCP Serv er automatically checkbox and assign a valid IP address subn...

Page 19: ...and modify the setting again Apply page When you click on the Apply it will start to update your settings to server Upgrade When you select one device or multiple devices of the same model the Firmwar...

Page 20: ...formation After connected to the selected device s it would display as below If you select more than one device then the device information will show all the selected devices You can switch to the ser...

Page 21: ...Select firmware button to browse the file that you want upgrade onto the se lected device s After selected the file Installation Wizard will check whether the file you select ed is correct If it s th...

Page 22: ...22 User s Manual Firmware Information Warning message for unmatched firmware...

Page 23: ...ocess Usually it will take about 5 to 10 minutes to finish the firmware upgrading It depends on your server model and network bandwidth We recommend you do the upgrade process in wired LAN environment...

Page 24: ...ch your web browser eg Microsoft Internet Explorer Mozilla Firefox or Netscape 2 Enter the IP address of the Network Camera in the address field Press Enter 3 The live video will be displayed in your...

Page 25: ...on please refer to Security on page 26 If you see a dialog box indicating that your security settings prohibit running ActiveX Controls please enable the ActiveX Controls for your browser 1 Choose Too...

Page 26: ...eaming through port number 554 please set the RTSP port to 554 For more information please refer to RTSP Streaming on page 41 For example 4 The live video will be displayed in your player For more inf...

Page 27: ...streaming is set to disable For more information please refer to RTSP Streaming on page 41 2 As the the bandwidth on 3G networks is limited larger video sizes are not available Please set the video a...

Page 28: ...ous monitoring and video recording for multiple Network Cameras Please install the recording software then launch the program to add the Network Camera to the Channel list For detailed information abo...

Page 29: ...name can be customized to fit your needs For more information please refer to System on page 24 Camera Control Area Video Stream This Network Camera supports MJPEG or MPEG 4 dual streams simultaneousl...

Page 30: ...ation please refer to Camera Control on page 59 Pan Tilt Zoom Focus speed Adjust the speed of pan tilt zoom focus Configuration Area Client Settings Click this button to access the client settings pag...

Page 31: ...use the transmission of the streaming media The button becomes the Resume button after clicking the Pause button Stop Stop the transmission of the streaming media Click the Resume button to continue t...

Page 32: ...captured images will be displayed in a pop up window Right click the image and choose Save Picture As to save it in JPEG jpg or BMP bmp format Digital Zoom Click and uncheck Disable digital zoom to en...

Page 33: ...unicast client connecting to the server takes up additional bandwidth and the Network Camera allows up to ten simultaneous accesses UDP multicast This protocol allows multicast enabled routers to forw...

Page 34: ...Here you can specify the storage destination and file name Folder Specify the storage destination for the recorded video files File name prefix Enter the text that will be appended to the front of the...

Page 35: ...ut Application Recording System log View parameters are not displayed in Basic Mode If you want to set up advanced functions please click Advanced Mode on the bottom of the configuration list to quick...

Page 36: ...witch over System This section explains how to configure the basic settings for the Network Camera including System System Time and DI DO When completed with the settings on this page click Save at th...

Page 37: ...clocks by periodically querying an NTP Server NTP server Assign the IP address or domain name of the time server Leaving the text box blank connects the Network Camera to the default time servers Upda...

Page 38: ...have the ability to control the Network Camera through the main page Please refer to Main Page on page 17 Allow anonymous viewing If you check this item any client can access the live stream without e...

Page 39: ...tion HTTP HTTPS or HTTPS only Note that you have to create and install a certificate first in the second column before clicking the Save button Create and Install Certificate Method Before using HTTPS...

Page 40: ...umn as shown below You can click Property to view detailed information about the certificate 5 Click Home to return to the main page Change the address from http to https in the address bar and press...

Page 41: ...ation will automatically be displayed in the third column as shown below You can click Property to see detailed information about the certificate Create certificate and install Select this option if y...

Page 42: ...User s Manual 3 If you see the following Information bar click OK and click on the Information bar on the top of the page to allow pop ups 4 The pop up window shows an example of a certificate reques...

Page 43: ...NOTE How do I cancel the HTTPS settings 1 Uncheck Enable HTTPS secure connection in the first column and click Save a warning dialog will pop up 2 Click OK to disable HTTPS 3 The webpage will redirec...

Page 44: ...ption to manually assign a static IP address to the Network Camera 1 You can make use of LevelOne Installation Wizard 2 on the software CD to easily set up the Network Camera on LAN Please refer to So...

Page 45: ...Application Server Settings please refer to Server Settings on page 71 to add a new email or FTP server 3 Go to Configuration Application Media Settings please refer to Media Settings on page 74 Selec...

Page 46: ...e computer as a system administrator to install the UPnPTM components 1 Go to Start click Control Panel then click Add or Remove Programs 2 In the Add or Remove Programs dialog box click Add Remove Wi...

Page 47: ...twork Camera shortcuts under My Network Places Enabling UPnP port forwarding allows the Network Camera to open a secondary HTTP port on the router not HTTP port meaning that you have to add the second...

Page 48: ...ove When IPv6 is enabled by default the network camera will listen to router advertisements and be assigned with a link local IPv6 address accordingly IPv6 Information Click this button to obtain the...

Page 49: ...default value is 8080 you can also link to the webpage in the following address format Please refer to HTTP on page 38 for detailed information If you choose PPPoE as the Network Type the PPP0 address...

Page 50: ...port is set to 80 and the secondary HTTP port is set to 8080 They can also be assigned to another port number between 1025 and 65535 If the ports are incorrectly assigned the following warning message...

Page 51: ...ess http port access name for stream1 or stream2 will fail to access the Network Camera HTTPS By default the HTTPS port is set to 443 It can also be assigned to another port number between 1025 and 65...

Page 52: ...refer to Client Settings on page 21 and Audio and Video Settings on page 51 Click to enable audio transmission to the Network Camera click to adjust the volume of microphone click to turn off the audi...

Page 53: ...ess The availability of the RTSP streaming for the three authentication modes is listed in the following table Access name for stream 1 Access name for stream 2 This Network camera supports dual strea...

Page 54: ...message will be displayed Multicast settings for stream 1 Multicast settings for stream 2 Click the items to display the detailed configuration information Select the Always multicast option to enable...

Page 55: ...tting Ad Hoc Connect the Network Camera directly to a host equipped with a wireless adapter in a peer to peer environment Channel While in infrastructure mode the channel is selected automatically to...

Page 56: ...he default setting is 64 bits Key format Hexadecimal or ASCII The fault setting is HEX HEX digits consist of the numbers 0 9 and the letters A F ASCII is a code for representing English letters as num...

Page 57: ...d in symmetric key cryptography From Wikipedia Pre shared Key Enter a key in ASCII format The length of the key can be between 8 to 63 characters 4 WPA2 PSK Use WPA2 pre shared key This advanced proto...

Page 58: ...the Internet Additionally we offer other DDNS providers such as Dyndns org Dynamic Dyndns org Custom TZO com DHS org CustomSafe100 dyn interfree it Note that before utilizing this function please app...

Page 59: ...has been successfully created you will see a success message in the DDNS Registration Result column 3 Click Copy and all for the registered information will be uploaded to the corresponding fields in...

Page 60: ...If the administrator has set a password for the webpage the clients have to enter a user name and password to access the live video The user name will be displayed in the User ID column If the adminis...

Page 61: ...cted temporarily and will automatically try to re link again IE Explore or Quick Time Player Enable access list filtering Check this item and click Save if you want to enable the access list filtering...

Page 62: ...n make a selection and click Delete NOTE For example when the range of IP addresses in the allowed list is set from 1 1 1 0 to 192 255 255 255 and the range in the denied list is set from 1 1 1 0 to 1...

Page 63: ...ith local utility settings to eliminate image flickering associated with fluorescent lights Note that after the power line frequency is changed you must disconnect and reconnect the power cord of the...

Page 64: ...n the cache memory of each Network Camera This function can work seamlessly with LevelOne s IP CamSecure recording software When an event occurs the recording software can request time shift cache str...

Page 65: ...S option will be 1 50 1 60 There are several options for AES 1 50 1 60 1 100 1 120 1 250 1 500 1 1000 1 200 and 1 4000 Faster electronic shutter would enable the Network Camera to capture fast moving...

Page 66: ...click Clear All to do vice versa When completed with the settings on this page click Save to take effect and click Close to exit the page Back to the CCD Settings page you can click Preview to fine tu...

Page 67: ...elected the bandwidth utilization is fixed at a selected level resulting in mutable video quality performance The bit rates are selectable at the following rates 20Kbps 30Kbps 40Kbps 50Kbps 64Kbps 128...

Page 68: ...ollowing message is displayed Internal microphone input gain Select the gain of the internal audio input according to ambient conditions Adjust the gain from 21 db most sensitive 33 db least sensitive...

Page 69: ...moving objects and the space ratio of all alerted pixels by moving the Sensitivity and Percentage slider bar 4 Click Save to enable the settings 5 Select Enable motion detection to enable this functi...

Page 70: ...the sensitivity to moving objects Higher sensitivity settings are expected to detect slight movements while smaller sensitivity settings will neglect them When the sensitivity is set to 70 the Networ...

Page 71: ...to a desired position using the buttons on the right side of the window 2 Click Set as home or Default home to define your home position 3 Enter a name for the preset position which allows for up to...

Page 72: ...locations list 3 Set the Dwelling time for the preset location during auto patrol The default value is 10 seconds You can also manually set a value and click Update 4 Repeat step 1 and 3 to select add...

Page 73: ...above Please remember to click Save to enable the settings Return to Home Position while Idle If you select this option the Network Camera will automatically return to the home position after idling f...

Page 74: ...tomatically show up in this Preview field The following shows the homepage using the default settings Hide Powered by LevelOne If you check this item it will be removed from the homepage Logo Here you...

Page 75: ...Here you can change the color of your homepage layout There are three types of preset patterns for you to choose from The new layout will simultaneously appear in the Preview filed Click Save to enabl...

Page 76: ...you want to change the color on the right column 3 The palette window will pop up as shown below 4 Drag the slider bar and click on the left square to select a desired color 5 The selected color will...

Page 77: ...he settings Please note that there is a limited number of customized scripts you can upload if the current amount of customized scripts has reached the limit an alert message will pop up If you need m...

Page 78: ...of 3 event settings can be configured Event name Enter a name for the event setting Enable this event Select this option to enable the event setting Priority Select the relative importance of this ev...

Page 79: ...Motion Detection Window first For more information please refer to Motion Detection on page 57 for details Periodically This option allows the Network Camera to trigger periodically for every other d...

Page 80: ...he Network Camera will move to the preset location when a trigger is activated Please setup the preset locations first Please refer to Preset Locations on page 59 for detailed information To set an ev...

Page 81: ...of Event Settings page When completed click Save to enable the settings and click Close to exit Event Settings page The new event settings server settings media settings will appear in the event drop...

Page 82: ...N to turn it to OFF status or click Delete to remove the event setting To remove a server setting from the list select a server name from the drop down list and click Delete Note that only when the se...

Page 83: ...ated Sender email address Enter the email address of the sender Recipient email address Enter the email address of the recipient Server address Enter the domain name or IP address of the email server...

Page 84: ...er where the media file will be placed If the folder name does not exist the Network Camera will create one on the FTP server Passive mode Most firewalls do not accept new connections initiated from e...

Page 85: ...n in a pop up window as below If successful you will receive a test txt file on the HTTP server Click Save to enable the settings then click Close to exit the page Network storage Select to send the m...

Page 86: ...ream 1 or stream 2 Send pre event images The Network Camera has a buffer area it temporarily holds data up to a certain limit Enter a number to decide how many images to capture before a trigger is ac...

Page 87: ...ding duration in seconds Up to 10 seconds can be set For example if pre event recording is set to five seconds and the maximum duration is set to ten seconds the Network Camera continues to record for...

Page 88: ...this page The new media settings will appear on the Event Settings page You can continue to select a server and media type for the event Create folders by date time and hour automatically If you chec...

Page 89: ...delete all recorded data Click to go back to the previous level of the directory The format is HH 24r Click to open the file list for that hour The format is File name prefix Minute mm You can set up...

Page 90: ...s NOTE Before setting up this page please set up the Network Storage on the Server Settings page first Network Storage Setting Click Server to open the Server Settings page and follow the steps below...

Page 91: ...ttings Click Add to open the recording setting page On this page you can define the recording source recording schedule and recording capacity A total of 2 recording settings can be configured Recordi...

Page 92: ...ed for cyclic recording to prevent malfunction This value must be larger than 15 MBytes If you want to enable recording notification please click Application to set up Please refer to Trigger Recordin...

Page 93: ...messages from the Network Camera An example is Kiwi Syslog Daemon Visit http www kiwisyslog com kiwi syslog daemon overview Follow the steps below to set up the remote log 1 In the IP address text bo...

Page 94: ...s Manual View Parameters Advanced Mode The View Parameters page lists the entire system s parameters in alphabetical order If you need technical assistance please provide the information listed on th...

Page 95: ...he Network Camera to factory default settings Network Type Select this option to retain the Network Type settings Please refer to Network Type on page 32 Daylight Saving Time Select this option to ret...

Page 96: ...rt files column click Export to export the daylight saving time configuration file from the Network Camera 2 A file download dialog will pop up as shown below Click Open to review the XML file or clic...

Page 97: ...se to upload a setting backup file Please note that the model and firmware version of the device should be the same as the setting backup file If you have set up a fixed IP or other special settings f...

Page 98: ...98 User s Manual The following message is displayed when the upgrade has succeeded The following message is displayed when you have selected an incorrect firmware file...

Reviews: