background image

DSA-1000 Network Device Server For PRT-1000 Thermal Printer 

Quick Installation Guide 


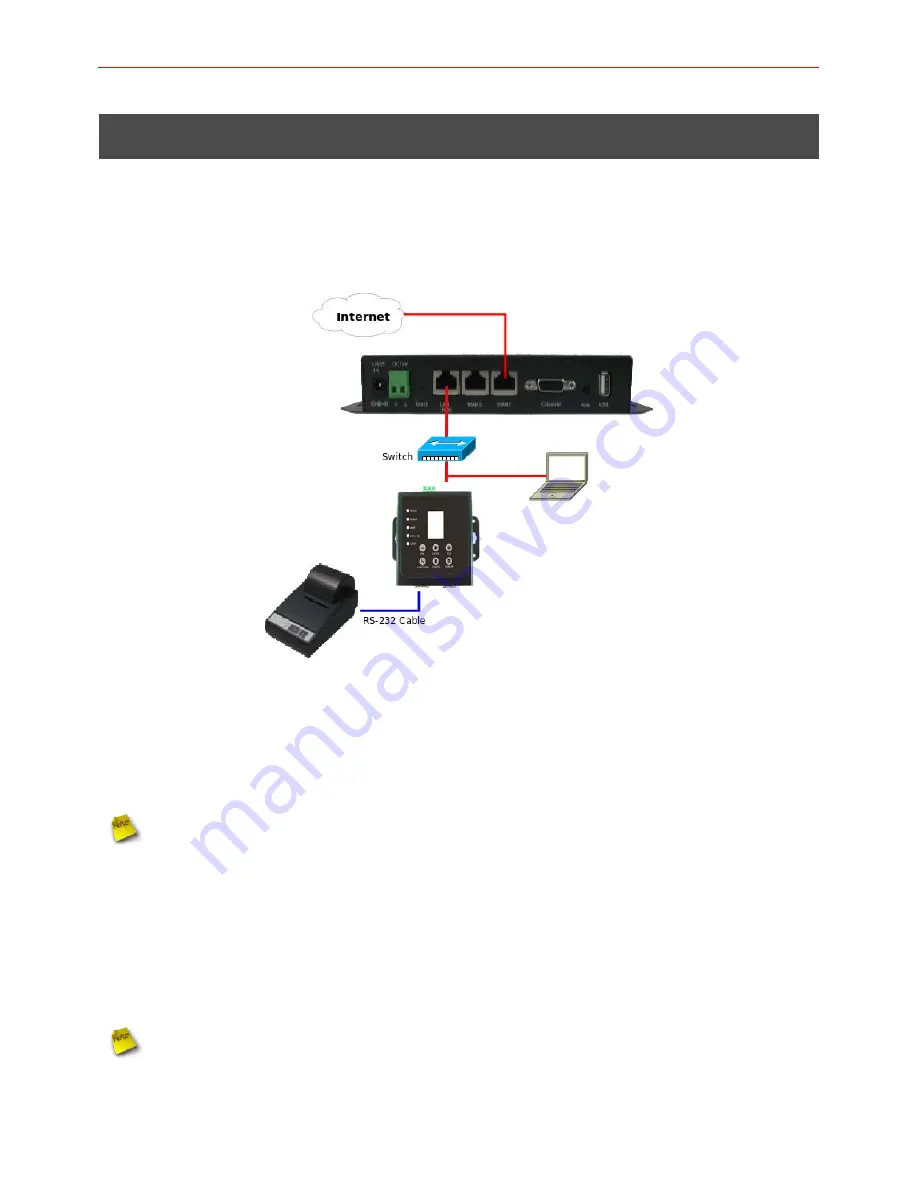
2. Hardware Installation 


Please follow the steps mentioned below to install the hardware of DSA-1000 with 

WHG-1000

 and               

PRT-1000 


1.  Connect DSA-1000 to your WHG-1000 via Ethernet cable. 

Connect one end of the Ethernet cable to the LAN port of DSA-1000 on the front panel. On your 

environment, connect the other end of the cable to your network. 


DSA-1000 also can connect to WAN1/WAN2 port of WHG-1000, but DSA-1000's 
network subnet must be same with WHG-1000's WAN1/WAN2 


2.  Connect DSA-1000 to your PRT-1000 via the provided RS-232(DB9 to DB25) cable. 

Connect one end of the RS-232 cable to 

COM1

 port of DSA-1000 on the front panel. Connect the 

other end of RS-232 cable to PRT-1000's 

DB25


Connector

 for communicating with Thermal Printer.   


3.  Connect the DC power adapter to the DSA-1000 power socket on the rear panel. 


Please only use the power adapter supplied with the DSA-1000 package. Using a 
different power adapter may damage this system 

Summary of Contents for DSA-1000

Page 1: ...LevelOne DSA 1000 PRT 1000 Device Server Thermal Printer User Manual V1 0...

Page 2: ...ch as airports hotels conventions stadiums restaurants or coffee shops this has revolutionized the Hotspot application and becoming more and more apparent in our daily lives WHG 1000 WiFi N Hotspot Ac...

Page 3: ...ticket billing kits is easy to installation and setup where the Line Thermal Printer connects directly to DSA 1000 Network Device Server with serial port RS 232 COM1 and COM2 for redundancy and standa...

Page 4: ...DSA 1000 Network Device Server For PRT 1000 Thermal Printer Quick Installation Guide 4 DSA 1000 Overview...

Page 5: ...or Function option Press and Hold two button for more than 5 seconds until Status LED FLASH to reset the device to default configurations Enter Click to printer On Demand Account Tickets or Function...

Page 6: ...On Demand Billing Plan Setup Enable and save a billing plan 3 Under Service Domain Authentication On Demand Thermal Printer Setup Edit a thermal printer After enabling it provide a 4 to 8 digit Lock P...

Page 7: ...to your network DSA 1000 also can connect to WAN1 WAN2 port of WHG 1000 but DSA 1000 s network subnet must be same with WHG 1000 s WAN1 WAN2 2 Connect DSA 1000 to your PRT 1000 via the provided RS 23...

Page 8: ...P address of 192 168 2 253 2 Launch a web browser to access the web GUI of DSA 1000 by entering http 192 168 2 253 setting htm in the address field 3 After a successful login the Setting Page will app...

Page 9: ...e Thermal Printer can generate On Demand s tickets The clients are required to get authenticated successfully before access the Internet Configuration Steps Step 1 Create Billing Plans Click Service D...

Page 10: ...in Authentication Type Below depicts an example for Domain1 with AP0 and On Demand s authentication Step 3 Select Billing Plans for Thermal Printer Click Service Domain Authentication On Demand Therma...

Page 11: ...Status LED should be FLASH Select in number 1 and press Enter button the PRT 1000 Thermal Printer should be print Thermal Printer Link Test message Press CANCEL button to stop function event the Statu...

Page 12: ...n IP address automatically via DHCP from WHG 1000 Open a web browser on a client device access any URL and then the Domain1 User Login Page will appear Enter the Passcode of a printer ticket previousl...

Reviews: