14
Wall Mounting
Follow the steps below to mount the industrial Ethernet switch using the wall mounting
bracket as shown below in Figure 3.4.
Caution:
“Wall” means industrial control panel wall.
Step 1
Remove the DIN-Rail bracket from the industrial Ethernet switch by loosening the
screws.
Step 2
Place the wall mounting brackets on the top and bottom of the industrial Ethernet
switch.
Step 3
Use the screws to screw the wall mounting bracket on the industrial Ethernet switch.
Step 4
Use the hook holes at the corners of the wall mounting bracket to hang the industrial
Ethernet switch on the wall.
Step 5
To remove the wall mount bracket, do the opposite from the steps above.
Figure 3.4: Remove DIN-Rail Bracket from the Switch
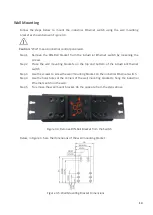
Below, in Figure 3.5 are the dimensions of the wall mounting bracket.
Figure 3.5: Wall Mounting Bracket Dimensions


