background image

2

FEATURES

3

ASSEMBLE

CHANGING THE FOOD DISPENSER

APP INSTALLATION

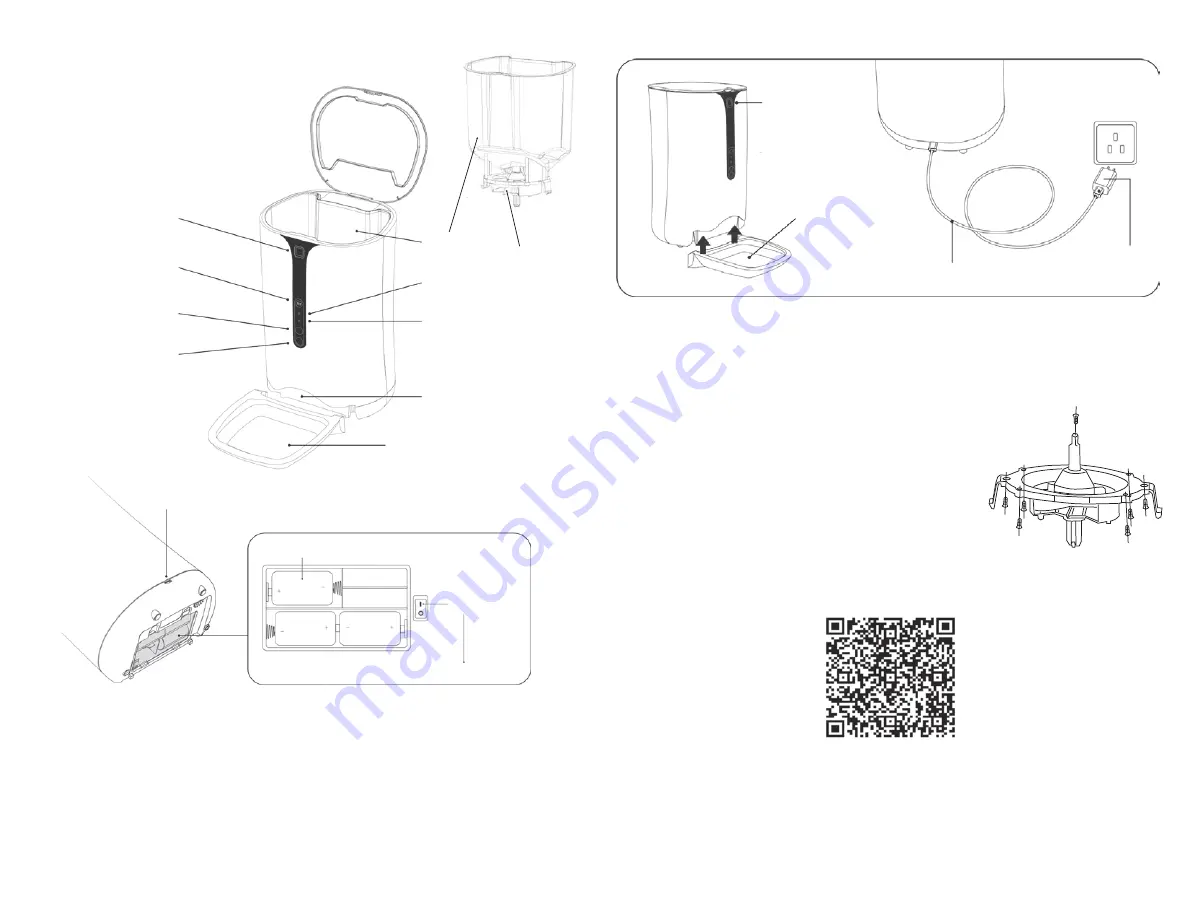
lid button

bowl

USB cable

adaptor

Method 1

Scan the QR code (Fig 1-1) to redirect to the APP download page, follow the instructions to download 

and install corresponding APP.
Method 2

Search “PetU” at APP Store (IOS users) or in Google Play (Android users), download and install.
NOTES

• Permissions needed when installing the app.

• Allow WLAN, Location, Use Microphone, Use Phone Storage.

• SET button : short press to activate the manual feeding function; long press for 5 seconds 
  to restore factory settings.
• The batteries are only a backup in case of power failure.

MIC

hopper

food dispenser

lid button

SET button

night light

camera

indicator

dispensing port

bowl

USB port

Make sure the power switch 

is at “I” location.

3 x ‘D’ batteries (not included)

power switch

• Open the cover by pressing the Lid Button.

• Assemble the bowl upward, disassemble the bowl downward.

• To power via power adaptor, plug in power adaptor.

The default installed food dispenser is the larger size, programmable:

- 1 to 39 portions (10-390g)

Small food dispenser for small pets, programmable: 

- 1 to 39 portions (5-195g)

Changing between dispensers:

Step 1 : lift the hopper from the body of the unit

Step 2 : remove the 7 screws and the dispenser installed

Step 3 : replace with the desired sized dispenser and fix in place with the screws. 

Fig 1-1

SIZE D

SIZE D

SIZE D

Summary of Contents for PF-1

Page 1: ... Any implied warranties including the implied warranty of merchantability are also limited to the duration of 90 days from the date of retail purchase WARRANTY Keep the original dated sales receipt with this manual WARRANTY AND SERVICE PROCEDURE If you have a problem with your unit or require replacement parts please telephone the following numbers for assistance North America 1 800 265 8456 Koola...

Page 2: ...backup in case of power failure MIC hopper food dispenser lid button SET button night light camera indicator dispensing port bowl USB port Make sure the power switch is at I location 3 x D batteries not included power switch Open the cover by pressing the Lid Button Assemble the bowl upward disassemble the bowl downward To power via power adaptor plug in power adaptor The default installed food di...

Page 3: ...eeder until you hear the ding dong sound to restore the factory settings then log in the other account You could log in your account on multiple phones Open the PetU APP tap Register to sign up an account with your email then log in Fig 2 1 Fig 2 2 Fig 2 3 Fig 2 4 Open the APP log in with your email tap to add the feeder Fig 3 1 Select the V86 on WiFi Video column Fig 3 2 Fig 3 3 Fig 3 4 ...

Page 4: ...unt and password to connect your 2 4GHz WiFi network NOTE 5 0GHz is NOT supported tap Next then tap OK Fig 4 2 Fig 4 3 Fig 4 4 PAIRING The indicator light is green and flickers slowly Tap Got it on interface Fig 5 1 point the QR code on your phone to the camera of the feeder you could move your phone back and forth and keep 10 20cm distance When you hear the beep sound tap Next Fig 5 2 CONNECTING ...

Page 5: ...minute Fig 6 1 When the progress bar reaches 100 tap Confirm to accept connection to the feeder Fig 6 2 Fig 6 3 NOTE If the connection fails follow the next steps and retry 1 In the QR code scanning part tap on Operation completed but no prompt tone was heard Fig 7 2 2 Tap on No switch to device hot connection Fig 7 3 CONNECTING cont CONNECTION FAILED ...

Page 6: ...feeder Fig 9 2 Tap Smart Pet Feeder to enter the settings page Fig 9 3 NOTE If the connection fails refer to the FAQ section in this manual In WLAN page in your phone Fig 8 1 choose WiFi named PetU_xxxxxx and connect Fig 8 2 Fig 8 3 DEVICE HOT CONNECTION DEVICE HOT CONNECTION cont ...

Page 7: ...ails manual feeding feeding status of two recent times camera interface pet interface Tap Fig 11 1 to enter more setting page You could set the recording feeder name for Alexa event list and unbind the feeder Fig 11 2 Tap Voice record setting to the audio list and tap Add an audio record to record your sound Fig 11 3 ...

Page 8: ...12 2 Press the Done button Fig 12 2 then goes to the next interface Fig 12 3 where you can change the default record name Audio0 or keep it Then tap OK Tap top left arrow in Fig 9 3 to go back to Fig 7 1 interface Tap Modify Fig 10 1 to enter the auto feeding setting page Fig 13 1 Tap the meal name for example tap Breakfast to set Feeding Portion Recording Meal Name and Feeding time Fig 13 2 Fig 1...

Page 9: ...you took Video icon Tap to check the videos you shoot Headphone icon Tap to listen to sounds surrounding the feeder and the voice of your pet Tap Pet to access to the interface Fig 15 1 and tap Edit pet information to edit corresponding pet information Fig 15 2 record video talk to your pet listen to the sound video folder take photo gallery 16 17 CAMERA FUNCTIONS EDIT PET INFORMATION ...

Page 10: ...https alexa amazon com 1 Log in Alexa with your Amazon account 2 Search PetU in Skills section 3 Tap ENABLE 4 Bind the account of the PetU APP ALEXA SETTING PC LAPTOP 18 19 ALEXA SETTING PC LAPTOP cont ...

Page 11: ...s a WiFi hotspot named PetU_XXXXX c Uninstall the APP and then reinstall it Please authorize the APP the right to acquire location information during installation d Check whether the router has set up a restriction to the number of online devices It is recommended that the WPA WPA2 PSK encryption be applied Please use 2 4G routers only 2 OFF LINE OR POWER OFF In case of power failure or disconnect...

Page 12: ... DEVICE ABNORMALITY Check whether or not the motor is running normally 10 THE CELLPHONE INDICATES EXCESSIVE FOOD DISCHARGE There is too much food at the food outlet which needs cleaning 11 HOW TO RE CONNECT THE DEVICE TO THE NETWORK QUICKLY AFTER IT IS DISCONNECTED a Exit the APP tap it again and wait for data updating b Switch from feeding interface to the video interface and wait for video refre...

Reviews: