background image

Troubleshooting 


NO 

PROBLEM 

SOLUTION 

“NO 

DISC” 

is 

displayed  on  the 

screen 

1.


Ensure the disc is placed inside the tray correctly with the 

label side up. 

2.


Ensure the format of disc is compatible. 

3.


Ensure the discs are not dirty or damaged. 

4.


Clean the lens of the DVD player with a lens cleaning discs. 

No sound 

1.


Ensure speakers are connected properly. 

2.


If connecting to a TV, ensure correct connection to the TV. 

3.


Ensure the unit is not on mute. 

4.


Increase volume. 

5.


Increase volume on your Bluetooth or Aux-in device. 

Remote  control  is 

not working 

1.


The  remote  was  not  aimed  at  the  unit  correctly.  Aim  the 

remote at the display screen on the unit. 

2.


Batteries  are  not  inserted  correctly.  Ensure  batteries  are 

inserted  as  per  the  polarity  marked  in  the  battery 

compartment of the remote control. 

3.


The  batteries  are  flat.  Add  new  batteries  to  the  remote 

control. 

No sound from mic 

When the unit is connected to a TV screen, press the SETUP 

button on the remote control to access the SETUP page. 

Access the AUDIO settings. 

Access the KARAOKE settings. 

There you can access the MIC SETUP. 

Turn the mic on or off. Adjust the mic volume. Adjust the 

echo level. 

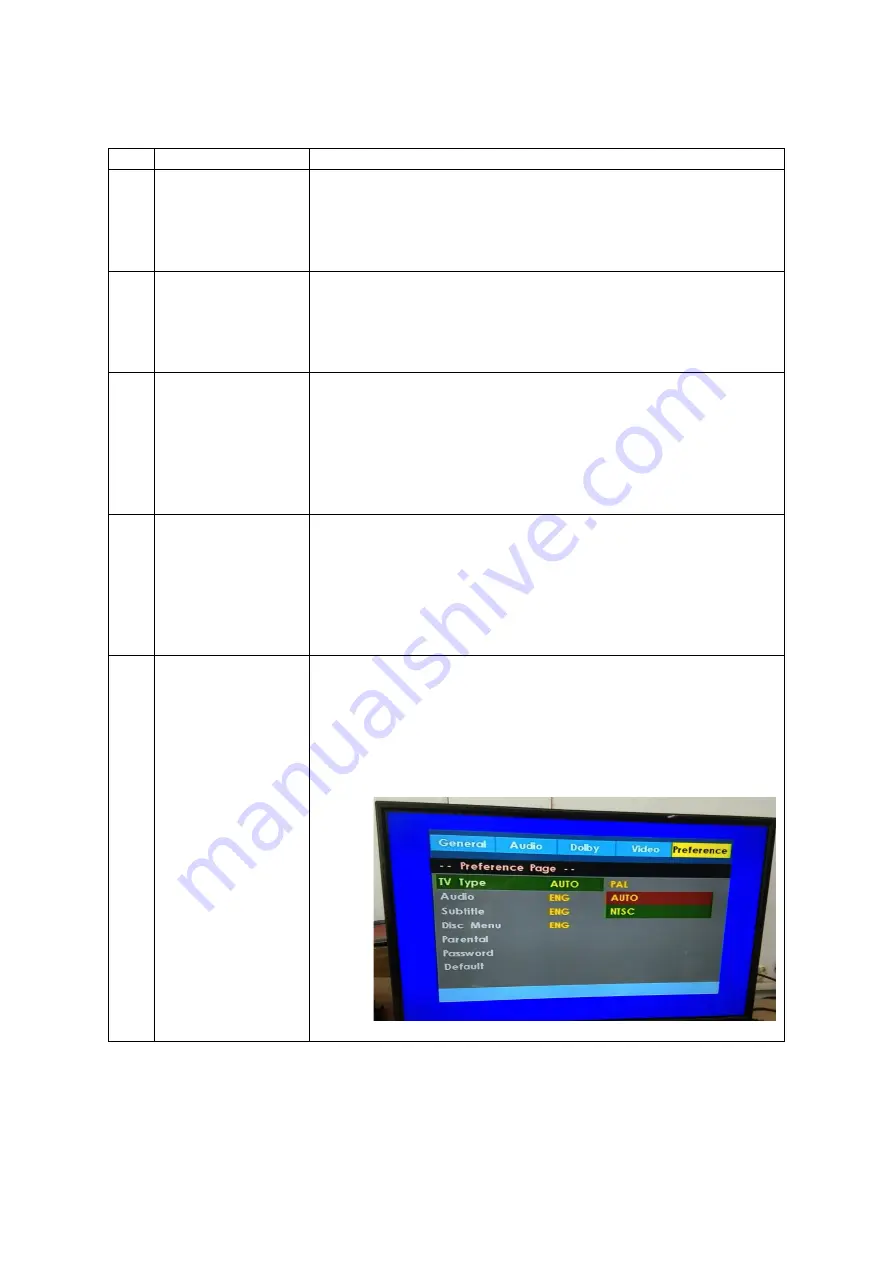
Screen display on TV 

is in black and white 

When the unit is connected to a TV screen, press the SETUP 

button on the remote control to access the SETUP page. 

Access the PREFERENCE page. 

Access TV type. 

Arrow across to amend the settings. 

PAL is for Australia. Press the ENTER button on the remote 

control to save your selection. 


Summary of Contents for BMV26

Page 1: ...RUCTIONS FOR FUTURE REFERNCE The illustrations used in this manual are to illustrate the operation method and product structure of the product Where there is a small difference between the physical item and the illustrations please take the physical as the standard ...

Page 2: ...ease dispose of them appropriately Electrical safety and cord handling To prevent contact with high voltage components inside do not attempt to open the equipment Before installing this equipment make sure your outlet voltage corresponds to the voltage stated on the appliance rating label When connecting the equipment align the plug properly and insert it fully to prevent electric shock Only use t...

Page 3: ...of the equipment or step on it Do not place objects filled with water such as vases or any naked flame sources such as lit candles incense sticks or cigarettes on top of the unit The equipment is not intended for use by persons including children with reduced physical sensory or mental capabilities or lack of experience and knowledge unless they have been given supervision or instruction concernin...

Page 4: ... Should there be a strange noise or vibration whilst playing if the picture or sound skips or if the picture is distorted stop the player immediately Front panel 1 Power button 2 Volume 3 Stop 4 Next CH 5 Prev CH 6 Mode DVD FM AUX BT 7 EQ Rock Pop Classic Disco 8 Play Pause Search 9 Mute 10 Open Close 11 Mic input 12 Earphone jack 13 USB port 14 Disc tray 15 Display window ...

Page 5: ...Rear Panel 1 FM antenna 2 AUX in port 3 Y Cb Pb Cr Pr 4 ML MR out 5 Video out 6 Speaker out ...

Page 6: ...Connections Connecting a TV set ...

Page 7: ...Remote control Before use Insert 2 x AAA batteries to the remote control s battery compartment as per the polarity indicator Batteries not included ...

Page 8: ... Also used to adjust volume for a connected microphone 11 DOWN Directional button used for navigation in menus 12 CLEAR Press to remove a selection in some setup functions 13 TITLE Press to go back to the title screen when playing a DVD disc 14 STEP Press to play a single frame on a DVD disc Press repeatedly to move forward to the next frames Press the play button to resume normal playback 15 SLOW...

Page 9: ...ess again for sound to resume 34 V MODE For use with YUV video output on the rear of the unit when connecting to a TV to make some screen adjustments 35 VOL Press to increase volume 36 FWD TUNING When playing a DVD disc press to fast forward through a disc Each time the FWD button is pressed the fast forward speed changes Press the play button to resume normal playback In radio mode press to manua...

Page 10: ... unit using an AUX IN lead not included 3 Begin music playback on the external music player BLUETOOTH 1 When the unit is powered on press the MODE button on the unit or the remote control to switch between the different playback modes of the unit DVD TUNER AUX BLUETOOTH 2 When BLUETOOTH is shown on the screen access the Bluetooth settings on your smart device to search for devices 3 Connect with t...

Page 11: ...ton on the remote control to access the SETUP page The SETUP page is accessible when the unit is connected to a TV screen Use the arrow directional buttons on the remote control to move down and across the different options on the screen Use the enter button on the remote control to save settings when your chosen option is highlighted General General setup page Arrow down to access options TV disp...

Page 12: ...rrow across to change between Video YUV Sharpness arrow across to change between High Medium Low Brightness level adjustment use the left or right buttons Press enter when done Contrast level adjustment use the left or right buttons Press enter when donw Preference TV type arrow across to change netween PAL Auto NTSC Audio arrow across to change the spoken lanuage from the options listed Subtitle ...

Page 13: ...nded BITRATE Press the enter button on the remote control to change between 128 192 256 320 96 112 kbps 128 kbps is recommended CREATE ID3 Press the enter button on the remote control to change between YES or NO An ID3 tag will only be created if the data is already on the music file which you were copying If the data is not already there it cannot be copied even if you choose the yes option DEVIC...

Page 14: ... on the unit 2 Batteries are not inserted correctly Ensure batteries are inserted as per the polarity marked in the battery compartment of the remote control 3 The batteries are flat Add new batteries to the remote control 4 No sound from mic When the unit is connected to a TV screen press the SETUP button on the remote control to access the SETUP page Access the AUDIO settings Access the KARAOKE ...

Page 15: ...PEG2 PCM Stereo Audio output Analogue audio Electric level output 1 0 2 0v Resistance 75 Ω Audio output Digital audio Electric level output 0 5vp p Resistance 75 Ω Video output Electric level output 1 0vp p Resistance 75 Ω YUV output Y CB CR Electric level output 0 7vp p Resistance 75 Ω TUNER FM frequency range 87 5 108 MHz AMPLIFIER Output power 30W FL FR 30W 8 Ω Frequency response 20Hz 20KHz 3dB...

Reviews: