


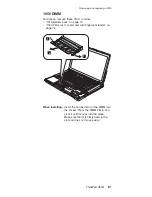

FRU
replacement
notices
This
section
contains
notices
related
to
removing
and
replacing
parts.
Read
this
section
carefully
before
replacing
any
FRU.
Screw
notices
Loose
screws
can
cause
a
reliability
problem.
In
the
ThinkPad
computer,
this
problem
is
addressed
with
special
nylon-coated
screws
that
have
the
following
characteristics:
v
They
maintain
tight
connections.
v
They
do
not
easily
come
loose,
even
with
shock
or
vibration.
v
They
are
harder
to
tighten.
v
Each
one
should
be
used
only
once.
Do
the
following
when
you
service
this
machine:
v
Keep
the
screw
kit
(for
the
P/N,
see
“Miscellaneous
parts”
on
page
171)
in
your
tool
bag.
v
Always
use
new
screws.
v
Use
a
torque
screwdriver
if
you
have
one.
Tighten
screws
as
follows:
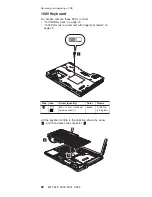
v
Plastic
to
plastic
Turn
an
additional
90
degrees
after
the
screw
head
touches
the
surface
of
the
plastic
part:
90 degrees more
(Cross-section)
v
Logic
card
to
plastic
Turn
an
additional
180
degrees
after
the
screw
head
touches
the
surface
of
the
logic
card:
180 degrees more
(Cross-section)
v
Torque
driver
If
you
have
a
torque
driver,
refer
to
the
“Torque”
column
for
each
step.
FRU
replacement
notices
68
MT
2529,
2530,
2531,
2532
Summary of Contents for ThinkPad Z60m Series
Page 6: ...2 MT 2529 2530 2531 2532 ...
Page 48: ...Checkout guide 44 MT 2529 2530 2531 2532 ...
Page 100: ...2 3 Removing and replacing a FRU 96 MT 2529 2530 2531 2532 ...
Page 106: ...7 7 Removing and replacing a FRU 102 MT 2529 2530 2531 2532 ...
Page 132: ...3a 3b 6 5 4 continued Removing and replacing a FRU 128 MT 2529 2530 2531 2532 ...
Page 136: ...5 4 4 4 4 5 Removing and replacing a FRU 132 MT 2529 2530 2531 2532 ...
Page 140: ...3 10 16 11 1 17 12 13 14 15 2 4 7 6 8 9 19 18 5 Locations 136 MT 2529 2530 2531 2532 ...
Page 164: ...LCD FRUs a b c d 1 2 3 7 8 9 10 4 5 6 e Parts list 160 MT 2529 2530 2531 2532 ...


