


Attention:
Lenovo has no responsibility for the performance or safety of unauthorized batteries, and
provides no warranties for failures or damage arising out of their use.
Move your pointer to the battery-status icon in the Windows notification area to check the battery status. The
battery-status icon displays the percentage of battery power remaining and how long you can use your
computer before you must charge the battery.
To check whether the battery charges properly during operation, do the following:
1. Discharge the battery until the remained battery power is less than 50%.
2. Connect the computer to ac power to charge the battery. If the battery status icon in the Windows
notification area indicates that the battery is not charging, remove the battery and let it return to room
temperature.
3. Reinstall the battery. If the battery is still not charging, replace the battery.
4. Check the battery status icon again. If the same error still exists, replace the system board.
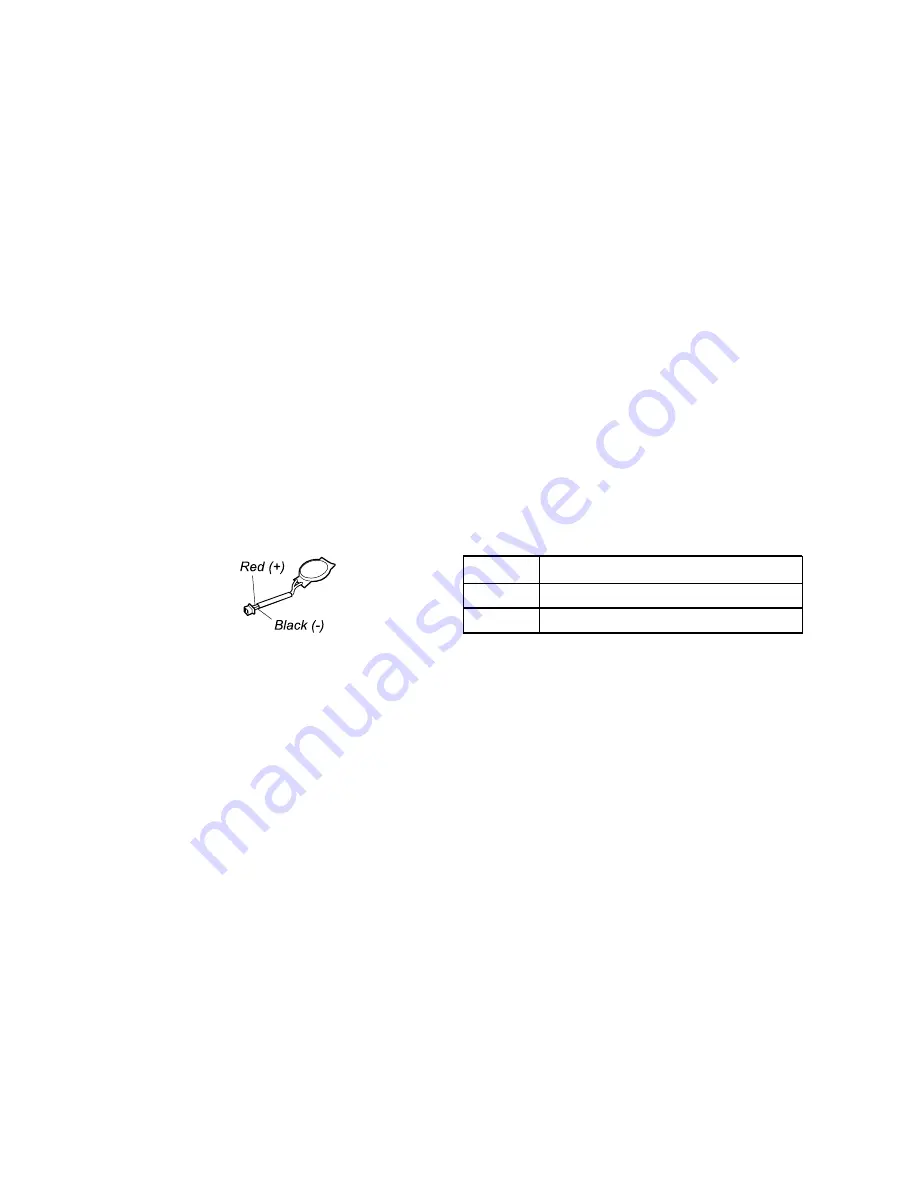
Checking the coin-cell battery
To check the coin-cell battery, do the following:
1. Disable the built-in battery. See “Disable Fast Startup and the built-in battery” on page 64.
2. Remove the coin-cell battery. See “1080 Coin-cell battery” on page 70.
3. Measure the voltage of the coin-cell battery. See the following illustration.
Wire
Voltage (V dc)
Red
+2.5 to +3.2
Black
Ground
• If the voltage is correct, replace the system board.
• If the voltage is not correct, replace the coin-cell battery.
• If the coin-cell battery discharges quickly after replacement, replace the system board.
29
Summary of Contents for ThinkPad X13 Yoga Gen 2
Page 1: ...X13 Yoga Gen 2 Hardware Maintenance Manual ...
Page 6: ...iv X13 Yoga Gen 2 Hardware Maintenance Manual ...
Page 11: ...DANGER DANGER DANGER DANGER DANGER Chapter 1 Safety information 5 ...
Page 12: ...6 X13 Yoga Gen 2 Hardware Maintenance Manual ...
Page 13: ...PERIGO PERIGO Chapter 1 Safety information 7 ...
Page 14: ...PERIGO PERIGO PERIGO PERIGO PERIGO 8 X13 Yoga Gen 2 Hardware Maintenance Manual ...
Page 15: ...PERIGO DANGER DANGER DANGER DANGER Chapter 1 Safety information 9 ...
Page 16: ...DANGER DANGER DANGER DANGER VORSICHT 10 X13 Yoga Gen 2 Hardware Maintenance Manual ...
Page 17: ...VORSICHT VORSICHT VORSICHT VORSICHT Chapter 1 Safety information 11 ...
Page 18: ...VORSICHT VORSICHT VORSICHT 12 X13 Yoga Gen 2 Hardware Maintenance Manual ...
Page 19: ...Chapter 1 Safety information 13 ...
Page 20: ...14 X13 Yoga Gen 2 Hardware Maintenance Manual ...
Page 21: ...Chapter 1 Safety information 15 ...
Page 22: ...16 X13 Yoga Gen 2 Hardware Maintenance Manual ...
Page 23: ...Chapter 1 Safety information 17 ...
Page 24: ...18 X13 Yoga Gen 2 Hardware Maintenance Manual ...
Page 25: ...Chapter 1 Safety information 19 ...
Page 26: ...20 X13 Yoga Gen 2 Hardware Maintenance Manual ...
Page 30: ...24 X13 Yoga Gen 2 Hardware Maintenance Manual ...
Page 36: ...30 X13 Yoga Gen 2 Hardware Maintenance Manual ...
Page 48: ...42 X13 Yoga Gen 2 Hardware Maintenance Manual ...
Page 49: ... Copyright Lenovo 2021 43 ...
Page 52: ...46 X13 Yoga Gen 2 Hardware Maintenance Manual ...
Page 58: ...LCD FRUs 52 X13 Yoga Gen 2 Hardware Maintenance Manual ...
Page 68: ...62 X13 Yoga Gen 2 Hardware Maintenance Manual ...
Page 96: ...Removal steps of the wireless antenna kit 90 X13 Yoga Gen 2 Hardware Maintenance Manual ...
Page 98: ...92 X13 Yoga Gen 2 Hardware Maintenance Manual ...
Page 103: ......
Page 104: ...Part Number SP40T80100_01 Printed in 1P P N SP40T80100_01 ...
Page 105: ... 1PSP40T80100_01 ...


