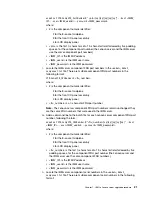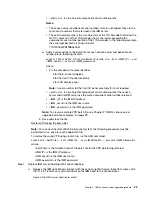
To restore the saved system configuration to the Lenovo server:
1. Restore the saved system configuration using the
ASU restore
<filename>
command, where
<filename>
is the complete path name of the file where the configuration was saved.
2. Restore the original IMM IP address, user name, and password. If upgrading an x3950
server, you will need to restore this information for both IMMs.
•
Restore Features on Demand (FoD) keys
Import the transferred or newly purchased FoD keys to the upgraded Lenovo server using the
ASU fodcfg installkey
command.
•
Restore vital product data (VPD)
Notes:
– Make sure that you are using the latest version of the Lenovo ASU.
– Make copies of the original VPD files captured from the IBM server before you begin making
modifications. If you make any mistakes when creating the batch files for restoring VPD to the
Lenovo server, these copies will allow you to start over.
– For a Lenovo System x3950 X6 8-socket system, the following procedure must be performed
twice, once for each of the standard I/O books in the system.
To modify and restore the saved IBM vital product data (VPD) to the Lenovo server, create and
run batch files using the Lenovo Advanced Settings Utility (ASU) as described in the following
tasks.
Create a VPD upgrade batch file
The batch files for Lenovo System x3850 X6 4-socket and Lenovo System x3950 X6 8-socket
systems are different.
– To create a VPD batch file for a Lenovo System x3850 X6 4-socket system:
1. Open a new
<serial>
_system.bat
file (where
<serial>
is the serial number of the standard
I/O book, allowing each batch file to be identified). This file will be edited to create a VPD
update batch file.
2. Complete the following steps to add commands to the
<serial>
_system.bat
file:
a. Open the
<serial>
_system.txt
file (where
<serial>
is the serial number of the standard
I/O book). This file was saved from the IBM System x3850 X6 4-socket system during
the Backup vital product data (VPD) procedure.
b. Locate the IBM server machine type and model string in the
<serial>
_system.txt
file.
This string has the following format:
SYSTEM_PROD_DATA.SysInfoProdName=
<IBM_machine_type_model>
where:
<IBM_machine_type_model>
is a 7–character field that combines the 4–
character machine type and the 3–character model number.
c. Change the IBM server machine type to the Lenovo server machine type by replacing
the IBM server 4-character machine type, 3837, with the Lenovo server 4-character
machine type, 6241. The 3-character model number remains unchanged between the
IBM and Lenovo servers.
For example, if the original IBM server machine type and model number was
3837
FT4, the new Lenovo server machine type and model number would be
6241
FT4.
d. Add a command line to the batch file for the Lenovo server machine type and model
created in the previous step. (this model number varies based on the original IBM
server model number), following the form:
Chapter 1
.
IBM to Lenovo server upgrade procedure
9
Summary of Contents for System x3850 X6
Page 1: ...System x3850 X6 and x3950 X6 IBM to Lenovo Upgrade Installation Guide Machine Type 6241 ...
Page 4: ...ii System x3850 X6 and x3950 X6 IBM to Lenovo Upgrade Installation Guide ...
Page 32: ...28 System x3850 X6 and x3950 X6 IBM to Lenovo Upgrade Installation Guide ...
Page 36: ...32 System x3850 X6 and x3950 X6 IBM to Lenovo Upgrade Installation Guide ...
Page 40: ...36 System x3850 X6 and x3950 X6 IBM to Lenovo Upgrade Installation Guide ...
Page 47: ...Taiwan Class A compliance statement Appendix B Notices 43 ...
Page 49: ......
Page 50: ......

