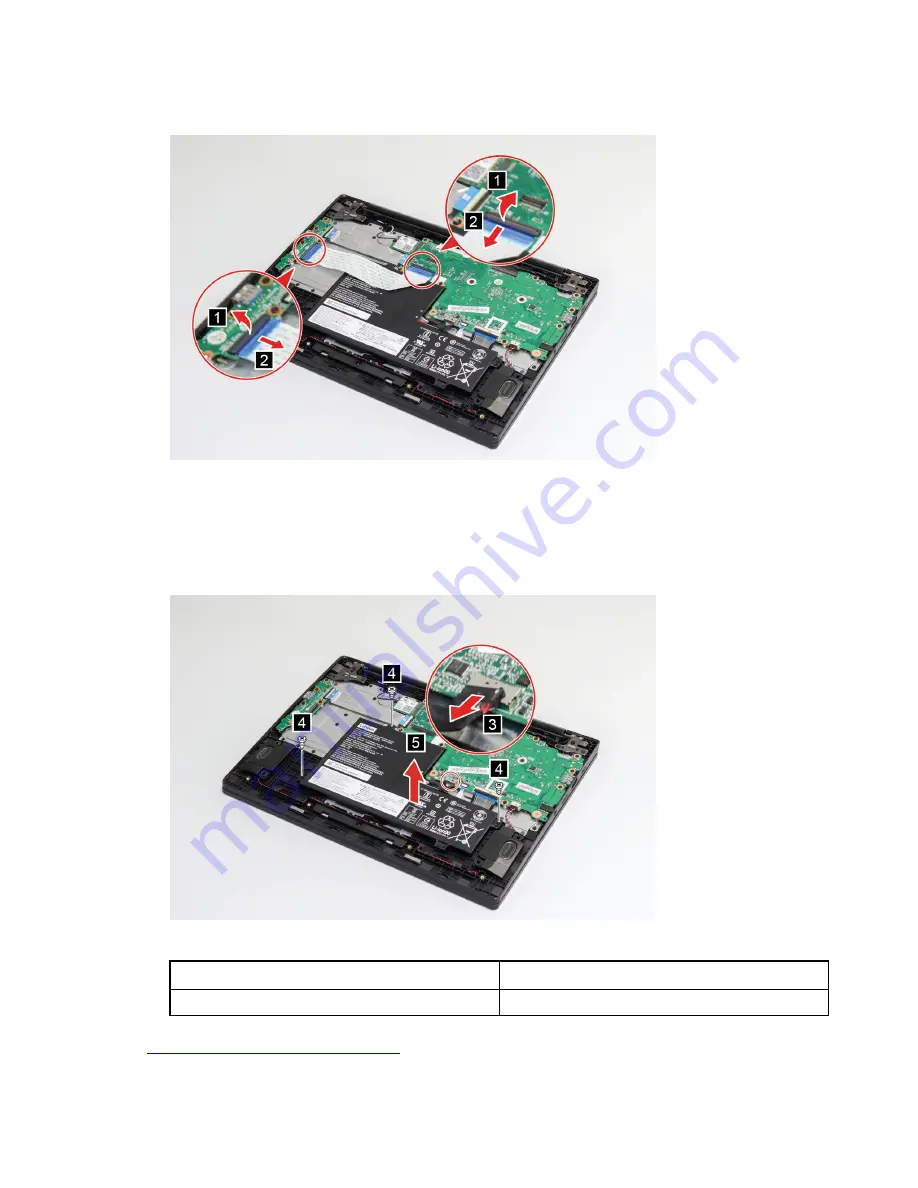
Step 1. Disconnect the I/O board cable from the system board and the I/O board.
Figure 29. Remove the I/O board cable
Step 2. Disconnect the cable from the system board.
Attention:
Use your fingernail to pull the connector to unplug it. Do not pull the cable.
Step 3. Remove four screws and then remove the battery pack.
Figure 30. Remove the battery pack
Screw specification
Number of screws
M2 x 4
4
Go to
https://support.lenovo.com/partslookup
to look up the Lenovo part numbers of the following
replacement part:
.
45
Summary of Contents for Chromebook C340
Page 1: ...Lenovo Chromebook C340 and S340 Hardware Maintenance Manual ...
Page 2: ...First Edition May 2019 Copyright Lenovo 2019 ...
Page 4: ...ii Lenovo Chromebook C340 and S340 Hardware Maintenance Manual ...
Page 6: ...iv Lenovo Chromebook C340 and S340 Hardware Maintenance Manual ...
Page 11: ...DANGER DANGER DANGER DANGER DANGER Chapter 1 Safety information 5 ...
Page 12: ...6 Lenovo Chromebook C340 and S340 Hardware Maintenance Manual ...
Page 13: ...PERIGO PERIGO PERIGO Chapter 1 Safety information 7 ...
Page 15: ...DANGER DANGER DANGER DANGER Chapter 1 Safety information 9 ...
Page 17: ...VORSICHT VORSICHT VORSICHT VORSICHT Chapter 1 Safety information 11 ...
Page 18: ...VORSICHT VORSICHT VORSICHT 12 Lenovo Chromebook C340 and S340 Hardware Maintenance Manual ...
Page 19: ...Chapter 1 Safety information 13 ...
Page 20: ...14 Lenovo Chromebook C340 and S340 Hardware Maintenance Manual ...
Page 21: ...Chapter 1 Safety information 15 ...
Page 22: ...16 Lenovo Chromebook C340 and S340 Hardware Maintenance Manual ...
Page 23: ...Chapter 1 Safety information 17 ...
Page 24: ...18 Lenovo Chromebook C340 and S340 Hardware Maintenance Manual ...
Page 25: ...Chapter 1 Safety information 19 ...
Page 26: ...20 Lenovo Chromebook C340 and S340 Hardware Maintenance Manual ...
Page 31: ...S340 14 Figure 2 Lenovo Chromebook S340 14 exploded view Chapter 3 Idetifying FRUs CRUs 25 ...
Page 66: ......
Page 67: ......
Page 68: ......


