background image

Installing a switch module

Note:

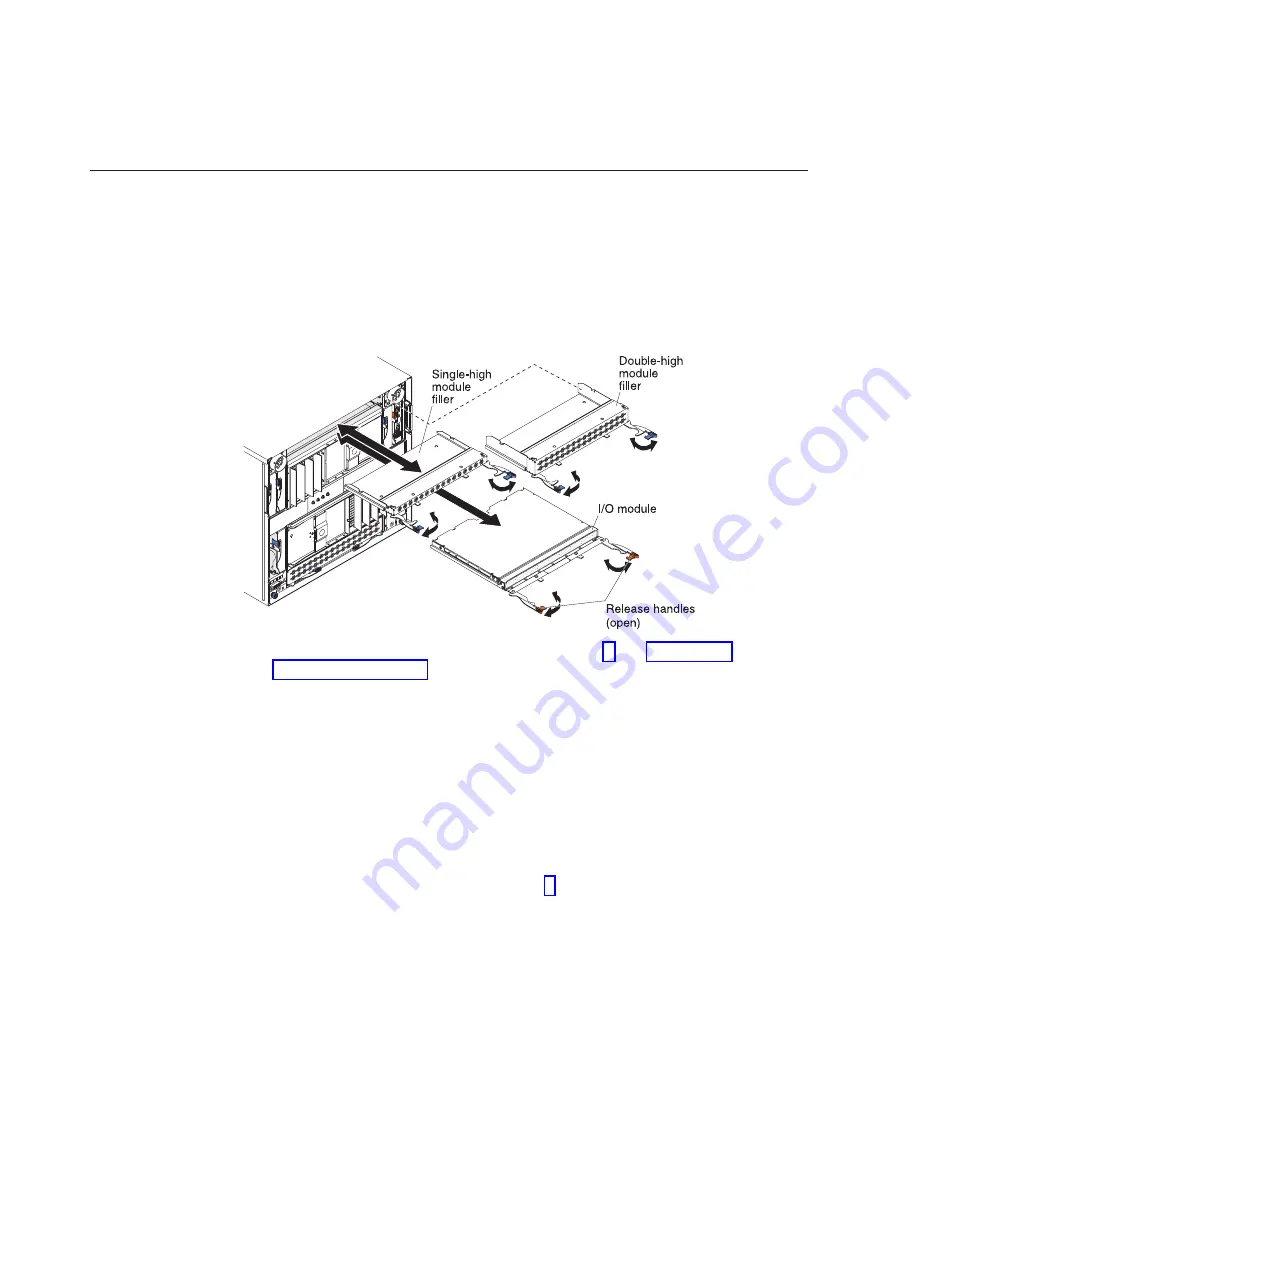
The following illustration shows how to install a switch module in a Type
8852 BladeCenter unit. The appearance of your BladeCenter unit might be
different; see the documentation for your BladeCenter unit for additional
information.

To install a switch module, complete the following steps:

1.

Read the safety information that begins on page and “Installation
guidelines” on page 8.

2.

Select I/O-module bay in which to install the switch module.

Note:

For details about I/O-module bay requirements and bay locations, see
the documentation for the BladeCenter unit and blade servers.

3.

Remove the filler module from the selected bay. Store the filler module for
future use.

4.

If you have not already done so, touch the static-protective package that
contains the switch module to an

unpainted

metal surface of the BladeCenter

unit or an

unpainted

metal surface on any other grounded rack-component for

at least 2 seconds.

5.

If the removed filler module (from step 3) occupied two bays:

v

Remove the single-high filler module from its static-protective package.

v

Install the single-high filler module into the unused bay.

6.

Remove the switch module from its static-protective package.

7.

Make sure that the release levers on the switch module are in the open
position (perpendicular to the module).
For specific instructions for installing a switch module in the BladeCenter
unit, see the documentation that comes with the BladeCenter unit.

8.

Slide the switch module into the applicable I/O-module bay until it stops.

9.

Push the release levers on the front of the switch module to the closed
position. After you insert and lock the switch module, it is turned on, and a
power-on self-test (POST) occurs to verify that the switch module is operating
correctly.

10

BladeCenter Virtual Fabric 10Gb Switch Module: Installation Guide

Summary of Contents for BladeCenter Virtual Fabric 10Gb Switch Module

Page 1: ...BladeCenter Virtual Fabric 10Gb Switch Module Installation Guide ...

Page 2: ......

Page 3: ...BladeCenter Virtual Fabric 10Gb Switch Module Installation Guide ...

Page 4: ...es document that comes with the product First Edition May 2015 Lenovo and the Lenovo logo are trademarks of Lenovo in the U S other countries or both Printed in USA Copyright Lenovo 2015 Portions Copyright IBM Corporation 2013 LIMITED AND RESTRICTED RIGHTS NOTICE If data or software is delivered pursuant a General Services Administration GSA contract use reproduction or disclosure is subject to re...

Page 5: ...erial console cable 19 Disconnecting the serial console cable 19 Connecting the SFP module cable 20 Disconnecting the SFP module cable 20 Connecting the RJ 45 cable 21 Disconnecting the RJ 45 cable 21 Chapter 5 Updating the software and configuring the switch module 23 Chapter 6 Information panels LEDs and external ports 25 Information panel 25 Information LEDs 26 Switch module status LEDs 27 Port...

Page 6: ...ia and New Zealand Class A statement 40 European Union EMC Directive conformance statement 40 Germany Class A statement 41 Japan VCCI Class A statement 42 Japan Electronics and Information Technology Industries Association JEITA statement 42 Korea Communications Commission KCC statement 42 Russia Electromagnetic Interference EMI Class A statement 43 People s Republic of China Class A electronic em...

Page 7: ...Information Avant d installer ce produit lisez les consignes de sécurité Vor der Installation dieses Produkts die Sicherheitshinweise lesen Prima di installare questo prodotto leggere le Informazioni sulla Sicurezza Les sikkerhetsinformasjonen Safety Information før du installerer dette produktet Antes de instalar este produto leia as Informações sobre Segurança Antes de instalar este producto lea...

Page 8: ... a caution statement is labeled Statement 1 translations for that caution statement are in the Systems Safety Notices document under Statement 1 Be sure to read all caution and danger statements in this document before you perform the procedures Read any additional safety information that comes with the server or optional device before you install the device This device is intended for use with UL...

Page 9: ...equipment when there is evidence of fire water or structural damage v Disconnect the attached power cords telecommunications systems networks and modems before you open the device covers unless instructed otherwise in the installation and configuration procedures v Connect and disconnect cables as described in the following table when installing moving or opening covers on this product or attached...

Page 10: ... an embedded Class 3A or Class 3B laser diode Note the following Laser radiation when open Do not stare into the beam do not view directly with optical instruments and avoid direct exposure to the beam Class 1 Laser Product Laser Klasse 1 Laser Klass 1 Luokan 1 Laserlaite Appareil A Laser de Classe 1 viii BladeCenter Virtual Fabric 10Gb Switch Module Installation Guide ...

Page 11: ...as the following label attached Hazardous voltage current and energy levels are present inside any component that has this label attached There are no serviceable parts inside these components If you suspect a problem with one of these parts contact a service technician Safety ix ...

Page 12: ...x BladeCenter Virtual Fabric 10Gb Switch Module Installation Guide ...

Page 13: ...Center unit you must also install a compatible high speed Ethernet expansion card also known as an Ethernet I O card in each blade server that you want to communicate with the switch module In this environment the expansion card operates as a host channel adapter HCA For additional information see Chapter 2 Installing and replacing a switch module on page 7 and the installation information for the...

Page 14: ...gh multiple interfaces v A Telnet connection to the embedded command line interface CLI v A terminal emulation program connection to the serial port interface v A Web browser based interface BBI connection to the switch module Record information about the switch module in the following table The product name and serial number are on the identification label on the bottom cover of the switch module...

Page 15: ... BladeCenter Advanced Management Module Installation Guide or BladeCenter T Advanced Management Module Installation Guide v BladeCenter Advanced Management Module Command Line Interface Reference Guide v BladeCenter Advanced Management Module User s Guide v Installation and User s Guide for the BladeCenter unit v Systems Safety Notices v Broadcom 10 Gb 2 Port and 4 Port Ethernet Expansion Cards CF...

Page 16: ... Safety Notices document The following notices and statements are used in this document v Note These notices provide important tips guidance or advice v Important These notices provide information or advice that might help you avoid inconvenient or problem situations v Attention These notices indicate potential damage to programs devices or data An attention notice is placed just before the instru...

Page 17: ... document might differ slightly from your hardware and your switch module might have labels that are not shown in the illustrations in this document For more information about the components of the information panel see Chapter 6 Information panels LEDs and external ports on page 25 Chapter 1 The BladeCenter Virtual Fabric 10Gb Switch Module 5 ...

Page 18: ...6 BladeCenter Virtual Fabric 10Gb Switch Module Installation Guide ...

Page 19: ...0 I O module bay 5 Power connector 2 Power connector 1 Management module 1 Management module bay 2 Blower module 1 Blower module 1 error LED Blower module 2 error LED Blower module 2 Rear system LED panel Serial connector An expansion card or host channel adapter HCA must be installed in each blade server that you want to communicate with To enable the switch module to communicate with a blade ser...

Page 20: ...tch module blade server or BladeCenter unit indicates that the component can be hot swapped which means that if the BladeCenter unit and operating system support hot swap capability you can remove or install the component while the BladeCenter unit is running Orange can also indicate touch points on hot swap components See the instructions for removing or installing a specific hot swap component f...

Page 21: ...or exposed printed circuitry v Do not leave the device where others can handle and damage it v While the device is still in its static protective package touch it to an unpainted metal surface of the BladeCenter unit chassis or an unpainted metal surface on any other grounded rack component in the rack that you are installing the device in for at least 2 seconds This drains static electricity from...

Page 22: ...etal surface of the BladeCenter unit or an unpainted metal surface on any other grounded rack component for at least 2 seconds 5 If the removed filler module from step 3 occupied two bays v Remove the single high filler module from its static protective package v Install the single high filler module into the unused bay 6 Remove the switch module from its static protective package 7 Make sure that...

Page 23: ...he switch module For information and instructions see Chapter 3 Installing and removing a 10 Gb SFP module on page 15 and the documentation that comes with the SFP module 13 Attach any cables that are required by the switch module For additional information about cabling the switch module see Chapter 4 Cabling the switch module and the SFP module on page 19 the documentation that comes with the ca...

Page 24: ...ables and the optional network devices to which the cables have been connected For the locations of the connectors on the BladeCenter unit see the documentation that comes with the BladeCenter unit Then continue with step 3 3 Pull the release latches out from the switch module The switch module moves out of the bay approximately 0 6 cm 0 25 inch 4 Slide the switch module out of the bay and set it ...

Page 25: ...deCenter unit see the documentation that comes with the BladeCenter unit Then continue with Chapter 3 Installing and removing a 10 Gb SFP module on page 15 Chapter 2 Installing and replacing a switch module 13 ...

Page 26: ...14 BladeCenter Virtual Fabric 10Gb Switch Module Installation Guide ...

Page 27: ...it also applies to the 1 Gb small form factor pluggable SFP module 3 The switch module also supports MSA compliant copper direct attach cables DAC up to 7 m 23 ft in length Handling an SFP module Before you install an SFP module read the following information v The module housing of the SFP has an integral guide key that is designed to prevent you from inserting the module incorrectly v Use minima...

Page 28: ... adjustments or performance of procedures other than those specified herein might result in hazardous radiation exposure DANGER Some laser products contain an embedded Class 3A or Class 3B laser diode Note the following Laser radiation when open Do not stare into the beam do not view directly with optical instruments and avoid direct exposure to the beam Class 1 Laser Product Laser Klasse 1 Laser ...

Page 29: ...t 2 seconds 3 Read the information in Handling an SFP module on page 15 4 Remove the SFP module from its static protective package 5 Remove the protective cap if one is installed from the SFP module port where you are installing the SFP module and store it in a safe place 6 Remove the protective cap from the SFP module and store it in a safe place Attention To avoid damage to the cable or the SFP ...

Page 30: ...e Disconnecting the SFP module cable on page 20 Attention To avoid damage to the cable or the SFP module make sure that you disconnect the fiber optic cable before you remove the SFP module 4 Unlock the SFP module by pulling the wire tab straight out as shown in the following illustration 5 Grasp the wire tab on the SFP module and pull it out of the port 6 Replace the protective cap on the SFP mod...

Page 31: ...re Connecting the serial console cable To connect the serial console cable to the switch module connect the serial cable to the RS 232 serial console port of the switch module and the other end of the cable to the console device Disconnecting the serial console cable To disconnect the serial console cable grasp the connector and gently pull the cable from the switch module Lenovo 2015 Portions IBM...

Page 32: ...Make sure that the cable is well supported To connect the SFP module cable complete the following steps 1 Remove the protective caps from the end of the fiber optic cable Protective cap Fiber optic cable 2 Gently slide the fiber optic cable into the SFP module until it clicks into place 3 Check the LEDs on the switch module When the switch module is operating correctly the green link LED is lit Fo...

Page 33: ...he RJ 45 cable connector into the port connector until it clicks into place as shown in the following illustration Disconnecting the RJ 45 cable To disconnect the RJ 45 connector squeeze the release tab and gently pull the cable connector out of the switch module connector Chapter 4 Cabling the switch module and the SFP module 21 ...

Page 34: ...22 BladeCenter Virtual Fabric 10Gb Switch Module Installation Guide ...

Page 35: ...additional information Make sure that you are using the latest version of the switch module software For instructions on upgrading the switch module software see the Menu Based CLI Command Reference or the ISCLI Industry Standard CLI Command Reference Guide at http www 947 ibm com support entry portal docdisplay lndocid MIGR 54667 For instructions on configuring the switch module see the BladeCent...

Page 36: ...24 BladeCenter Virtual Fabric 10Gb Switch Module Installation Guide ...

Page 37: ...the switch module For further details about LEDs see Information LEDs on page 26 v Ten SFP port connectors to attach SFP modules These connectors are identified as ports EXT1 through EXT10 in the I O module configuration menus and are labeled 1 through 10 from left to right on the switch module v One RS 232 serial port connector for console port use management purposes only This connector is betwe...

Page 38: ...n LED test occurs whenever the switch module is turned on All LEDs are lit and remain lit during POST and then all the LEDs except the OK LED turn off Any errors that are detected during POST are written to the system log For information about the command to read the system log see the Menu Based CLI Command Reference guide for the switch module When POST errors are written to the system log these...

Page 39: ...n Link Activity LED Ports 1 through 10 This green LED is on ports 1 through 10 It indicates whether the corresponding port link is up or down and the status of the link activity for the corresponding port v When this LED is not lit it indicates that there is no signal on the corresponding port or the link is down v When this LED is lit there is an active connection or link between the correspondin...

Page 40: ...28 BladeCenter Virtual Fabric 10Gb Switch Module Installation Guide ...

Page 41: ...the installation v Tier 2 customer replaceable unit You may install a Tier 2 CRU yourself or request Lenovo to install it at no additional charge under the type of warranty service that is designated for your compute node For information about the terms of the warranty and getting service and assistance For information about the terms of the warranty see the Warranty Information document The repla...

Page 42: ...30 BladeCenter Virtual Fabric 10Gb Switch Module Installation Guide ...

Page 43: ...e management module The specific failure is displayed on the system status I O module panel of the management module Note For the locations and descriptions of the switch module LEDs see Chapter 6 Information panels LEDs and external ports on page 25 POST errors There are two types of errors noncritical and critical A noncritical error applies to one port and the switch module is operational You c...

Page 44: ... and corresponding failure You might have to provide this information when you call for service For details see Appendix A Getting help and technical assistance on page 33 Diagnostic indicator in hex Failing functional area Failure criticality 00 7F Base internal functions Critical 80 9F Internal interface failures Noncritical A0 AF External interface errors Noncritical B0 FE Reserved Noncritical ...

Page 45: ...oftware firmware and operating system device drivers for your Lenovo product The Lenovo Warranty terms and conditions state that you the owner of the Lenovo product are responsible for maintaining and updating all software and firmware for the product unless it is covered by an additional maintenance contract Your service technician will request that you upgrade your software and firmware if the p...

Page 46: ...umentation for instructions for using the diagnostic programs The troubleshooting information or the diagnostic programs might tell you that you need additional or updated device drivers or other software Lenovo maintains pages on the World Wide Web where you can get the latest technical information and download device drivers and updates To access these pages go to http www ibm com supportportal ...

Page 47: ...e configuration and software problems with your Lenovo products For more information about Support Line and other IBM services see http www ibm com services or see http www ibm com planetwide for support telephone numbers In the U S and Canada call 1 800 IBM SERV 1 800 426 7378 Hardware service and support IBM is Lenovo s preferred service provider for the System x Flex System and NeXtScale System...

Page 48: ...mation to contact IBM Taiwan product service IBM Taiwan product service contact information IBM Taiwan Corporation 3F No 7 Song Ren Rd Taipei Taiwan Telephone 0800 016 888 36 BladeCenter Virtual Fabric 10Gb Switch Module Installation Guide ...

Page 49: ...ain transactions therefore this statement may not apply to you This information could include technical inaccuracies or typographical errors Changes are periodically made to the information herein these changes will be incorporated in new editions of the publication Lenovo may make improvements and or changes in the product s and or the program s described in this publication at any time without n...

Page 50: ...te Actual speeds vary and are often less than the possible maximum When referring to processor storage real and virtual storage or channel volume KB stands for 1 024 bytes MB stands for 1 048 576 bytes and GB stands for 1 073 741 824 bytes When referring to hard disk drive capacity or communications volume MB stands for 1 000 000 bytes and GB stands for 1 000 000 000 bytes Total user accessible ca...

Page 51: ... the levels of particulates or gases in your environment have caused damage to the device Lenovo may condition provision of repair or replacement of devices or parts on implementation of appropriate remedial measures to mitigate such environmental contamination Implementation of such remedial measures is a customer responsibility Table 3 Limits for particulates and gases Contaminant Limits Particu...

Page 52: ...d cables and connectors must be used in order to meet FCC emission limits Lenovo is not responsible for any radio or television interference caused by using other than recommended cables and connectors or by unauthorized changes or modifications to this equipment Unauthorized changes or modifications could void the user s authority to operate the equipment This device complies with Part 15 of the ...

Page 53: ...Des Weiteren dürfen auch nur von der Lenovo empfohlene Kabel angeschlossen werden Lenovo übernimmt keine Verantwortung für die Einhaltung der Schutzanforderungen wenn das Produkt ohne Zustimmung der Lenovo verändert bzw wenn Erweiterungskomponenten von Fremdherstellern ohne Empfehlung der Lenovo gesteckt eingebaut werden Deutschland Einhaltung des Gesetzes über die elektromagnetische Verträglichke...

Page 54: ...nmerkung Um die Einhaltung des EMVG sicherzustellen sind die Geräte wie in den Handbüchern angegeben zu installieren und zu betreiben Japan VCCI Class A statement This is a Class A product based on the standard of the Voluntary Control Council for Interference VCCI If this equipment is used in a domestic environment radio interference may occur in which case the user may be required to take correc...

Page 55: ...Russia Electromagnetic Interference EMI Class A statement People s Republic of China Class A electronic emission statement Taiwan Class A compliance statement Appendix B Notices 43 ...

Page 56: ...44 BladeCenter Virtual Fabric 10Gb Switch Module Installation Guide ...

Page 57: ...4 E electronic emission Class A notice 40 enabling management over external ports 11 enabling the external ports 11 error critical 31 noncritical 31 error log management module 26 power on self test POST 26 Ethernet expansion card 1 LEDs 26 27 network requirements 11 12 ports 25 27 Ethernet switch module activity TX RX LED 25 26 27 components 5 error LED 27 features specifications and standards 3 ...

Page 58: ... 27 M major components 5 management module event log 26 media access control MAC address label 2 5 N network requirements 1 7 11 New Zealand Class A statement 40 noncritical errors 31 notes 4 notes important 38 notices 37 electronic emission 40 FCC Class A 40 notices and statements 4 O OK LED 25 26 27 online product registration 2 options 8 BladeCenter Web site 1 8 configuring 3 installing 8 15 P ...

Page 59: ...6 27 ports 25 system status LEDs 25 26 27 external ports enabling 11 features specifications and standards 3 high speed 7 I O module bay locations 7 installation guidelines 8 installing 7 10 interconnections with blade server and expansion card 1 network requirements 1 11 operating speeds for internal and external ports 8 parts listing 29 product registration 2 removing or replacing 12 status 27 E...

Page 60: ...48 BladeCenter Virtual Fabric 10Gb Switch Module Installation Guide ...

Page 61: ......

Page 62: ...Part Number 00WA357 Printed in USA 1P P N 00WA357 ...

Reviews: