Lenovo 82K8002YGE-FL Hardware Maintenance Manual Download Page 31

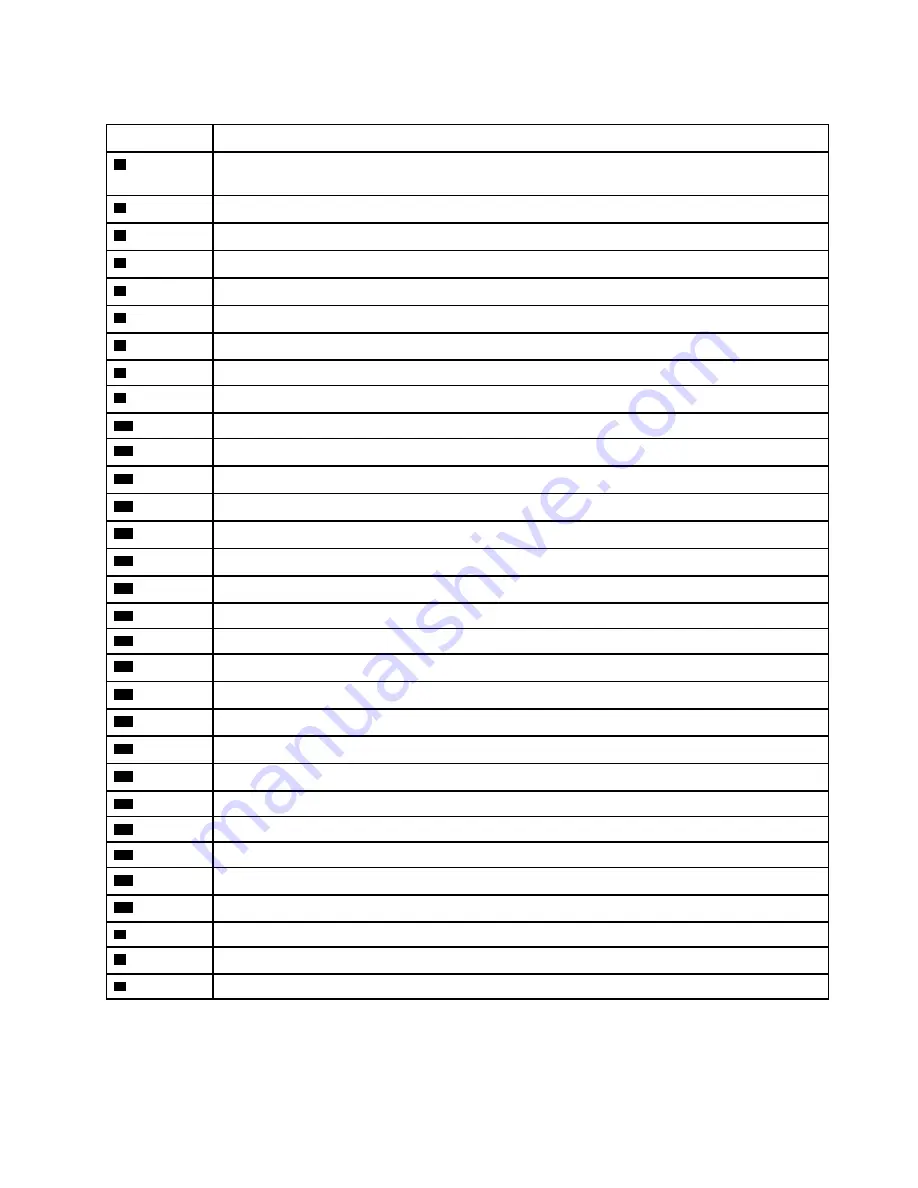
Table 3.  FRU (CRU) categories

No.

FRU (CRU) category

1

LCD module 

Note:

The LCD module as a whole is not an FRU, it contains FRUs as its components.

2

Strip cover (strip cover pet and strip cover L/M/R)

3

Upper case (with keyboard and touchpad)

4

Fingerprint board Cu Foil mylar

5

Fingerprint board 

6

Fingerprint board cable 

7

Thermal pad 

8

DC-in bracket 

9

System board 

10

Fans 

11

Solid-state drive (SSD) Cu Foil mylar

12

Solid-state drive (SSD)

13

Solid-state drive (SSD) holder

14

Solid-state drive (SSD) thermalpad

15

Speakers 

16

Battery pack

17

Lower case

18

Wi-Fi card

19

CMOS battery

20

Memory module shielding

21

Memory module 

22

Memory module mylar

23

Solid-state drive (SSD) mylar 

24

Heat sink 

25

USB board cable 

26

USB board

27

Solid-state drive (SSD) bracket

28

Touchpad cable

a

Power cord

b

ac power adapter

c

Screw kit

Chapter 3

.

Identifying FRUs (CRUs) 

25

Summary of Contents for 82K8002YGE-FL

Page 1: ...Hardware Maintenance Manual Lenovo Legion Slim 7 15 6 ...

Page 2: ...First Edition April 2021 Copyright Lenovo 2021 ...

Page 3: ...odule mylar 35 Remove the memory module 36 Remove the heat sink 37 Remove the fans 38 Remove the solid state drive SSD bracket 38 Remove the USB board module 39 Remove the CMOS battery 41 Remove the speakers 41 Remove the touchpad cable 42 Remove the system board 43 Use a Golden Key U1 tool to flash write key id information 44 Remove the fingerprint board cable 44 Remove the fingerprint board and ...

Page 4: ...ii Hardware Maintenance Manual ...

Page 5: ...Machine type MT Legion S7 15ACH6 82K8 Lenovo Legion S7 15ACH6 82K8 Important This manual is intended only for trained service technicians who are familiar with Lenovo products Before servicing a Lenovo product be sure to read all the information under Chapter 1 Safety information on page 1 Copyright Lenovo 2021 iii ...

Page 6: ...iv Hardware Maintenance Manual ...

Page 7: ...e clothing or fasten it with a non conductive clip about 8 centimeters 3 inches from the end Do not wear jewelry chains metal frame eyeglasses or metal fasteners for your clothing Attention Metal objects are good electrical conductors Wear safety glasses when you are hammering drilling soldering cutting wire attaching springs using solvents or working in any other conditions that might be hazardou...

Page 8: ...efully for possible hazards in your work area Examples of these hazards are moist floors non grounded power extension cables power surges and missing safety grounds Do not touch live electrical circuits with the reflective surface of a plastic dental mirror The surface is conductive such touching can cause personal injury and machine damage Do not service the following parts with the power on when...

Page 9: ...d sensitive to electrostatic discharge ESD ESD damage can occur when there is a difference in charge between objects Protect against ESD damage by equalizing the charge so that the machine the part the work mat and the person handling the part are all at the same charge Notes 1 Use product specific ESD procedures when they exceed the requirements noted here 2 Make sure that the ESD protective devi...

Page 10: ...g of the electrical outlet can be verified by a certified electrician Safety notices multilingual translations The safety notices in this section are provided in the following languages English Arabic Brazilian Portuguese French German Hebrew Japanese Korean Spanish Traditional Chinese DANGER DANGER DANGER 4 Hardware Maintenance Manual ...

Page 11: ...DANGER DANGER DANGER DANGER DANGER Chapter 1 Safety information 5 ...

Page 12: ...6 Hardware Maintenance Manual ...

Page 13: ...PERIGO PERIGO PERIGO Chapter 1 Safety information 7 ...

Page 14: ...PERIGO PERIGO PERIGO PERIGO PERIGO 8 Hardware Maintenance Manual ...

Page 15: ...DANGER DANGER DANGER DANGER Chapter 1 Safety information 9 ...

Page 16: ...DANGER DANGER DANGER DANGER VORSICHT 10 Hardware Maintenance Manual ...

Page 17: ...VORSICHT VORSICHT VORSICHT VORSICHT Chapter 1 Safety information 11 ...

Page 18: ...VORSICHT VORSICHT VORSICHT 12 Hardware Maintenance Manual ...

Page 19: ...Chapter 1 Safety information 13 ...

Page 20: ...14 Hardware Maintenance Manual ...

Page 21: ...Chapter 1 Safety information 15 ...

Page 22: ...16 Hardware Maintenance Manual ...

Page 23: ...Chapter 1 Safety information 17 ...

Page 24: ...18 Hardware Maintenance Manual ...

Page 25: ...Chapter 1 Safety information 19 ...

Page 26: ...20 Hardware Maintenance Manual ...

Page 27: ... When you return an FRU you must include the following information in the parts exchange form or parts return form that you attach to it 1 Name and phone number of service technician 2 Date of service 3 Date on which the machine failed 4 Date of purchase 5 Failure symptoms error codes appearing on the display and beep symptoms 6 Procedure index and page number in which the failing FRU was detected...

Page 28: ...laptop products The following symptoms might indicate damage caused by non warranted activities Missing parts might be a symptom of unauthorized service or modification Check for obvious damage to a hard disk drive If the spindle of a hard disk drive becomes noisy the hard disk drive might have been dropped or subject to excessive force CRU list Table 1 Model Legion S7 15ACH6 MT 82K8 CRU Type ac p...

Page 29: ...entifying FRUs CRUs Locate FRUs and CRUs The exploded illustrations help Lenovo service technicians identify FRUs or CRUs that they may need to replace when servicing a customer s computer Copyright Lenovo 2021 23 ...

Page 30: ...Figure 1 Legion S7 15ACH6 and Lenovo Legion S7 15ACH6 exploded view 24 Hardware Maintenance Manual ...

Page 31: ...l pad 8 DC in bracket 9 System board 10 Fans 11 Solid state drive SSD Cu Foil mylar 12 Solid state drive SSD 13 Solid state drive SSD holder 14 Solid state drive SSD thermalpad 15 Speakers 16 Battery pack 17 Lower case 18 Wi Fi card 19 CMOS battery 20 Memory module shielding 21 Memory module 22 Memory module mylar 23 Solid state drive SSD mylar 24 Heat sink 25 USB board cable 26 USB board 27 Solid...

Page 32: ...Figure 2 Legion S7 15ACH6 and Lenovo Legion S7 15ACH6 LCD module exploded view 26 Hardware Maintenance Manual ...

Page 33: ...LCD bezel 2 LCD panel 3 Camera 4 camera privacy shutter 5 Removable tape 6 Microphone rubbers 7 Microphone board 8 LCD cover 9 EDP cable 10 Camera cable 11 Hinge cover The FRU is not reusable Replace it when replacing related FRUs Chapter 3 Identifying FRUs CRUs 27 ...

Page 34: ...28 Hardware Maintenance Manual ...

Page 35: ...rical tape Double sided tape Conductive tape Eraser Heat gun Brown brush Notes T30 screw drivers are used to service the new Intel Xeon CPUs Hexagonal sockets are used to remove antenna connectors Silicone grease is applied to the CPU and heatsink surfaces to eliminate air gaps General guidelines When removing or replacing an FRU ensure that you observe the following general guidelines 1 Do not tr...

Page 36: ...r and unplug all power cords from electrical outlets Attention After replacing an FRU do not turn on the computer until you have ensured that all screws springs and other small parts are in place and none are loose inside the computer Verify this by shaking the computer gently and listening for rattling sounds Metallic parts or metal flakes can cause electrical short circuits Attention The system ...

Page 37: ...e sure the following FRU or CRU has been removed Remove the lower case on page 30 Step 1 Disconnect the battery pack cable from the system board Attention Use your fingernails to pull the connector to unplug it Do not pull the cable Figure 5 Disconnect the battery pack cable from the system board Step 2 Remove two screws and then remove the SSD module by pulling it away from the slot Chapter 4 Rem...

Page 38: ...p 3 Remove the SSD holder Figure 7 Remove the SSD holder Step 4 Peel off the SSD Cu foil mylar Figure 8 Peel off the SSD Cu foil mylar Go to https support lenovo com partslookup to look up the Lenovo part numbers of the following replacement parts SSD SSD holder Cu foil mylar 32 Hardware Maintenance Manual ...

Page 39: ...ws and remove the battery pack Screw specifications Number of screws M2 x L3 5 4 Go to https support lenovo com partslookup to look up the Lenovo part number of the following replacement part Battery pack Remove the Wi Fi card Make sure the following FRU or CRU has been removed Remove the lower case on page 30 Step 1 Disconnect the battery pack cable from the system board Attention Use your finger...

Page 40: ... SSD mylar Make sure the following FRU or CRU has been removed Remove the lower case on page 30 Step 1 Disconnect the battery pack cable from the system board Attention Use your fingernails to pull the connector to unplug it Do not pull the cable Step 2 Remove one SSD Note For details see Remove the solid state drive SSD module on page 31 Step 3 Peel off the SSD mylar Figure 11 Peel off the SSD my...

Page 41: ...d then remove the DC in bracket Figure 12 Remove one screw and then remove the DC in bracket Screw specifications Number of screws M2 x L3 5 1 Go to https support lenovo com partslookup to look up the Lenovo part number of the following replacement part DC in bracket Remove the memory module mylar Make sure the following FRU or CRU has been removed Remove the lower case on page 30 Step 1 Disconnec...

Page 42: ...emove the memory module Make sure the following FRUs or CRUs have been removed Remove the lower case on page 30 Remove the memory module mylar on page 35 Step 1 Remove the memory module shielding Figure 14 Remove the memory module shielding Step 2 Release the two latches on both edges of the socket at the same time Then remove the memory module 36 Hardware Maintenance Manual ...

Page 43: ...sink Make sure the following FRUs or CRUs have been removed Remove the lower case on page 30 Remove the memory module mylar on page 35 Step 1 Loosen six screws and then remove the heat sink Figure 16 Loosen six screws and then remove the heat sink Go to https support lenovo com partslookup to look up the Lenovo part number of the following replacement part Heat sink Chapter 4 Removing a FRU or CRU...

Page 44: ...ws M2 x L3 5 4 Go to https support lenovo com partslookup to look up the Lenovo part number of the following replacement part Fans Remove the solid state drive SSD bracket Make sure the following FRUs or CRUs have been removed Remove the lower case on page 30 Remove the memory module mylar on page 35 Remove the heat sink on page 37 Step 1 Remove the right fan and one SSD Note For details see Remov...

Page 45: ...wer case on page 30 Remove the solid state drive SSD module on page 31 Remove the battery pack on page 33 Remove the solid state drive SSD mylar on page 34 Remove the memory module mylar on page 35 Remove the heat sink on page 37 Remove the solid state drive SSD bracket on page 38 Step 1 Remove the right fan Note For details see Remove the fans on page 38 Step 2 Disconnect the cable connected to t...

Page 46: ... screw and then remove the USB board with cable Screw specifications Number of screws M2 x L3 5 1 Step 4 Separate the USB board cable from the USB board Figure 21 Separate the USB board cable from the USB board Go to https support lenovo com partslookup to look up the Lenovo part numbers of the following replacement parts USB board USB board cable 40 Hardware Maintenance Manual ...

Page 47: ...Remove the CMOS battery Go to https support lenovo com partslookup to look up the Lenovo part numbers of the following replacement parts CMOS battery Mylar Remove the speakers Make sure the following FRUs or CRUs have been removed Remove the lower case on page 30 Remove the solid state drive SSD module on page 31 Remove the battery pack on page 33 Remove the solid state drive SSD mylar on page 34 ...

Page 48: ...e touchpad cable Make sure the following FRUs or CRUs have been removed Remove the lower case on page 30 Remove the battery pack on page 33 Step 1 Detach the touchpad cable connectors and then remove the touchpad cable Figure 24 Remove the touchpad cable Go to https support lenovo com partslookup to look up the Lenovo part number of the following replacement part Touchpad cable 42 Hardware Mainten...

Page 49: ...3 Remove the solid state drive SSD mylar on page 34 Remove the DC in bracket on page 35 Remove the memory module mylar on page 35 Remove the memory module on page 36 Remove the heat sink on page 37 Remove the fans on page 38 Step 1 Disconnect cables connected to the system board Figure 25 Disconnect cables connected to the system board Step 2 Remove two screws and then remove the system board Chap...

Page 50: ...rmatted USB thumb drive Go to http support lenovo com us en solutions HT506954 for detailed instructions on how to create and use a Goldern Key U1 tool Remove the fingerprint board cable Make sure the following FRUs or CRUs have been removed Remove the lower case on page 30 Remove the solid state drive SSD module on page 31 Remove the battery pack on page 33 Remove the Wi Fi card on page 33 Remove...

Page 51: ... 31 Remove the battery pack on page 33 Remove the Wi Fi card on page 33 Remove the solid state drive SSD mylar on page 34 Remove the DC in bracket on page 35 Remove the memory module mylar on page 35 Remove the memory module on page 36 Remove the heat sink on page 37 Remove the fans on page 38 Remove the system board on page 43 Step 1 Peel off the Cu Foil mylar Figure 28 Peel off the Cu Foil mylar...

Page 52: ... been removed Remove the lower case on page 30 Remove the solid state drive SSD module on page 31 Remove the battery pack on page 33 Remove the Wi Fi card on page 33 Remove the solid state drive SSD mylar on page 34 Remove the DC in bracket on page 35 Remove the memory module mylar on page 35 Remove the memory module on page 36 Remove the heat sink on page 37 Remove the fans on page 38 Remove the ...

Page 53: ...rt Strip cover Remove the LCD module Make sure the following FRUs CRUs have been removed Remove the lower case on page 30 Remove the solid state drive SSD module on page 31 Remove the battery pack on page 33 Remove the Wi Fi card on page 33 Remove the solid state drive SSD mylar on page 34 Remove the DC in bracket on page 35 Remove the memory module mylar on page 35 Remove the memory module on pag...

Page 54: ...re 32 Remove two screws Screw specifications Number of screws M2 5 x L5 2 Step 2 Remove two screws and then lift the LCD module Figure 33 Remove six screws and then lift the LCD module Screw specifications Number of screws M2 5 x L2 3 2 Step 3 Take out the EDP cable and then remove the LCD module 48 Hardware Maintenance Manual ...

Page 55: ...y module on page 36 Remove the heat sink on page 37 Remove the fans on page 38 Remove the solid state drive SSD bracket on page 38 Remove the USB board module on page 39 Remove the CMOS battery on page 41 Remove the speakers on page 41 Remove the touchpad cable on page 42 Remove the system board on page 43 Remove the fingerprint board cable on page 44 Remove the fingerprint board and Cu Foil mylar...

Page 56: ...ge 47 Step 1 Remove the LCD bezel Note The LCD bezel is not reusable Replace it when replacing related FRUs Figure 35 Remove the LCD bezel Go to https support lenovo com partslookup to look up the Lenovo part number of the following replacement part LCD bezel Remove the hinge cover Make sure the following FRUs CRUs have been removed Remove the LCD module on page 47 Remove the LCD bezel on page 50 ...

Page 57: ...D module on page 47 Remove the hinge cover on page 50 Remove the LCD bezel on page 50 Step 1 Remove two screws and then remove the hinge caps Figure 37 Remove two screws and remove the hinge caps Screw specifications Number of screws M2 5 x L2 3 2 Step 2 Remove the three pieces of removable tape with tweezers Figure 38 Remove the three pieces of removable tape with tweezers Chapter 4 Removing a FR...

Page 58: ...ions to input the display serial number and click Submit You can find the display serial number and instructions on a sticker fixed to the front of the new LCD part When the new color profiles are installed successfully a prompted window will be displayed Go to https support lenovo com partslookup to look up the Lenovo part numbers of the following replacement parts LCD panel Removable tape Remove...

Page 59: ... sure the following FRUs CRUs have been removed Remove the LCD module on page 47 Remove the hinge cover on page 50 Remove the LCD bezel on page 50 Remove the LCD panel on page 51 Remove the camera privacy shutter on page 52 Step 1 Disconnect the camera cable from the microphone board and the camera board Remove the camera cable Figure 41 Remove the camera cable Step 2 Remove the camera Chapter 4 R...

Page 60: ...e 47 Remove the hinge cover on page 50 Remove the LCD bezel on page 50 Remove the LCD panel on page 51 Step 1 Remove the microphone rubbers Figure 43 Remove the microphone rubbers Go to https support lenovo com partslookup to look up the Lenovo part numbers of the following replacement parts Removable tape Microphone rubbers Remove the microphone board and the EDP cable Make sure the following FRU...

Page 61: ...he EDP cable Step 2 Separate the EDP cable from the microphone board Figure 45 Separate the EDP cable from the microphone board Go to https support lenovo com partslookup to look up the Lenovo part numbers of the following replacement parts EDP cable Removable tape Microphone board Remove the LCD cover Make sure the following FRUs CRUs have been removed Remove the LCD module on page 47 Remove the ...

Page 62: ...odule on page 53 Remove the microphone rubbers on page 54 Remove the microphone board and the EDP cable on page 54 Go to https support lenovo com partslookup to look up the Lenovo part number of the following replacement part LCD cover 56 Hardware Maintenance Manual ...

Page 63: ... All base cover labels Label Label name Applied country region Label dimensions a OS label All 16 mm x 22 5 mm b Adapter label 170W Argentina 65 mm x 20 mm c Adapter label 230W 65 mm x 20 mm d Country label US CA TW CA_Group 32 mm x 10 mm e Argentina 68 mm x 6 mm f South Africa 20 mm x 10 mm g Israel 32 mm x 10 mm h Brazil 16 5 mm x 15 mm I Malaysia 8 mm x 8 mm j TW vision warning label 70 mm x 10...

Page 64: ...58 Hardware Maintenance Manual ...

Page 65: ...Trademarks LENOVO and the LENOVO logo are trademarks of Lenovo All other trademarks are the property of their respective owners 2021 Lenovo ...

Page 66: ......

Page 67: ......

Page 68: ......

Reviews: