background image

•  Plastic parts, latches, pins, or connectors that have been cracked or broken by excessive force
•  Damage caused by liquid spilled into the system
•  Damage caused by the improper insertion of a PC Card or the installation of an incompatible card
•  Diskette drive damage caused by pressure on the diskette drive cover, foreign material in the drive, or the 

insertion of a diskette with multiple labels

•  Damaged or bent diskette eject button
•  Fuses blown by attachment of a nonsupported device
•  Forgotten computer password (making the computer unusable)
•  Sticky keys caused by spilling a liquid onto the keyboard
•  Use of an incorrect ac power adapter on laptop products

The following symptoms might indicate damage caused by nonwarranted activities:

•  Missing parts might be a symptom of unauthorized service or modification.
•  Check for obvious damage to a hard disk drive. If the spindle of a hard disk drive becomes noisy, the hard 

disk drive might have been dropped or subject to excessive force.

Power system checkout

If you suspect a power problem, see the appropriate one of the following power supply checkouts:
•  “Checking the ac power adapter” on page 22
•  “Checking the built-in battery and operational charging” on page 22

Checking the ac power adapter

You are here because the computer fails only when the ac power adapter is used.
•  If the system status indicator is not on when an ac power source is connected, check the power cord of 

the ac power adapter for correct continuity and installation.

•  If the computer does not charge during operation, go to “Checking the built-in battery and operational 

charging” on page 22.

To check the ac power adapter, measure the output voltage across the plug of the ac power adapter cable to 
see if the voltage is correct.

Notes: 

•  Noise from the ac power adapter does not always indicate a defect.
•  Ensure that you use the ac power adapter that is shipped with the computer to provide enough power to 

the computer. Otherwise, a message might be displayed, prompting you that the computer will not be 
charged or will be charged slowly.

Checking the built-in battery and operational charging

This computer supports only batteries specially designed for this specific system and manufactured by 
Lenovo or an authorized builder. The system does not support unauthorized batteries or batteries designed 
for other systems. If an unauthorized battery or a battery designed for another systems is installed, the 
system will not charge.

Attention:

Lenovo has no responsibility for the performance or safety of unauthorized batteries, and 

provides no warranties for failures or damage arising out of their use.

To check whether the battery charges properly during operation, do the following: 

1.  Discharge the battery until the remained battery power is less than 50%.

2.  Connect the computer to ac power to charge the battery. If the battery status icon indicates that the 

battery is not charging, remove the battery and let it return to room temperature.

3.  Reinstall the battery. If the battery is still not charging, replace the battery.

22

Lenovo 10e Chromebook Tablet Hardware Maintenance Manual

Summary of Contents for 10e Chromebook

Page 1: ...Lenovo 10e Chromebook Tablet Hardware Maintenance Manual ...

Page 2: ...nder Appendix B Notices on page 51 First Edition February 2020 Copyright Lenovo 2020 LIMITED AND RESTRICTED RIGHTS NOTICE If data or software is delivered pursuant a General Services Administration GSA contract use reproduction or disclosure is subject to restrictions set forth in Contract No GS 35F 05925 ...

Page 3: ...ir shim 25 Create a USB repair shim 25 Use the USB repair shim 26 Chapter 4 Identifying FRUs CRUs 29 Locating FRUs and CRUs 29 Major FRUs and CRUs 30 Miscellaneous parts 31 Looking up FRU information 31 Chapter 5 Removing or replacing a FRU 33 General guidelines 33 Disabling the built in battery 34 1010 LCD unit and LCD cable 34 1020 Front camera with cable 36 1030 Microphone board 37 1040 Microph...

Page 4: ...ii Lenovo 10e Chromebook Tablet Hardware Maintenance Manual ...

Page 5: ...r trained service technicians who are familiar with Lenovo products Use this manual along with the advanced diagnostic tests to troubleshoot problems effectively Depending on the model some hardware configuration and software programs might not be available on the Chromebook Some statements in this manual might not be applicable to the Chromebook Before servicing a Lenovo product be sure to read a...

Page 6: ...iv Lenovo 10e Chromebook Tablet Hardware Maintenance Manual ...

Page 7: ...ans and the customer s personnel are not in a hazardous position Place removed covers and other parts in a safe place away from all personnel while you are servicing the machine Keep your toolcase away from walk areas so that other people will not trip over it Do not wear loose clothing that can be trapped in the moving parts of a machine Ensure that your sleeves are fastened or rolled up above yo...

Page 8: ...al shock can occur only when there is a complete circuit By observing the above rule you may prevent a current from passing through your body When using testers set the controls correctly and use the approved probe leads and accessories for that tester Stand on suitable rubber mats obtained locally if necessary to insulate you from grounds such as metal floor strips and machine frames Observe the ...

Page 9: ...mputer Disconnect the power cord 3 Check the power cord for a A third wire ground connector in good condition Use a meter to measure third wire ground continuity for 0 1 ohm or less between the external ground pin and the frame ground b The power cord should be the authorized type specified for your computer Go to https support lenovo com partslookup c Insulation must not be frayed or worn 4 Check...

Page 10: ...nt Note The use of a grounding system to guard against ESD damage is desirable but not necessary Attach the ESD ground clip to any frame ground ground braid or green wire ground When working on a double insulated or battery operated system use an ESD common ground or reference point You can use coax or connector outside shells on these systems Use the round ground prong of the ac plug on ac operat...

Page 11: ...DANGER DANGER DANGER DANGER DANGER DANGER Chapter 1 Safety information 5 ...

Page 12: ...DANGER 6 Lenovo 10e Chromebook Tablet Hardware Maintenance Manual ...

Page 13: ...PERIGO Chapter 1 Safety information 7 ...

Page 14: ...PERIGO PERIGO PERIGO PERIGO 8 Lenovo 10e Chromebook Tablet Hardware Maintenance Manual ...

Page 15: ...PERIGO PERIGO PERIGO DANGER DANGER Chapter 1 Safety information 9 ...

Page 16: ...DANGER DANGER DANGER DANGER DANGER 10 Lenovo 10e Chromebook Tablet Hardware Maintenance Manual ...

Page 17: ...DANGER VORSICHT VORSICHT VORSICHT VORSICHT Chapter 1 Safety information 11 ...

Page 18: ...VORSICHT VORSICHT VORSICHT VORSICHT 12 Lenovo 10e Chromebook Tablet Hardware Maintenance Manual ...

Page 19: ...Chapter 1 Safety information 13 ...

Page 20: ...14 Lenovo 10e Chromebook Tablet Hardware Maintenance Manual ...

Page 21: ...Chapter 1 Safety information 15 ...

Page 22: ...16 Lenovo 10e Chromebook Tablet Hardware Maintenance Manual ...

Page 23: ...Chapter 1 Safety information 17 ...

Page 24: ...18 Lenovo 10e Chromebook Tablet Hardware Maintenance Manual ...

Page 25: ...Chapter 1 Safety information 19 ...

Page 26: ...20 Lenovo 10e Chromebook Tablet Hardware Maintenance Manual ...

Page 27: ...or log and run the test again If the error does not recur do not replace the FRU Be careful not to replace a nondefective FRU What to do first When you return a FRU you must include the following information in the parts exchange form or parts return form that you attach to it 1 Name and phone number of service technician 2 Date of service 3 Date on which the machine failed 4 Date of purchase 5 Fa...

Page 28: ...correct continuity and installation If the computer does not charge during operation go to Checking the built in battery and operational charging on page 22 To check the ac power adapter measure the output voltage across the plug of the ac power adapter cable to see if the voltage is correct Notes Noise from the ac power adapter does not always indicate a defect Ensure that you use the ac power ad...

Page 29: ...4 Check the battery status icon again If the same error still exists replace the system board Chapter 2 General checkout 23 ...

Page 30: ...24 Lenovo 10e Chromebook Tablet Hardware Maintenance Manual ...

Page 31: ...he overall test marked as failed RunIn and FAT The RunIn and FAT are designed to test how the system functions under stress by running the maximum workload It takes about 10 minutes to finish Google Required Tests GRT The GRT is designed to check the system status and help reset the system back to factory settings If any test fails the finalized step of the GRT has to be forced to end in order to ...

Page 32: ...pe root to log in and then type enable_dev_usb_ boot to enable USB booting Note If the Chromebook is connected to a Keyboard Folio press Ctrl Alt to open the Developer Console Step 7 Type reboot to restart the Chromebook Step 8 Connect the prepared USB repair shim to the Chromebook After the OS verification screen is displayed press Ctrl U The Chromebook will install the image automatically Step 9...

Page 33: ...are for the lifetime of the Chromebook Reset the Chromebook to factory settings HWID mismatch can be caused by using unauthorized or missing parts If the write protect function is not turned off before recovering the Chromebook with the USB repair shim it can also cause HWID mismatch Write protect malfunction The Chromebook system cannot be finalized until the write protect function is turned on N...

Page 34: ...28 Lenovo 10e Chromebook Tablet Hardware Maintenance Manual ...

Page 35: ...rsion of this manual can be found at https support lenovo com Click Documentation and then follow the on screen instructions to find the manual for your product You might be required to return the defective CRU When return is required 1 return instructions a prepaid shipping label and a container will be included with the replacement CRU and 2 you might be charged for the replacement CRU if Lenovo...

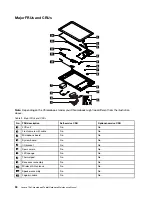
Page 36: ...lf service CRU Optional service CRU 1 LCD unit No No 2 Front camera with cable No No 3 Microphone board No No 4 System board No No 5 I O bracket No No 6 Rear camera No No 7 LED sponge No No 8 Thermal pad No No 9 Base cover assembly No No 10 Wireless LAN antenna No No 11 Speaker assembly No No 12 Pogo pin cable No No 30 Lenovo 10e Chromebook Tablet Hardware Maintenance Manual ...

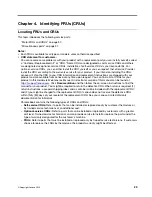
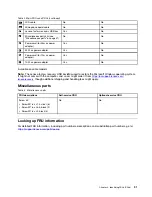
Page 37: ...is used to restore the Microsoft Windows operating system It might not come with the computer and a user might order it from https pcsupport lenovo com lenovorecovery though additional shipping and handling fees might apply Miscellaneous parts Table 3 Miscellaneous parts FRU descriptions Self service CRU Optional service CRU Screw kit Screw M1 6 x L1 5 silver 6 Screw M1 6 x L3 5 black 2 Screw M1 6...

Page 38: ...32 Lenovo 10e Chromebook Tablet Hardware Maintenance Manual ...

Page 39: ...etails General guidelines When removing or replacing a FRU ensure that you observe the following general guidelines 1 Do not try to service any computer unless you have been trained and certified An untrained person runs the risk of damaging parts 2 Begin by removing any FRUs that have to be removed before replacing the failing FRU Any such FRUs are listed at the beginning of each FRU replacement ...

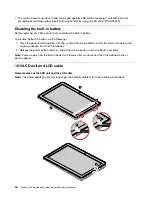
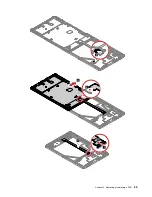
Page 40: ...button together with the end of the volume button and at the same time detach the ac power adapter from the Chromebook 2 Release the power button and the end of the volume button and wait about 10 seconds Note Power supply from the built in battery will resume after you reconnect the Chromebook to the ac power adapter 1010 LCD unit and LCD cable Removal steps of the LCD unit and the LCD cable Note...

Page 41: ...Chapter 5 Removing or replacing a FRU 35 ...

Page 42: ...ly and adhere them to the new one Lenovo 10e Chromebook Tablet Contains QCNFA324 Module FCC ID POD QCNFA324 IC 4104A QCNFA324 Manufactured for Lenovo Made in China CAN ICES 3 B NMB 3 B Model Name 82AM PN SL10Y56131 Factory ID HFBITLAND SN P20XXXXX MO YDN0BXXXXXXX MTM XXXXXXXXXX MFG DATE 19 03 27 INPUT 5V 2A eSupport 1 Country label 2 SN label 3 Geo label 4 QR code label 1020 Front camera with cabl...

Page 43: ...steps of the microphone board Step Screw quantity Color 4 M1 6 1 5 mm flat head nylon coated 2 Silver When installing Ensure that the connector is attached firmly 1040 Microphone board cable For access remove this FRU 1010 LCD unit and LCD cable on page 34 Chapter 5 Removing or replacing a FRU 37 ...

Page 44: ...rder 1010 LCD unit and LCD cable on page 34 1020 Front camera with cable on page 36 1040 Microphone board cable on page 37 Removal steps of the wireless LAN antenna Unplug the connectors by using the antenna RF connector removal tool or pick the connectors with your fingers and gently unplug them as shown 38 Lenovo 10e Chromebook Tablet Hardware Maintenance Manual ...

Page 45: ...or on the card 1060 Speaker assembly For access remove these FRUs in order 1010 LCD unit and LCD cable on page 34 1020 Front camera with cable on page 36 1040 Microphone board cable on page 37 1050 Wireless LAN antenna on page 38 Removal steps of the speaker assembly Chapter 5 Removing or replacing a FRU 39 ...

Page 46: ...ly 1070 Thermal pad For access remove this FRU 1010 LCD unit and LCD cable on page 34 Removal step of the thermal pad 1080 LED sponge For access remove this FRU 1010 LCD unit and LCD cable on page 34 40 Lenovo 10e Chromebook Tablet Hardware Maintenance Manual ...

Page 47: ...0 LED sponge on page 40 Removal steps of the I O bracket Step Screw quantity Color 1 M1 6 2 mm flat head nylon coated 3 Silver 1100 System board For access remove these FRUs in order 1010 LCD unit and LCD cable on page 34 1070 Thermal pad on page 40 1090 I O bracket on page 41 Chapter 5 Removing or replacing a FRU 41 ...

Page 48: ...of the system board Step Screw quantity Color 12 M1 6 1 5 mm flat head nylon coated 4 Silver When installing Ensure that the connectors are attached firmly 42 Lenovo 10e Chromebook Tablet Hardware Maintenance Manual ...

Page 49: ...ntity Color 3 M1 6 3 5 mm flat head nylon coated 2 Black When installing Ensure that the connectors are attached firmly 1120 Rear camera For access remove this FRU 1010 LCD unit and LCD cable on page 34 Removal steps of the rear camera When installing Ensure that the connector is attached firmly Chapter 5 Removing or replacing a FRU 43 ...

Page 50: ...44 Lenovo 10e Chromebook Tablet Hardware Maintenance Manual ...

Page 51: ...rs and indicators No Control connector or indicator 1 Speakers 2 Microphones 3 Front camera 4 Power button 5 Volume button 6 Audio connector 7 Power status indicator 8 Power connector USB C connector 9 Pogo interface connector 10 Multi touch screen Copyright Lenovo 2020 45 ...

Page 52: ...g on the model the Chromebook might come with a Lenovo 10e Chromebook Tablet Keyboard Folio referred to as keyboard folio Attach the keyboard folio to the Chromebook so that you can transform your Chromebook into a portable notebook computer 46 Lenovo 10e Chromebook Tablet Hardware Maintenance Manual ...

Page 53: ...easily and effectively Go to the previous page Go to the next page Refresh your current page Make the current window full screen Open the task view to see all your open windows Darken the display Brighten the display Mute the speakers Decrease the speaker volume Increase the speaker volume Lock the screen Appendix A Controls connectors and indicators 47 ...

Page 54: ...ake a screenshot Alt Switch the letter case between the upper case and lower case L Lock the screen Ctrl Alt View all keyboard shortcuts Use the keyboard folio Install the Chromebook in the keyboard folio 48 Lenovo 10e Chromebook Tablet Hardware Maintenance Manual ...

Page 55: ...Remove the Chromebook from the keyboard folio Appendix A Controls connectors and indicators 49 ...

Page 56: ...50 Lenovo 10e Chromebook Tablet Hardware Maintenance Manual ...

Page 57: ...ublication Lenovo may make improvements and or changes in the product s and or the program s described in this publication at any time without notice The products described in this document are not intended for use in implantation or other life support applications where malfunction may result in injury or death to persons The information contained in this document does not affect or change Lenovo...

Page 58: ...a Landererova 12 811 09 Bratislava Slovakia Trademarks LENOVO and the LENOVO logo are trademarks of Lenovo The terms HDMI is the trademark of HDMI Licensing LLC in the United States and other countries USB C is a trademark of USB Implementers Forum All other trademarks are the property of their respective owners 2020 Lenovo 52 Lenovo 10e Chromebook Tablet Hardware Maintenance Manual ...

Page 59: ......

Page 60: ...Part Number SP40G76889 Printed in China 1P P N SP40G76889 ...

Page 61: ... 1PSP40G76889 ...

Reviews: