


What to do next:
• To work with another piece of hardware, go to the appropriate section.
• To complete the installation or replacement, go to “Completing the parts replacement” on page 109.
Replacing the microprocessor
Attention:
Do not open your computer or attempt any repair before reading and understanding the “Important safety information”
on page v.
This section provides instructions on how to replace the microprocessor.
CAUTION:
The heat sink and microprocessor might be very hot. Before you open the computer cover, turn off
the computer and wait several minutes until the computer is cool.
To replace the microprocessor, do the following:
1. Remove all media from the drives and turn off all attached devices and the computer. Then, disconnect
all power cords from electrical outlets and disconnect all cables that are connected to the computer.
2. Remove the computer cover. See “Removing the computer cover” on page 42.
3. Remove the front bezel. See “Removing and reinstalling the front bezel” on page 42.
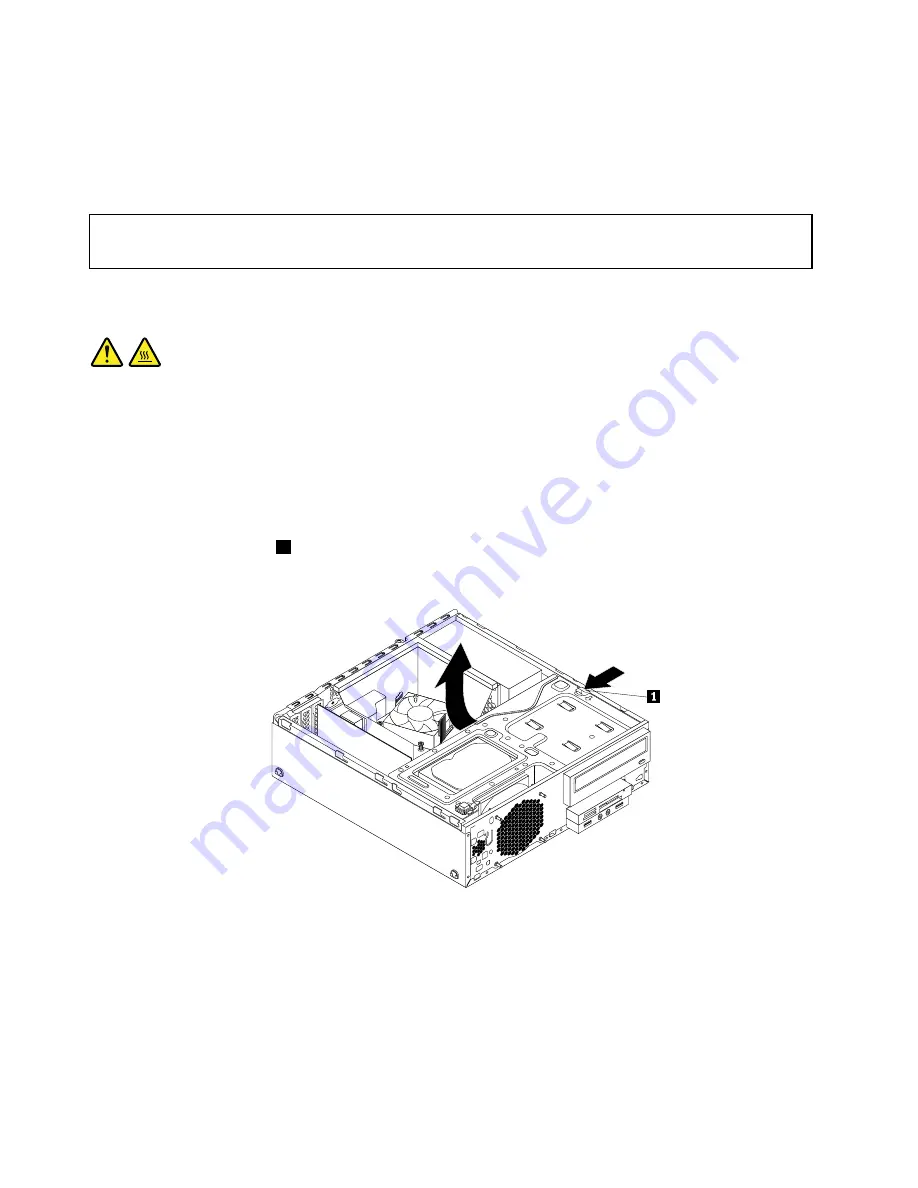
4. Press the retaining clip
1
in the direction as shown and pivot the drive bay assembly upward at the
same time.
Figure 64. Pivoting the drive bay assembly upward
5. Remove the heat sink and fan assembly. See “Replacing the heat sink and fan assembly” on page 71.
Note:
Do not let the thermal grease on the bottom of the heat sink and fan assembly get in contact
with anything.
6. Record the cable routing and connections. Then, locate the system board and disconnect all cables
connected to the system board. See “Locating parts on the system board” on page 13.
74
ThinkCentre M83, M93/p User Guide
Summary of Contents for 10A2
Page 1: ...ThinkCentre M83 M93 p User Guide Machine Types 10A2 10A3 10A8 10A9 10AH 10AJ 10AM and 10AN ...
Page 6: ...iv ThinkCentre M83 M93 p User Guide ...
Page 12: ...x ThinkCentre M83 M93 p User Guide ...
Page 30: ...18 ThinkCentre M83 M93 p User Guide ...
Page 40: ...28 ThinkCentre M83 M93 p User Guide ...
Page 48: ...3 4 5 6 7 8 Figure 9 Installing a padlock 36 ThinkCentre M83 M93 p User Guide ...
Page 124: ...112 ThinkCentre M83 M93 p User Guide ...
Page 166: ...154 ThinkCentre M83 M93 p User Guide ...
Page 172: ...160 ThinkCentre M83 M93 p User Guide ...
Page 176: ...164 ThinkCentre M83 M93 p User Guide ...
Page 180: ...168 ThinkCentre M83 M93 p User Guide ...
Page 184: ...172 ThinkCentre M83 M93 p User Guide ...
Page 185: ......
Page 186: ......


