background image

Page 9

Installation − Setting Equipment

WARNING

Do not install the furnace on its front or its back. Do
not connect the return air ducts to the back of the fur-
nace. Doing so will adversely affect the operation of
the safety control devices, which could result in per-
sonal injury or death.

Select a location that allows for the required clearances
that are listed on the unit nameplate. Also consider gas
supply connections, electrical supply, vent connection,
condensate trap and drain connections, and installation
and service clearances [24 inches (610 mm) at unit
front]. 

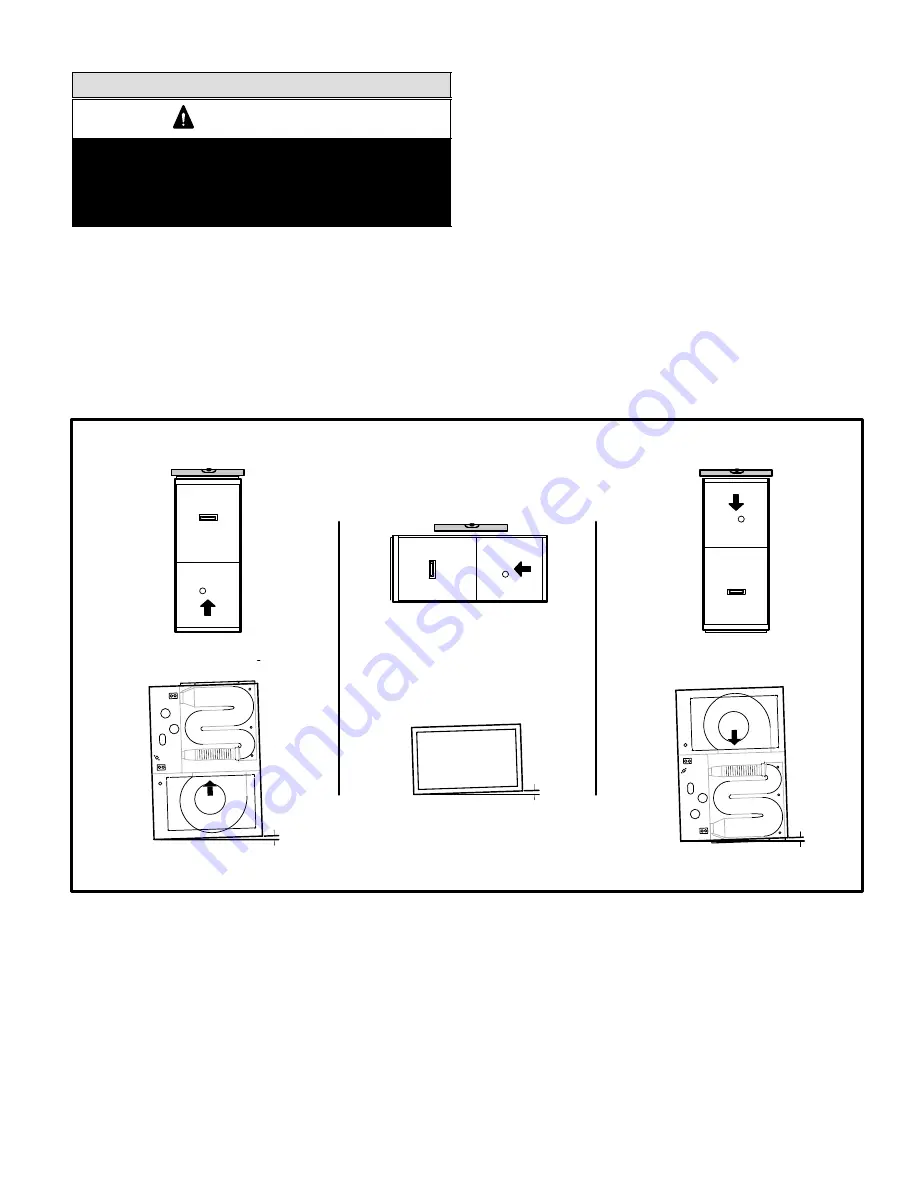
The unit must be level from front to back and side

to side.  The unit may be tilted slightly (maximum 1/2 in.)
from back to front to aid in the draining of the heat ex-
changer. See figure 7.

NOTE

 − 1/3 hp blower motors are equipped with four flex-

ible mounting legs, and 1/2 hp blower motors are equipped
with three flexible legs and one rigid leg. The rigid leg is
equipped with a shipping bolt and a flat white plastic wash-
er (rather than the rubber mounting grommet used with a
flexible mounting leg). 

The bolt and washer must be re-

moved before the furnace is placed into operation.

 Af-

ter the bolt and washer have been removed, the rigid leg
will not touch the blower housing.

NOTE

 − The G51MP−60D−135 units are equipped with a

shipping pad under the blower housing. Remove the ship-
ping pad prior to opertion.

Allow for clearances to combustible materials as indicated
on the unit nameplate. Minimum clearances for closet or al-
cove installations are shown in figures 8, 13 and 17.

FIGURE 7

SETTING EQUIPMENT

UPFLOW APPLICATION

DOWNFLOW APPLICATION

HORIZONTAL APPLICATION

FRONT VIEW

SIDE VIEW

FRONT VIEW

END VIEW

FRONT VIEW

SIDE VIEW

AIR FLOW

AIR FLOW

AIR FLOW

UNIT

FRONT

AIR FLOW

AIR FLOW

UNIT

FRONT

UNIT

FRONT

1/2"

max.

1/2"

max.

1/2"

max.

UNIT MUST BE LEVEL SIDE−TO−SIDE IN ALL APPLICATIONS.

UNIT SHOULD BE LEVEL FROM LEFT TO RIGHT BUT MAY BE

TILTED SLIGHTLY (MAX. 1/2") FROM BACK TO FRONT

TO AID IN THE DRAINING OF THE HEAT EXCHANGER.

Summary of Contents for G51MP

Page 1: ...n 41 Other Unit Adjustments 43 Service 46 Planned Service 48 Repair Parts List 48 Troubleshooting 49 Ignition Control Board Diagnostic Codes 52 Vent Pipe Sizing Worksheet 53 Start Up Performance Check...

Page 2: ...he optional RAB Return Air Base NOTE 60C and 60D size units installed in upflow applica tions that require air volumes over 1800 cfm 850 L s must have one of the following 1 Single side return air wit...

Page 3: ...lokPlusTM HEAT EXCHANGER ASSEMBLY CONDENSER COIL CONTROL BOX DOOR INTERLOCK SWITCH COLD HEADER COLLECTOR BOX COMBUSTION AIR INDUCER BLOWER ACCESS DOOR BURNER ACCESS PANEL FLUE COLLAR COMBUSTION AIR PR...

Page 4: ...deck in the heating compartment G51MP 60D 135 units are shipped with a 3 to 2 PVC re ducing elbow Canadian Installations Only Replace the provided 2 street elbow shipped with the G51MP 48C 110 and G5...

Page 5: ...rrangement a damper or other means to control the flow of air must adequately prevent chilled air from entering the furnace If the damper is manually oper ated it must be equipped to prevent operation...

Page 6: ...berglass wool is known to the State of Cal ifornia to cause cancer Fiberglass wool may also cause respiratory skin and eye irritation To reduce exposure to this substance or for further information co...

Page 7: ...a door Though an area may appear to be un confined it might be necessary to bring in outdoor air for combustion if the structure does not provide enough air by infiltration If the furnace is located i...

Page 8: ...ng of all equipment in the enclosure See figures 4 and 5 When communicat ing with the outdoors through horizontal ducts each open ing shall have a minimum free area of 1 square inch 645 mm2 per 2 000...

Page 9: ...one rigid leg The rigid leg is equipped with a shipping bolt and a flat white plastic wash er rather than the rubber mounting grommet used with a flexible mounting leg The bolt and washer must be re m...

Page 10: ...her combustible materials other than wood flooring FIGURE 8 Return Air Upflow Units Return air can be brought in through the bottom or either side of the furnace installed in an upflow application If...

Page 11: ...th RAB Return Air Base 1 Both the unit return air opening and the base return air opening must be covered by a single plenum or IAQ cabinet Minimum unit side return air opening dimensions for units re...

Page 12: ...k 0 Sides 0 Vent 0 Floor NC Front clearance in alcove installation must be 24 in 610 mm Maintain a minimum of 24 in 610 mm for front service access Allow proper clearances to accommodate condensate tr...

Page 13: ...rnace over the plenum 6 Ensure that the seal between the furnace and plenum is adequate G51MP UNIT SUPPLY AIR PLENUM ADDITIVE BASE PROPERLY SIZED FLOOR OPENING FIGURE 14 Installation on Cooling Cabine...

Page 14: ...front of unit 3 If unit is installed above finished space fabricate a drain pan fitted with a 1 2 inch or 3 4 inch N P T fitting 4 Using 3 8 inch rods and support frame kit ordered separately fabricat...

Page 15: ...n figure 18 or install the furnace on a field fabri cated raised platform as shown in figure 19 The unit must be supported at both ends and beneath the blower deck to prevent sagging Unit Heater Disch...

Page 16: ...ed on a platform make an airtight seal between the bottom of the furnace and the platform to ensure that the unit operates properly and safely Use fiberglass sealing strips caulking or equivalent seal...

Page 17: ...r Dia X Length Outdoor Ex haust Accel erator Dia X Length 1 1 2 Concentric Kit 2 Con centric Kit 3 Con centric Kit 2 Wall Plate Kit 3 Wall Plate Kit 2 Wall Ring Kit 1 1 2 X 12 2 X 12 71M80 or 44W92 69...

Page 18: ...cations which permit the use of several differ ent sizes of vent pipe a combination vent pipe may be used Contact Lennox Application Department for assis tance in sizing vent pipe in these application...

Page 19: ...ION Fumes from PVC glue may ignite during system check Allow fumes to dissipate for at least 5 minutes before placing unit into operation 1 Measure and cut vent pipe to desired length 2 Debur and cham...

Page 20: ...In upflow or downflow applications the reducing ell must be glued using transition solvent cement directly into the unit flue collar 1 Choose the appropriate side for venting in upflow or downflow pos...

Page 21: ...e exhaust vent pipe operates under positive pres sure and must be completely sealed to prevent leak age of combustion products into the living space Intake Piping The G51MP furnace may be installed in...

Page 22: ...on Shown 2 2 2 2 TRANSITION TRANSITION 2 2 1 2 3 OR 4 2 1 2 3 OR 4 Limit pipe length to 4 in 135 applications 2 2 24B 045 36B 045 36B 070 36C 090 48C 090 60C 090 48C 110 60C 110 60D 135 24B 045 36B 04...

Page 23: ...arance of 3 76mm around the air intake opening The air intake opening with the protective screen should always be directed either downward or straight out Use 2 pipe and fittings only and make sure th...

Page 24: ...n temperature is below 32 F 0 C exhaust piping should be insulated with 1 2 13mm Ar maflex or equivalent when run through unheated space Do not leave any surface area of exhaust pipe open to out side...

Page 25: ...rance above paved sidewalk or paved driveway located on public property Clearance under veranda porch deck or balcony 12 Equal to or greater than soffit depth 3 feet 9m 12 3 feet 9m within a height 15...

Page 26: ...ewalk or paved driveway located on public property Clearance under veranda porch deck or balcony 12 3 feet 9m 7 feet 2 1m 3 feet 9m within a height 15 feet 4 5m above the meter regulator assembly 3 fe...

Page 27: ...3 FOAM INSULATION IN UNCONDITIONED SPACE SIZE TERMINATION PIPE PER TABLE 8 3 76 MAX 12 305 ABOVE AVERAGE SNOW ACCUMULATION 3 76 OR 2 51 PVC PROVIDE SUPPORT FOR INTAKE AND EXHAUST LINES 8 203 MIN Inche...

Page 28: ...305 MAX for 2 51 8 203 MIN 1 2 13 FOAM INSULATION 1 2 13 FOAM INSULATION IN UNCONDITIONED SPACE PROVIDE SUPPORT FOR INTAKE AND EXHAUST LINES EVERY 36 914 OUTSIDE WALL Inches mm SIDE VIEW DIRECT VENT W...

Page 29: ...ULATE TO FORM SEAL SHEET METAL TOP PLATE MINIMUM 12 305mm ABOVE ROOF OR AVERAGE SNOW ACCUMULATION SIZE TERMINATION PIPE PER TABLE 8 Details of Exhaust Piping Terminations for Non Direct Vent Applicati...

Page 30: ...RMINATION PIPE PER TABLE 8 G51MP NON DIRECT VENT APPLICATION USING EXISTING CHIMNEY Condensate Piping This unit is designed for either right or left side exit of con densate piping in either upflow or...

Page 31: ...1 8m kit no 26K68 24 ft 7 3m kit no 26K69 and 50 ft 15 2m kit no 26K70 CAUTION Do not use copper tubing or existing copper condensate lines for drain line 5 If unit will be started immediately upon co...

Page 32: ...and field installed for gas leaks Use a leak detecting solution or other preferred means The furnace must be isolated from the gas supply system by closing its individual manual shut off valve during...

Page 33: ...1 73 57 1 61 53 1 50 50 1 42 3 4 19 05 824 20 930 360 10 19 250 7 08 200 5 66 170 4 81 151 4 28 138 3 91 125 3 54 118 3 34 110 3 11 103 2 92 1 25 4 1 049 26 645 680 19 25 465 13 17 375 10 62 320 9 06...

Page 34: ...can be turned off for servicing Before connecting the thermostat or the power wiring check to make sure the wires will be long enough for servicing at a later date Remove the blower access panel to c...

Page 35: ...mostat terminal block which is lo cated on the control board Install the room thermostat according to the instruc tions provided with the thermostat See figure 51 for thermostat designations If the fu...

Page 36: ...eating Speed 120VAC Unused Blower Not energized Continuous Low Blower Speed Accessory Terminal 120VAC Transformer 120VAC Input 120VAC Heat Only Accessory 120VAC 120 Volt Neutral Flame Sensor Heat Only...

Page 37: ...Page 37 FIGURE 54 TYPICAL G51MP WIRING DIAGRAM...

Page 38: ...should be primed with suffi cient water to ensure proper condensate drain opera tion BEFORE LIGHTING the unit smell all around the fur nace area for gas Be sure to smell next to the floor be cause so...

Page 39: ...rmostat calls for heat combustion air inducer starts Combustion air pressure switch proves blower opera tion Switch is factory set and requires no adjustment After a 15 second prepurge the hot surface...

Page 40: ...ove the threaded plug from the outlet side of the gas valve and install a field provided barbed fitting Connect test gauge connection to barbed fitting to measure manifold pressure 2 Tee into the gas...

Page 41: ...izes 10 0 10 0 10 0 10 0 10 0 Conversion kit required for applications at altitudes above 7501 ft above sea level Conversion kit required for applications at all altitudes NOTE A natural to L P propan...

Page 42: ...y inspect the venting system for proper size and horizontal pitch Determine there is no blockage or re striction leakage corrosion or other deficiencies which could cause an unsafe condition 3 To the...

Page 43: ...onds See figure 53 Thermostat Heat Anticipation Set the heat anticipator setting if adjustable according to the amp draw listed on the wiring diagram that is attached to the unit Electrical 1 Check al...

Page 44: ...965 335 860 295 0 80 1080 440 1010 360 865 310 775 270 0 90 945 400 840 320 765 275 710 245 G51MP 36C 090 PERFORMANCE Less Filter External Static Pressure in w g Air Volume Watts at Different Blower...

Page 45: ...10 1090 2055 935 1620 710 2625 1350 2310 1080 1885 885 1515 700 0 10 2665 1355 2385 1075 2025 885 1730 735 2570 1330 2325 1060 1910 865 1575 700 0 20 2585 1315 2350 1015 2030 865 1680 690 2410 1305 22...

Page 46: ...ger If cleaning the heat exchanger becomes necessary follow the below procedures and refer to figure 1 when disassem bling unit Use papers or protective covering in front of fur nace while removing he...

Page 47: ...mps 35 Reinstall burner box assembly in vestibule area 36 Reconnect flame roll out switch wires 37 Reconnect sensor wire and reconnect 2 pin plug from ignitor 38 Secure burner box assembly to vestibul...

Page 48: ...mporarily shut down the furnace until the items can be repaired or replaced Instruct the homeowners to pay attention to their furnace Situations can arise between annual furnace in spections that may...

Page 49: ...LOUT SWITCH CLOSES GAS VALVE OFF COMBUSTION AIR INDUCER ON INDOOR BLOWER ON HEATING SPEED DS1 SLOW FLASH DS2 OFF GAS VALVE OFF COMBUSTION AIR INDUCER OFF INDOOR BLOWER OFF WITH DELAY DS1 OFF DS2 SLOW...

Page 50: ...AL FOR IGNITION GAS VALVE OPENS IGNITOR ENERGIZED FOR UP TO 4 SECONDS YES FLAME STABILIZATION PERIOD GAS VALVE OFF COMBUSTION AIR INDUCER ON INDOOR BLOWER OFF HAS CONTROL FAILED TO SENSE FLAME FOR FIV...

Page 51: ...ONTINUOUSLY ARE ROLLOUT SWITCHES CLOSED DS1 DS2 SLOW FLASH RATE REMAINS UNCHANGED THROUGHOUT COOLING CYCLE THERMOSTAT CALLS FOR COOLING COMPRESSOR CONTACTOR AND SYSTEM FAN ENERGIZED WITH 2 SECOND DELA...

Page 52: ...ring cooling and continuous fan SIMULTANEOUS FAST FLASH SIMULTANEOUS FAST FLASH Normal operation Signaled when heating demand initiated at thermostat SLOW FLASH ON Primary or secondary limit switch op...

Page 53: ...ved NOTE In Direct Vent systems total the equivalent length of either the exhaust OR intake piping run depending upon which will be LONGER Intake and exhaust pipe diameter must be the same size and mu...

Page 54: ...eight 8 feet above grade di rectly in line with the exhaust vent terminal for the hori zontally vented gas fueled heating appliance or equipment The sign shall read in print size no less than one half...

Reviews: