background image

Page 28

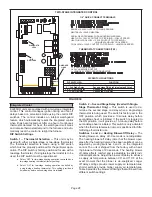
TWO-STAGE INTEGRATED CONTROL

THERMOSTAT CONNECTIONS (TB1)

1/4” QUICK CONNECT TERMINALS

DIP SWITCH FUNCTIONS

DIP

SWITCHES

DIAGNOSTIC

LEDs

ON-BOARD

LINKS

1=  ERROR CODE RECALL

H= 24V HUMIDIFIER OUTPUT

L= LENNOX SYSTEM OPERATION MONITOR

SENSE = 120 VAC OUTPUT TO FLAME SENSOR
NEUTRALS= 120 VAC NEUTRAL
PARK = DEAD TERMINAL FOR UNUSED BLOWER LEAD

HEAT LOW = 120 VAC OUTPUT TO CIRC BLWR -- LOW HT SPEED

HEAT HIGH/ COOL LOW = 120 VAC OUTPUT TO CIRC BLWR -- 

             HIGH HEAT AND LOW COOL SPEED

COOL HIGH = 120 VAC OUTPUT TO CIRC BLWR -- HIGH COOL SPEED

N

O

I

T

C

N

U

F

)

S

E

(

H

C

T

I

W

S


P

I

D

1 -- 2 Stage T'stat

Selects t/stat type (single or two-stage)

2 -- 2nd Stage Delay

Second stage ON delay (single-stage t'stat)

3 & 4 -- Heat Off Delay

Heating fan OFF delay

5 -- Cool Off Delay

Cooling fan OFF delay

W915

W951

FIGURE 30 

Integrated Contol

EL280UH units are equipped with a two-stage integrated 

control. This control manages ignition timing and fan off 

delays based on selections made using the control DIP 

switches. The control includes an internal watchguard 

feature which automatically resets the integrated control 

when it has been locked out. After one hour of continuous 

thermostat demand for heat, the watchguard will break 

and remake thermostat demand to the furnace and auto-

matically reset the control to relight the furnace.

DIP Switch Settings
Switch 1 -- Thermostat Selection --

 This unit may be 

used with either a single-stage or two-stage thermostat. 

The thermostat selection is made using a DIP switch 

which must be properly positioned for the particular appli-

cation. The DIP switch is factory-positioned for use with a 

twostage thermostat. If a single-stage thermostat is to be 

used, the DIP switch must be repositioned.

a.   Select “OFF” for two-stage heating operation controlled by a 

two-stage heating thermostat (factory setting);

b.   Select “ON” for two-stage heating operation controlled by 

a single-stage heating thermostat. This setting provides a 

timed delay before second-stage heat is initiated.

Switch 2 -- Second Stage Delay (Used with Single-
Stage Thermostat Only) --

 This switch is used to de-

termine the second stage on delay when a single-stage 

thermostat is being used. The switch is factory-set in the 

OFF position, which provides a 10-minute delay before 

secondstage heat is initiated. If the switch is toggled to 

the ON position, it will provide a 15-minute delay before 

secondstage heat is initiated. This switch is only activated 

when the thermostat selector jumper is positioned for SIN-

GLEstage thermostat use.

Switches 3 and 4 -- Heating Blower-Off Delay -- 

The 

heating blower-on delay of 30 seconds is not adjustable. 

The heating blower-off delay (time that the blower oper-

ates after the heating demand has been satisfied) can be 

adjusted by moving switches 3 and 4 on the integrated 

control. The unit is shipped from the factory with a heat-

ing blower-off delay of 90 seconds. The heating blower 

off delay affects comfort and is adjustable to satisfy indi-

vidual applications. Adjust the blower off delay to achieve 

a supply air temperature between 90° and 110°F at the 

exact  moment  that  the  blower  is  de-energized.  Longer 

off delay settings provide lower supply air temperatures; 

shorter settings provide higher supply air temperatures.

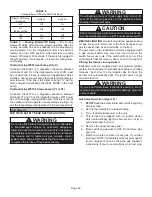
Table 8 provides the blower off timings that will result from 

different switch settings.

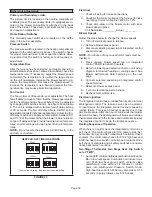
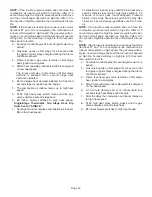
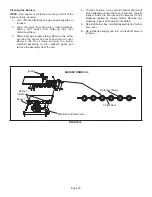
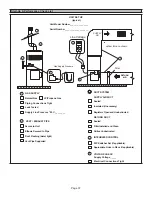
Summary of Contents for EL280UH070P24A

Page 1: ...ife Installation and service must be performed by a licensed professional HVAC installer or equivalent service agency or the gas supplier 2017 Lennox Industries Inc Dallas Texas USA ELITE SERIES GAS F...

Page 2: ...y 3 Optional External Side Return Air Filter Kit is not for use with the optional Return Air Base 1 NOTE 60C and 60D size units that require second stage air volumes over 1800 cfm 850 L s must have on...

Page 3: ...installation of gas furnaces must conform with local building codes In the absence of local codes units must be installed according to the current National Fuel Gas Code ANSI Z223 1 The National Fuel...

Page 4: ...uction heater during any phase of construc tion Very low return air temperatures harmful vapors and operation of the unit with clogged or misplaced filters will damage the unit EL280UH units may be us...

Page 5: ...renced subject which is represented only by the standard in its entirety CAUTION Insufficient combustion air can cause headaches nausea dizziness or asphyxiation It will also cause excess water in the...

Page 6: ...d equipment in the confined space Each opening must be at least 100 square inches 64516 mm2 One opening shall be within 12 inches 305 mm of the top of the enclosure and one opening within 12 inches 30...

Page 7: ...penings shall each have a free area of at least one square inch 645 mm2 per 4 000 ment in the enclosure CHIMNEY OR GAS VENT WATER HEATER OUTLET AIR VENTILATION LOUVERS Each end of attic INLET AIR Ends...

Page 8: ...hipping leg equipped with a shipping bolt and flat white plastic washer The bolt and washer must be re moved before the furnace is placed into operation Af ter the bolt and washer have been removed th...

Page 9: ...de Return Air with transition and filter FIGURE 8 Optional Return Air Base Upflow Applications Only For use with A B C and D cabinets NOTE Optional Side Return Air Filter Kits are not for use with Opt...

Page 10: ...ic or a crawl space Either suspend the furnace from roof rafters or floor joists as shown in figure 12 or install the furnace on a platform as shown in figure 13 Typical Horizontal Application Unit Su...

Page 11: ...can be drawn into living space resulting in personal injury or death Filters This unit is not equipped with a filter or rack A field pro vided high velocity filter is required for the unit to operate...

Page 12: ...duct system Return Air Plenum NOTE Return air must not be drawn from a roomwhere this furnace or any other gas fueled appliance i e water heater or carbon monoxide producing device i e wood fireplace...

Page 13: ...rifice plate See figure 14 Lift and rotate the assembly 90 degrees clockwise or counter clockwise to either the 3 o clock position or to 9 o clock position and re secure with four screws Gasket should...

Page 14: ...e other side of orifice plate and re connect pressure switch hose Re secure pressure switch wires by either pulling excess wires through the blower compartment and securing with supplied wire tie or c...

Page 15: ...irst vent connector elbow at a minimum of six inches 152 mm from the furnace vent outlet See figure 22 Venting Using a Masonry Chimney The following additional requirements apply when a lined masonry...

Page 16: ...gnized standards lined or relined with suitable materials or replaced with a gas vent or chimney suitable for venting EL280UH series units The chimney passageway must be checked periodically to ensure...

Page 17: ...the common venting tables should be reduced by 20 the equivalent of two 90 elbows 0 80 x maximum common vent capacity The horizontal length of the offset shall not exceed1 1 2 feet 46 m for each inch...

Page 18: ...l L feet Vent and Connector Diameter D inches 3 inch 4 inch 5 inch 6 inch Appliance Input Rating in Thousands of Btu Per Hour Min Max Min Max Min Max Min Max 6 0 0 78 0 152 0 251 0 375 2 13 51 18 97 2...

Page 19: ...33 89 47 142 64 220 2 22 53 35 96 49 153 66 235 3 24 55 36 102 51 163 68 248 20 1 21 54 33 99 46 157 62 246 2 2 57 34 105 48 167 64 259 3 23 60 35 110 50 176 66 271 30 1 20 62 31 113 45 181 60 288 2 2...

Page 20: ...r other deficiencies which could cause an unsafe condition 3 Close all building doors and windows and all doors between the space in which the appliances remaining connected to the common venting syst...

Page 21: ...figure 31 6 In some localities codes may require the installation of a manual main shut off valve and union furnished by the installer external to the unit The union must be of the ground joint type...

Page 22: ...ged Tap Shown NOTE BLACK IRON PIPE ONLY TO BE ROUTED INSIDE OF CABINET FIGURE 25 GROUND JOINT UNION DRIP LEG MANUAL MAIN SHUT OFF VALVE GROUND JOINT UNION DRIP LEG MANUAL MAIN SHUT OFF VALVE GROUND JO...

Page 23: ...must be properly grounded in accordance with national and local codes WARNING Fire Hazard Use of aluminum wire with this product may result in a fire causing property damage severe injury or death Use...

Page 24: ...er rated up to one amp can be connected to this terminal with the neutral leg of the circuit being con nected to one of the provided neutral terminals If a hu midifier rated at greater than one amp is...

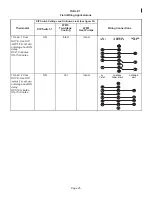
Page 25: ...DIP Switch 1 W915 Two Stage Cooling W951 Heat Pumps 1 Heat 1 Cool NOTE Use DIP ond stage heat ON delay OFF10 minutes ON 15 minutes ON Intact Intact S1 T STAT CONTROL TERM STRIP OUTDOOR UNIT 1 Heat 2 C...

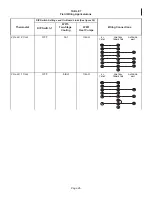
Page 26: ...tch Settings and On Board Links See figure 30 Wiring Connections DIP Switch 1 W915 Two Stage Cooling W951 Heat Pumps 2 Heat 2 Cool OFF Cut Intact S1 T STAT CONTROL TERM STRIP OUTDOOR UNIT 2 Heat 1 Coo...

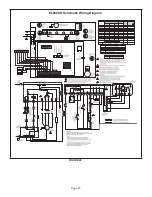
Page 27: ...Page 27 EL280UH Schematic Wiring Diagram FIGURE 29...

Page 28: ...switch is factory positioned for use with a twostage thermostat If a single stage thermostat is to be used the DIP switch must be repositioned a Select OFF for two stage heating operation controlled b...

Page 29: ...control system parts and electrical parts that have been wet or to replace the furnace if deemed necessary WARNING If overheating occurs or if gas supply fails to shut off shut off the manual gas val...

Page 30: ...volution 1 cu ft dial 2 cu fr dial 1 cu ft Dial 2 cu ft Dial 045 80 160 200 400 070 55 110 136 272 090 41 82 102 204 110 33 66 82 164 135 27 54 68 136 Furnace should operate at least 5 minutes before...

Page 31: ...atuarl 1 7 3 5 1 5 3 2 1 7 3 5 4 5 13 0 LP propane 3 4 9 10 0 4 9 10 0 4 9 10 0 11 0 13 0 110 Natural 1 7 3 5 1 5 2 8 1 7 3 5 4 5 13 0 LP propane 3 4 9 10 0 4 9 10 0 4 9 10 0 11 0 13 0 135 Natural 1 7...

Page 32: ...ired setting FIGURE 32 Electrical 1 Check all wiring for loose connections 2 Check for the correct voltage at the furnace furnace operating Correct voltage is 120VAC 10 3 Check amp draw on the blower...

Page 33: ...witch set at SINGLE 1 SureLight control energizes combustion air inducer B6 on low heat speed Combustion air inducer runs until S128 low heat prove switch contacts close switch must close within 2 1 2...

Page 34: ...installed must be properly sized open and unobstructed to provide combustion air 10 Inspect the furnace venting system to make sure it is in place structurally sound and without holes corrosion or bl...

Page 35: ...e four screws securing the burner manifold assembly to the vestibule panel and remove the assembly from the unit 4 To clean burners run a vacuum cleaner with a soft brush attachment over the face of b...

Page 36: ...lent service agency or gas supplier Cabinet Parts Main access panel Blower panel Top cap Control Panel Parts Transformer Integrated control Door interlock switch Circuit breaker Blower Parts Blower wh...

Page 37: ...sted Supply Line Pressure W C ________ 1 VENT EXHAUST PIPE Secure to Unit Elbows Secured to Pipe Vent Pipe Supported 2 Roof Flashing water tight 3 DUCT SYSTEM SUPPLY AIR DUCT Sealed Insulated if neces...

Page 38: ...___ 5 COOLING MODE INDOOR BLOWER AMPS______ 3 TEMPERATURE DROP Return Duct Temperature _________ Supply Duct Temperature _ _______ 4 5 6 7 DRAIN LINE Leak Free THERMOSTAT Adjusted and Programmed Opera...

Reviews: