background image

25

NOTE: DIAGRAMS & ILLUSTRATIONS ARE NOT TO SCALE.

NOTE: DIAGRAMS & ILLUSTRATIONS ARE NOT TO SCALE.

LIGHTING INSTRUCTIONS - ELECTRONIC

1.  Slide the switch on the receiver, wall switch or ON/OFF 

switch to "OFF.

2.  (if applicable) Press ON/OFF button on remote control 

transmitter to "OFF."

P/N 580491-01, REV. 01

FOR YOUR SAFETY READ BEFORE OPERATING

WARNING: If you do not follow these instructions exactly, a fire or explosion may result causing 

property damage, personal injury or loss of life. 

A. This appliance is equipped with an ignition device which 

automatically lights the pilot. Do not try to light the pilot by 

hand.

B. BEFORE OPERATING smell all around the appliance area for 

gas. Be sure to smell next to the floor because some gas is 

heavier than air and will settle on the floor.

WHAT TO DO IF YOU SMELL GAS:

•  Do not try to light any appliance.

•  Do not touch any electric switch; do not use any phone in your 

building.

OPERATING INSTRUCTIONS

TO TURN OFF GAS TO APPLIANCE

WARNING

HOT GLASS WILL  CAUSE BURNS.

DO NOT TOUCH GLASS  UNTIL COOLED.

NEVER ALLOW CHILDREN TO TOUCH GLASS.

•  Immediately call your gas supplier from a neighbor’s phone. 

Follow the gas supplier’s instructions.

•  If you cannot reach your gas supplier, call the fire department.

C. If any portion of this appliance does not operate as the 

instructions indicate, do not try to repair it, call a qualified 

service technician.  Do not use tools.  Force or attempted 

repair may result in a fire or explosion.

D. Do not use this appliance if any part has been under water. 

Immediately call a qualified service technician to inspect the 

appliance and to replace any part of the control system and 

any gas control which has been under water.

Electronic Gas Control 

Valve - SIT

Electronic Pilot Assembly

3.  Turn off all electric power to the appliance if service is to 

be performed. Note: The control may have a battery backup 

(remove batteries, if installed).

4.  Close the main line gas shut-off valve.

1.  STOP! Read the safety information above on this label.

2.  Read the Care and Operation manual including the section on 

"Remote Control System," (if applicable).

3.  Slide the switch on the receiver, wall switch or ON/OFF switch to 

"OFF."

4.  Turn "OFF" all electric power to the appliance. Note: The control 

may have a battery backup (remove batteries, if installed).

5.  This appliance is equipped with an ignition device which 

automatically lights the pilot.  Do not try to light the pilot by hand.

6.  Wait five (5) minutes to clear out any gas. Then smell for gas, 

including near the floor. If you smell gas, STOP! Follow “B” in the 

safety information above on this label. If you don’t smell gas, go 

to the next step.

7.  Turn on all electric power to the appliance. Note: The control may 

have a battery backup (install batteries, if applicable).

8.  Slide the switch on the receiver to REMOTE or ON/OFF switch /

wall switch to ON.

9.  (if applicable) Press ON/OFF button on remote control transmitter 

to "ON."

10. (if applicable) 

Set thermostat on remote control to desired setting.

11.  If the appliance will not operate, follow the instructions "To Turn 

Off Gas To Appliance" and call your service technician or gas 

supplier.

Summary of Contents for EDV35RNE

Page 1: ...rsonal injury or death WARNING AVERTISSEMENT AVISO HOT GLASS WILL CAUSE BURNS DO NOT TOUCH GLASS UNTIL COOLED NEVER ALLOW CHILDREN TO TOUCH GLASS UNE SURFACE VITRÉE CHAUDE PEUT CAUSER DES BRÛLURES LAISSER REFROIDIR LA SURFACE VITRÉE AVANT D Y TOUCHER NE PERMETTEZ JAMAIS À UN ENFANT DE TOUCHER LA SURFACE VITRÉE EL VIDRIO CALIENTE CAUSARÁ QUEMADURAS USTED DEBE NUNCA TOCAR EL VIDRIO CALIENTE LOS NIÑO...

Page 2: ...reaches EXTREMELY HIGH temperatures and can cause severe burns if touched Keep children away from an operating fireplace Closely supervise children in any room where a fireplace is operating to prevent contact with glass Keep clothing furniture gasoline and other flammable liquids away from the fireplace Even after the gas is turned off fireplace surfaces remain extremely hot Be sure to attach the...

Page 3: ...s relatives à la sécurité page 4 Toutes les parties de votre foyer Lennox Hearth Products deviennent EXTRÊMEMENT CHAUDES Instale una malla o barrera física para evitar el contacto directo con el vidrio y prevenir las quemaduras y lesiones graves Ver los detalles a la izquierda para ordenar un Lennox SAFETY GUARD GRATIS para su chimenea Siga las instrucciones de seguridad a continuación y asegúrese...

Page 4: ...des brûlures s ils viennent en contact avec la surface chaude Il est recommandé d installer une barrière physique si des personnes à risques habitent la maison Pour empêcher l accès à un foyer ou à un poêle installez une barrière de sécurité cette mesure empêchera les tout petits les jeunes enfants et toute autre personne à risque d avoir accès à la pièce et aux surfaces chaudes 7 Toutécranouprote...

Page 5: ...oroeltermostatode paredparaquitarelpolvoyaceite Peguelaetiqueta enlasuperficiedelaplacadelinterruptorquecontrola la chimenea Figura A o en el termostato de pared Figura B Seleccione el idioma que más se habla en la casa 2 Si se usa un control remoto para controlar la chimenea encuentre el transmisor y límpielo bien para quitar el polvo y aceite Pegue la etiqueta en la superficie del transmisor Fig...

Page 6: ... Surveiller les enfants Garder les vêtements les meubles l essence ou autres liquides produisant des vapeur inflammables loin de l appareil Appliance Installation Service and Maintenance Notices WARNING Improper installation adjustment alteration service or maintenance can cause injury or property damage Refer to the owner s information manual provided with this appliance For assistance or additio...

Page 7: ...N for the inlet and OUT for the manifold side The control valves have a 3 8 10mm NPT thread inlet and outlet side of the valve refer to Figures 2 and 3 Propane tanks are at pressures that will cause damage to valve components Verify that the tanks have step down regulators to reduce the pressure to safe levels Orifice Sizes Sea Level to High Altitude All Models These appliances are tested and appr...

Page 8: ...c systems the gas valve is located in the control compartment See Figure 1 Remove the bottom compartment door by sliding the hinge pin located at the door s left side to the right until it disengages from the left corner post hole Pull the door diagonally to the left away from the fireplace To ease door closure depress the catches to place them in their retracted position until they stay there the...

Page 9: ... location Once the pilot is lighted the ON OFF rocker switch will control the appliance ON OFF operation To operate Toggle the switch between its ON and OFF positions If your millivolt appliance is equipped with an optional remote wall switch or remote control kit and the pilot is lit the appliance main burner may be turned on and off with the wall switch or remote control Electronic Appliances To...

Page 10: ...qualified service techni cian inspection should include ensuring that exhaust or intake passages are unobstructed and vent components are properly assembled and not damaged Homeowner must contact a qualified service technician at once if any abnormal condition is observed If the venting system is disassembled for any reason a qualified service technician should follow vent installation instruction...

Page 11: ...ng care to protect it from inadvertent damage Figure 4 Glass Door Spring Latch Lower Compartment Door and Hinge Glass Door Firebox Floor Bottom Vee flange Glass Door Frame Top Flange Glass Door Frame Modesty Panel WARNING Donotattempttosubstitutethe materialsusedonthesedoors or replace cracked or broken glass Handlethisglasswithextreme care Glass is susceptible to damage Do not scratch or handlero...

Page 12: ...gapsbetweentheflamepeaksand should be positioned so they do not impinge the flames Step 5 Position the individual logs as shown in Figures 7 and 8 Logs should be placed in the order shown All logs that have notches to fit over the grate tines should be positioned with these notches directly against the grate Handle logs carefully to prevent breakage Proper log placement is critical to encourage ou...

Page 13: ...At The Bottom Of Log 1 Over The Grate And Push It Towards The Rear Align The Holes In One End Of Logs 2 3 Over The Locating Pins And Align The Grooves On The Other End Over The Grate And Push It Toward The Rear Locating Pin 2 3 AlignTheGrooveInTheBottomOfLog 4 Over The Grate And Slide It Toward The Front 5 4 Align The Hole On The Log 5 Over The Locating Pin And Postition The Notch Over The Grate A...

Page 14: ...e Bottom Of Log 1 Over The Grate And Push It Towards The Rear Align The Holes In One End Of Logs 2 3 Over The Locating Pins And Align The Grooves On The Other End Over The Grate And Push It Toward The Rear Locating Pin 2 3 Align The Groove In The Bottom Of Log 4 Over The Grate And Slide It Toward The Front 5 4 Align The Hole On The Log 5 Over The Locating Pin And Postition The Notch Over The Grate...

Page 15: ...o extremes Air Shutter Adjustment Guidelines If there is smoke or soot present first check the log set positioning to ensure that the flames are not impinging on any of the logs If the log set is properly positioned and a sooting condition still exists then the air shutter opening should be increased Themoreoffsetsintheventsystem thelarger the air shutter opening will need to be An appliance opera...

Page 16: ...d 4 Leave the control knob off pilot on in the ON position and the burner OFF ON switch OFF and remote switches if applicable 5 When satisfied that the burner flame appear ance is normal re install the lower control compartment door then proceed to finish the installation Figure 12 Air Shutter Opening Burner Venturi Tube Air Shutter Door Orifice Increase Air Shutter Opening Decrease Air Shutter Op...

Page 17: ...ealer s Name ____________________________________________________ Parts will be shipped at prevailing prices at time of order When ordering repair parts always give the following information 1 The model number of the appliance 2 The serial number of the appliance 3 The part number 4 The description of the part 5 The quantity required 6 The installation date of the appliance If you encounter any pr...

Page 18: ...atic or Manual modes LCD Display Up to 9 hour Count down Timer Includes batteries Child lock Low battery indicator Receiver may be wall mounted or placed in the valve compartment Cost Effective Solution Simple On Off operation Workswithmillivoltandlowvoltageelectronic ignition controls Kit includes Remote and Receiver Wall Thermostat Wall surface mounted Thermostat or manual ON OFF operation Large...

Page 19: ...dels Only Blower Kits Cat No Model No Description 80L84 FBK 100 Single Speed 80L85 FBK 200 Variable Speed with wall mountable switch 80L86 FBK 250 Heat activated vari able speed with unit mounted switch Unit Mountable ON OFF Rocker Switch Kit Millivolt systems only The rocker switch may be used to provide ON OFF operation as an alternative to the optional wall switch The rocker switch installs dir...

Page 20: ...B 2 Arch Pane Doors Black EDV45 H8780 APD45SP 2 Arch Pane Doors Satin Pewter SQUARE PANE DESIGN KITS Cat No Model Description Model Series H9147 SPD35EB 2 Sq Pane Doors Black EDV35 H9148 SPD35SP 2 Sq Pane Doors Satin Pewter H8783 SP40B 2 Sq Pane Doors Black EDV40 H8784 SP40SP 2 Sq Pane Doors Satin Pewter H8785 SP45B 2 Sq Pane Doors Black EDV45 H8786 SP45SP 2 Sq Pane Doors Satin Pewter These barrie...

Page 21: ...e Upper Grill Kit Charcoal EDV40 H3575 SUGK40SP 40 Sunrise Upper Grill Kit Satin Pewter H3577 SLGK40C 40 Sunrise Lower Grill Kit Black H3579 SLGK40SP 40 Sunrise Lower Grill Kit Satin Pewter H3581 SUGK45C 45 Sunrise Upper Grill Kit Black EDV45 H3583 SUGK45SP 45 Sunrise Upper Grill Kit Satin Pewter H3585 SLGK45C 45 Sunrise Lower Grill Kit Black H3587 SLGK45SP 45 Sunrise Lower Grill Kit Satin Pewter ...

Page 22: ...ause corrosion of caps pipe fit tings excessive condensation can be caused by long lateral runs too many elbows and or exterior portions of the system being exposed to cold weather Also inspect the wall straps or plumbers s tape to ensure they are securely in place Appliance Checkout Qualified Service Technician Perform the appropriate appliance checkout procedure detailed in this manual Replace G...

Page 23: ...hen released stop and immediately call your service technician or gas supplier LIGHTING INSTRUCTIONS TO TURN OFF GAS TO APPLIANCE If the pilot will not stay lit after several tries turn the gas control knob to OFF and call your service technician or gas supplier 10 Turn gas control knob counterclockwise to ON 11 Close control compartment 12 If applicable Turn on all electrical power to the applian...

Page 24: ...allumée Si elle s éteint répétez les étapes 5 à 8 inclusivement Si la manette ne se soulève pas d elle même lorsqu on la relâche arrêter et appeler immédiatement un technicien qualifié ou le fournisseur de gaz Si la veilleuse ne reste pas allumée après plusieurs tentatives réglez la manette d admission du gaz à la position OFF et appelez un technicien qualifié ou le fournisseur de gaz 10 Tournez l...

Page 25: ...Do not use this appliance if any part has been under water Immediately call a qualified service technician to inspect the appliance and to replace any part of the control system and any gas control which has been under water Electronic Gas Control Valve SIT Electronic Pilot Assembly 3 Turn off all electric power to the appliance if service is to be performed Note The control may have a battery bac...

Page 26: ...ppareil sous tension Note Le contrôleur peut avoir une batterie de secours installer les batteries au besoin 8 Placez l interrupteur du récepteur en position REMOTE ou l interrupteur mural en position ON 9 Si applicable Appuyez sur le bouton ON OFF pour sélectionner ON 10 Si applicable Ajustez le thermostat sur la télécommande à l ajustement désiré 11 Si l appareil ne se met pas en marche suivez l...

Page 27: ...gement on thermocouple Ensure that the connection between the valve and thermocouple are tight and secure 3 Pilot burning no gas to burner Valve knob ON and the standard burner OFF ON switch is ON Read impor tant note below IMPORTANT NOTE If an optional remote switch is used for burner operation if the standard burner OFF ON switch is still installed on appliance it must be in the OFF position Opt...

Page 28: ...n if required C Pilot flame is not engulfing the sensor Call a service technician D Obstructed vent system Call a service technician 4 Soot is present on the glass and panels A Initial fireplace operation A white film may develop on the glass during the first few fires as part of the burn in process The first few times you use the fireplace clean the glass after each use AFTER THE GLASS HAS COMPLE...

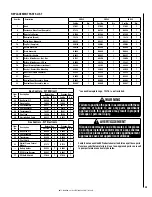
Page 29: ...ket Venturi Tube Mounting 43K85 1 43K85 1 43K85 1 20 Gas Line Flexible Connector 93L32 1 93L32 1 93L32 1 21 Magnet H3699 1 H3699 1 H3699 1 22 Radiant Panel Assembly Upper H8661 1 H8662 1 H8663 1 23 Radiant Panel Assembly Lower H8665 1 H8666 1 H8667 1 WARNING Failure to position the parts in accordance with these diagrams or failure to use only parts specifically approved with this appliance may re...

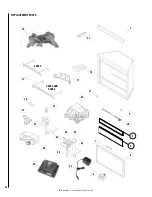
Page 30: ...30 NOTE DIAGRAMS ILLUSTRATIONS ARE NOT TO SCALE Replacement Parts 4 8 14 7 40 31 33 32 34 36 35 16 30 13 17 19 11 9 1 12 21 10 15 20 EDV40 AND EDV45 EDV35 41 42 43 6 2 3 ...

Page 31: ...31 NOTES ...

Page 32: ...ls specifications andprices andalsotodiscontinuecolors styles andproducts Consult your local distributor for fireplace code information LENNOX the LENNOX design DAVE LENNOX the image of DAVE LENNOX and other related LENNOX marks are registered or common law trademarks of Lennox Industries Inc and are used with permission 1508 Elm Hill Pike Suite 108 Nashville TN 37210 P506013 05 ...

Reviews: