background image


4.3 Audio and video input 

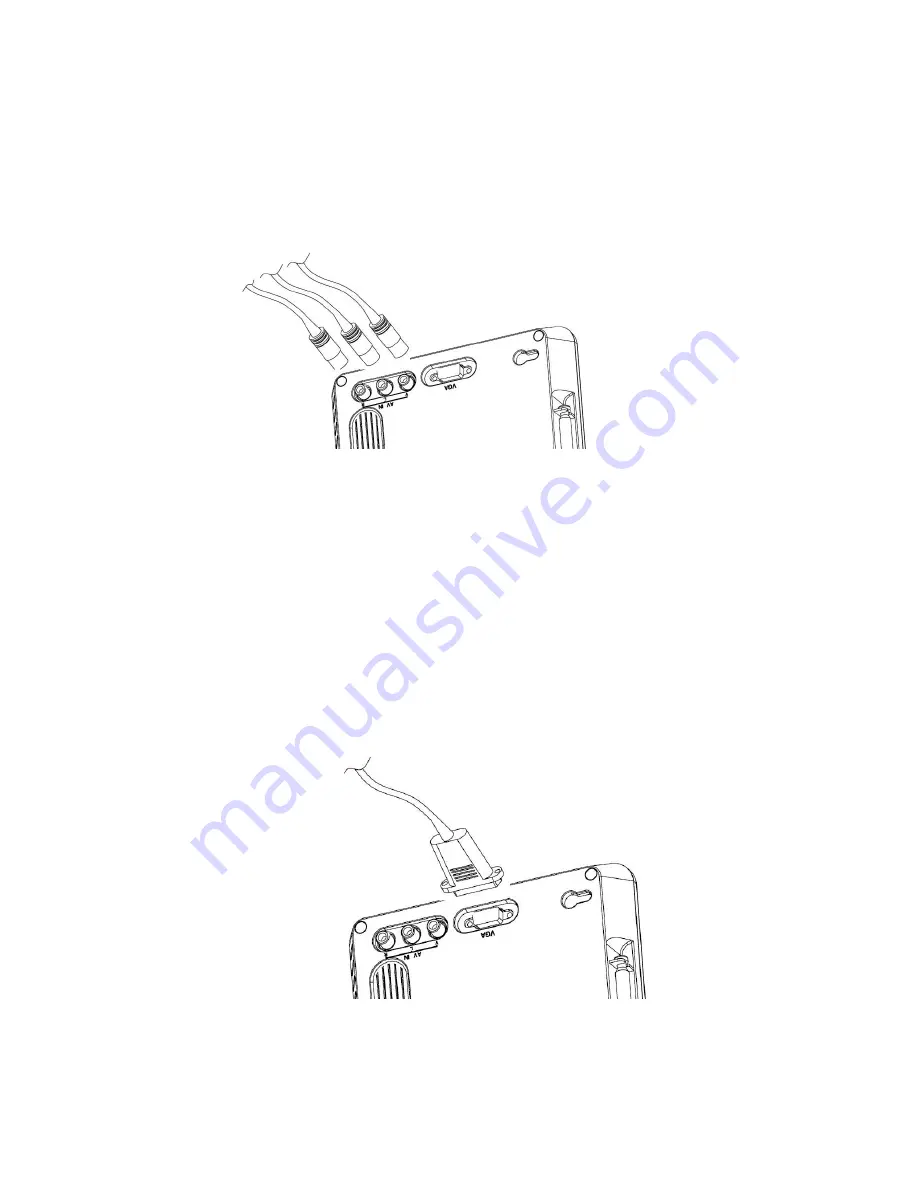
First just inset the plug of the external video cord into yellow jack, and left audio plug into the 
white port and right audio plug into the red port. 

Press the 

MODE


key to the AV mode, the screen display video play and music. 


Figure 4.3.1 


! Attention:   

in the AV and VGA mode the operate menu have a little difference      compare 

with DTV and ATV mode. 

4.4 Connect to PC 

Just inset the connect cord to the VGA port of PC, and tighten the screws to keep good contact, 
then plug the other end of the cord to the VGA port of the TV set and tighten the screws as the 
same. 
Then turn the mode to VGA, the screen display as the monitor.         

! Attention:

 The VGA mode only support Standard is 640*480 60Hz and 800*600 60Hz. 


Figure 4.4.1


Summary of Contents for TFT-1020

Page 1: ...LENCO TFT LCD DIGITAL AND ANALOG TV TFT 1020 User Manual For information and support www lenco eu ...

Page 2: ...als or explosive materials near this product Do not place any container containing water on this television which will lead to fire hazard or electric shock Do not expose this television in the rain or somewhere near water such as somewhere near bathtub water basin water trough in a kitchen or laundry pool damp basement or near swimming pool If this television gets wet accidentally please immediat...

Page 3: ...f the product is to be installed in an environment with much dust high temperature or low temperature high humidity and chemical materials and in airport or railway station where the product is to be used 24 hours a day please contact the authorized service center Otherwise the display may be seriously damaged and the product may be seriously damaged Please do not allow any child to play with this...

Page 4: ...TERNAL ANTENNA 6 2 6 INSTALLING STAND 7 3 REMOTE CONTROL 8 3 1 DEFINITION 8 3 2 PREPARING THE REMOTE CONTROL 9 4 NAVIGATING WITH MENUS 10 4 1 BASIC OPERATION METHODS OF TV SET 10 4 2 DIGITAL TV AND ANALOG TV 10 4 2 1 Menu summarize 10 4 2 2 Menu definition 10 4 2 3 Special Features at the DTV mode 17 4 3 AUDIO AND VIDEO INPUT 18 4 4 CONNECT TO PC 18 4 5 MULTIMEDIA 19 5 MAINTENANCE 21 5 1 HANDLING ...

Page 5: ...unctions NOTICE Using the buttons on the remote control can perform all functions But using the buttons on the front panel can perform some of the functions This product support several types of memory cards such as SD MMC MS since there are many memory card brands it is recommended to test whether a card is compatible with this product Note this product does not support illegal cards If the card ...

Page 6: ...rol Before using the remote controller you need to insert the supplied battery in order to enable communication between the TFT 1020 and remote controller To insert battery Turn the remote controller over Press in the tab and lift the battery cover up Insert the supplied battery into the remote controller Align the battery cover to the remote controller Press down until the cover clicks into place...

Page 7: ...is left 9 Audio input jack red port is right 10 Speaker 11 Portable receiving antenna the antenna jack can plug the accessorial antenna 12 Infrared remote receiver and Indicators Red Green The states are shown as Blue Machine turn on no charge Red Machine turn on and charge battery Machine turn off and charge battery Null Machine turn off or charge battery full 13 Stand 14 Headphone jack ...

Page 8: ...l in viewing mode VOL Move left change settings in menus Decrease the volume level in viewing mode VOL Move right change settings in menus Increase the volume level in viewing mode OK To confirm a selection Press to open the menus exit to go back to the topper menus MODE Open the mode main menu press again to shift between DTV ATV AV VGA Multimedia If you touch the front panel keys and the key sho...

Page 9: ...n can block Radio and TV signals Depending on whether the receiver is located in a valley behind a mountain or in a concrete building the quality of reception may vary considerably As with most other transmissions bad weather affects reception quality We recommend use the accessorial long antenna instead of short antenna when the signal isn t good 2 3 About the portable receiving antenna and acces...

Page 10: ...ot a big barrier to digital TV signals 2 4 Connecting the TFT 1020 to the TV Connect the TFT 1020 AV input socket for video and audio Connect the TFT 1020 Headphone jack to the TV audio input socket for sound 2 5 Connecting the accessorial antenna and the external antenna Align the telescopic antenna plug with the antenna jack on the TV set and just plug in until its end If you use the external an...

Page 11: ...nd of the support to the slot on the back cover and then rotate the base as illustrated in bottom until the support is locked properly In order to storage remote control more expedient insert the remote control to the slot on the back stand ...

Page 12: ...off on mute unmute 16 9 4 3 Screen switch DTV ATV and AV Function mode Mode Press this button open the mode menu and press again to shift between Digital TV Analogue TV AV VGA and Multimedia AUTO Start auto search At Digital TV and Analogue TV mode Ok To confirm a selection Or to open the channel list Menu At Digital TV and Analogue TV mode Menu Exit Press to open the menus and press again to go b...

Page 13: ...S TIT Press to display the subtitle of the current programs only Digital TV Mode L R Press to change the sound channel At Digital TV Or audio mode At ATV AV and VGA mode EPG Press this button to display Electronic Program Guide only Digital TV Mode 3 2 Preparing the remote control Remove the cover from the battery compartment at the bottom of the remote control Insert the battery taking care to ob...

Page 14: ...d if they are included in the transmitted program information 4 2 Digital TV and analog TV 4 2 1 Menu summarize You can open the main menu by pressing Menu key at the remote control or front panel You can perform different settings enter menus at current mode And you can press mode key display mode menu you can press up down cursor buttons to select mode which you want with OK button enter Display...

Page 15: ... 4 2 1 Brightness Left right cursor buttons adjust the brightness of the screen Contrast adjust the contrast of the screen Color adjust the color of the screen Sharpness adjust the sharpness of the screen You can select how the audio mode shall be sorted There are five sort mode personal standard music movie and sports are used here ...

Page 16: ...r buttons adjust the prefer language English German Danish and so on Audio Channel and Prefer Language menus only DTV mode and the program signal must contain You can select Country and the menu Language at the standard of local TV system In order to fit the person of different countries the menu language can be set to different languages English Dutch French German Italian Portuguese Spanish The ...

Page 17: ...rmany French Poland Portugal Russia and so on Restore Default Press the Left right cursor buttons to enter next step and press OK key to come back the factory default Antenna Power Left right cursor buttons adjust the screen on off Zoom Mode only operated in DTV ATV and AV mode If the machine turn on and used the outside power supplied or charge battery the battery icon hide whenever on or off If ...

Page 18: ...de Only DTV mode To open this menu you will be asked to enter your access code From the factory the access code is set to 0000 After set the access code has to be entered before you can watch locked channels and change the password Figure 4 2 5 ...

Page 19: ...h And you can edit favorite or skip channel lists in this menu If you edit channel favorite list ON Press the FAV button can display the favorite List Figure 4 2 6 Under the Program Search menu Use right cursor button enter the submenu Figure 4 2 7 The TV list may contain a lot of channels To sort your own lists you can make it easier to handle channels by LCN number and name ...

Page 20: ... system and sound system submenu Color System Left right cursor buttons adjust the screen AUTO PAL SECAM Sound System Left right cursor buttons adjust the screen BG DK I L If the Program List menu does not exist The system will automatically start the first time installation Figure 4 2 9 ...

Page 21: ...is information is included in the channel transmission from the distributor You may also select the type of program you want information about like Movie Sports or Music TELETEXT Pressing TTX key will open a TTX page if TTX is transmitted for that channel Select TTX pages using the TTX buttons on the remote control You can also quickly move to the different page options shown on any page by pressi...

Page 22: ...tention in the AV and VGA mode the operate menu have a little difference compare with DTV and ATV mode 4 4 Connect to PC Just inset the connect cord to the VGA port of PC and tighten the screws to keep good contact then plug the other end of the cord to the VGA port of the TV set and tighten the screws as the same Then turn the mode to VGA the screen display as the monitor Attention The VGA mode o...

Page 23: ...ress CH CH buttons to select multimedia press OK button enter You can enter the icon by pressing OK key and pressing MENU key to go back to the topper Menu interface Figure 4 5 1 When you select memory equipment display reading fulfil you can enter the icon by pressing OK key Music At the function select interface use the VOL VOL to move the cursor to icon and press OK key enter Figure 4 5 2 ...

Page 24: ... OK key enter during the picture view mode press VOL key to photo control submenu And then play the pictures which in current directory automatically Figure 4 5 4 Movie At the function select interface use the VOL VOL to move the cursor to icon and use the CH CH to choose the file and press OK key playing In the video play interface choose the file and press OK key playing During movie playing Pre...

Page 25: ...achine on porous surfaces such as rugs or blankets or near material such as curtains or draperies that may block its ventilation slots 6 The machine uses high frequency radio signals and may cause interference to radio or TV reception If this occurs relocate the machine a suitable distance away from the set 7 Use only specified peripheral equipment and interface cables otherwise problems may occur...

Page 26: ...y any force to the LCD If the liquid leaves out please use soap and clean water to clean 9 If you bring your LCD from a cold location to a warm one moisture may condense on the LCD In such a case wipe off the moisture before using your LCD It is recommended to use tissue papers to wipe off the moisture If the LCD surface is still not warm enough moisture may condense again Leave LCD until its surf...

Page 27: ...ng charging time 3 This machine is designed to operate only with special batteries The battery design for only professional or Service Provider can open Do not open or try to disassemble the battery cover on the back yourself 4 While the battery is in use or being charged the battery pack heats up This normal and is not cause concern 5 When the battery indicated iron on the screen flashes or when ...

Page 28: ...xhausted Remote control is incorrectly aimed Change battery Aim the remote control at box Check that nothing blocks the front panel Don t display the subtitle The program signal no subtitle date The subtitle don t open or signal too weak Try press the S TIT button open the subtitle Make sure the signal is good When the machine tries to find and store channels you get the message No signal When onl...

Page 29: ... Can t play the video The file is damaged or code is wrong The format of the video doesn t compatible or file has damaged Change the right files The max bit rate of the video is 8Mbps Picture or video doesn t full screen The resolution of the files not suitable Change the files 7 TECHNICAL SPECIFICATIONS Model Name TFT 1020 LCD Model Size 10 2 inch Digital TFT LCD Active area 222 0 W 132 48 H mm L...

Page 30: ...Bit Rate32k 320kbps CVBS input level range 1 0Vp p 75Ω AV input Supported CVBS systems PAL NTSC AUTO Supported VGA Format 640 480 60Hz 800 600 60Hz VGA input VGA input level range H SYNC 3 3 5 0Vp p V SYNC 3 3 5 0Vp p RGB 1Vp p USB 2 0 Memory Support SD MMC MS Card Max card capacity 2GB Insert Battery Connect 2200Ma h 7 4V input 100V 240V 10 50 60Hz 0 55AMAX Power consumption 18W External power su...

Reviews: