background image

28

You can lock the front panel buttons
to prevent your settings from being
changed accidentally (by children,
for example).
When the panel lock is in ON, all
control buttons on the TV front
panel (except POWER) do not
operate.

1

Select PANEL LOCK.

Then press 

 to display the password entering screen.

2

Using the 

10 number


buttons 

to enter your password,

then press 

ENTER

.

The PANEL LOCK menu screen appears.
If you input the password for the first time, enter the same
password again for confirmation.
• If you input wrong number, “ERROR” will appear for

approx. 4 seconds. Then input correct number again.

3

Press 

 or 

 to select PANEL LOCK and

press 

 or 

 to select ON.

4

Press 

MENU 

repeatedly until the MENU disappears.

If a button on the front panel is pressed, the message
“PANEL LOCK” appears for approx. 4 seconds.

To unlock the panel

Select OFF at step 3 above.

To change password

At step 3 above select NEW PASSWORD and press 

 to

display the password entering screen. Then input new
password.

Using the panel lock feature


:  R E T U R N

M E N U

:  A D J U S T

:  S E L E C T

PA S S W O R D

: RETURN

MENU

: SET

ENTER

[0Ð9] : SELECT


:  R E T U R N

M E N U

:  A D J U S T

:  S E L E C T

  3U84011A [E] P26-34

20/12/05, 15:22

28

Summary of Contents for PL-4201

Page 1: ...Operating Instructions Before operating the unit please read this manual thoroughly 42 Plasma Colour Television PL 4201 3U84011A E COVER 20 12 05 15 21 1...

Page 2: ...o not set the headphone s volume louder extremely Battery notice The legislative organ regulates the disposal of batteries clearly Batteries must be collected from a seller or communities many gatheri...

Page 3: ...8 Stereo reception with the built in tuner 19 Bass Treble and Balance 21 Selecting the BBE 22 Turning off the built in speakers 22 Brightness Contrast Colour and Sharpness DNR 23 Selecting the color t...

Page 4: ...ruct the vents and cause the interior of the set to overheat resulting in faults or damage to the set Taking fall prevention measures If these measures are not taken the unit can fall and you could be...

Page 5: ...ce in direct sunshine When placing on a shelf leave 10 cm free space around the whole unit This Plasma display is designed to be mounted horizontally wide viewing 10cm OK OK Avoid to place the unit on...

Page 6: ...sible Adverse Effects on Plasma Screen If a fixed non moving pattern remains on the plasma screen for long periods of time the image can become permanently engrained in the plasma TV panel and cause s...

Page 7: ...MI PC 5 POWER button To turn the unit standby mode on and off 6 STANDBY ON indicator It lights up in red at STANDBY and in green at POWER ON 7 Remote sensor 8 Loudspeakers 9 HEADPHONES jack Plug headp...

Page 8: ...n 33 Call Menu Select TV channel or Videotext page step by step 17 32 34 In Menu Setting In Standby Turning on the unit 11 Volume 17 In Menu Setting Memorize Videotext ON Mix OFF 32 Reset Sound Pictur...

Page 9: ...e by it Therefore remove the exhausted batteries early 3 1 Open the battery compart ment Close the battery compartment 2 Install the batteries as shown below The remote control handset will not work p...

Page 10: ...e TV s remote control To control the audio turn on the TV and the stereo amplifier and turn off the TV s built in speakers see page 22 C Scart sockets AV1 AV2 AV3 To the connection of scart cables See...

Page 11: ...TO TUNING on the following pages the MENU can be called in the same way as here 4 Press MENU repeatedly until the MENU disappears PICTURE menu Each setting option Short guide AUDIO menu SETUP menu OPT...

Page 12: ...ly until the MENU disappears Teletext Language Selection A U T O T U N I N G M A N U A L T U N I N G C H A L L O C AT I O N T E X T L A N G U A G E W E S T L A N G U A G E E N G L I S H E N G L I S H...

Page 13: ...e 16 Preparation Connect a antenna or a cable net Do not connect any other unit or cable To avoid every reception disturbance all connected unit must be turned off and power supply is connected Press...

Page 14: ...ange all channels begin with program 1 Furthermore continue this procedure to select the broadcast that should be seen on program position 2 3 4 and so on The Automatic station presetting stores the f...

Page 15: ...ormally not necessary If want you can do the manual fine tuning additionally In step 3 when the auto search stopped at each station press or until the desired fine tuning achieved Then press ENTER The...

Page 16: ...this use the remote control of the satellite receiver You can not store the same station once again additionally in PDP Monitor which already stored in satellite receiver Connection to Satellite Recei...

Page 17: ...r QuickView button allows you to go back to the last selected channel Volume adjusting Press or to adjust the volume The volume level disappears after 4 seconds MUTE Press The sound will be cut off MU...

Page 18: ...h to set the OFF TIMER press or to select OFF TIMER at step 1 4 Press MENU repeatedly until the MENU disappears Put your TV into standby mode by pressing POWER button Notes button allows you to set th...

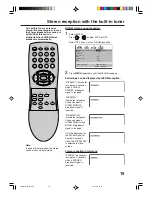
Page 19: ...sturbed NICAM ST illuminates for approx 4 seconds when a NICAM STEREO broadcast signal is received NICAM M1 illuminates for approx 4 seconds when a NICAM MONO A broadcast signal is received NICAM M1 M...

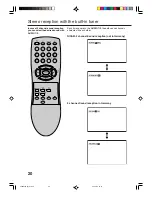
Page 20: ...ound reception you can select the desired sound with AUDIO 1 2 Each time you press the AUDIO 1 2 the both sound channels alternate with each other NICAM 2 channel Sound reception not in Germany 2 chan...

Page 21: ...eatedly until the MENU disappears Notes TocentralizeBASS TREBLEandBAL ANCE press NORMAL in step 1 If you do not press any button within 1 minute the menu will disappear auto matically N I C A M A U T...

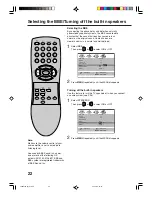
Page 22: ...n you connect an audio system see P 36 1 Select SPEAKERS Then press or to select ON or OFF 2 Press MENU repeatedly until the MENU disappears Note Make sure the volume control of your audio amplifier i...

Page 23: ...C or AUTO was selected at AV COLOUR see P 37 2 Press MENU repeatedly until the MENU disappears Notes To centralize these picture adjust ments press NORMAL in step 1 In HDMI mode the DNR option can not...

Page 24: ...s Blue back You can set the TV to automatically change to a blue screen and mute the sound if the signal is weak or absent or when there is no input from an external device 1 Select BLUE BACK Then pre...

Page 25: ...de FULL SCREEN It shows a 4 3 picture in full screen mode Note A screen is distorted as you approach the both ends of a screen 16 9 It corresponds for 16 9 format which comes from e g DVD or from a Sa...

Page 26: ...picture press 3 Press MENU repeatedly until the MENU disappears Auto 4 3 Default In case AUTO mode is selected for wide mode and any picture width signal is not received you can preset beforehand eit...

Page 27: ...ionary images i e channel identification logo etc 1 Select SCREEN SAVER Then press or to select ON or OFF 2 Press MENU repeatedly until the MENU disappears Static Image Automatically reduce the bright...

Page 28: ...for confirmation If you input wrong number ERROR will appear for approx 4 seconds Then input correct number again 3 Press or to select PANEL LOCK and press or to select ON 4 Press MENU repeatedly unt...

Page 29: ...turned off Plasma TV VGA Cable not supplied Use the optional PC VGA cable not supplied to connect the PDP Monitor with your PC Plug the cable carefully not to break or bend the contact inside of plug...

Page 30: ...ring lines RED GREEN BLUE influences the colour balance the NORMAL button resets these values to the middle WXGA INPUT When you input WXGA set this option to ON WVGA INPUT When you input WVGA set this...

Page 31: ...uncompressed video from a HDMI device or uncompressed digital video from a DVI device When you connect to a DVI device with a HDMI to DVI adapter cable it transfers only the video signal Separate ana...

Page 32: ...ll channels Select the channel that shows teletext Press You will now see a teletext page The channel you have chosen does not send teletext if 100 is shown Press again Teletext and TV picture are sho...

Page 33: ...being shown at the moment Press in order to select subpage 2 4 dashes are shown Enter 0 0 0 2 It can take a minute before subpage 0002 appears Press again in order to switch off the subpage feature Yo...

Page 34: ...The programme number flashes You can conceal as many channels as you like Example 5 channels are automatically stored via the automatic channel storage feature When you keep pressing then the channel...

Page 35: ...pplied RGB provide best possible picture quality Therefore in case of RGB signal s playback color and also sharpness adjustment can not be available Example You will perform the color adjustment as ex...

Page 36: ...AV2 OUTPUT selection Press or to select TV or MONITOR TV the latest channel position MONITOR the picture displayed on TV screen In case of AV2 INPUT selection Press or to select AV or S VIDEO AV Comp...

Page 37: ...sed in Germany NTSC 3 58 is used in the USA PAL 60 used in Germany handled video recorders which play NTSC video tape recording DVD players which are region code free and can play NTSC DVD emit a diff...

Page 38: ...umption PDP HDMI input PC Connection Output Power Surrounding temperature Operating Humidity Dimensions Weight Accessories PAL B G D K I I SECAM L Color System PAL 2 12 X Y Z S1 S41 21 69 SECAM FB FC...

Page 39: ...39 3U84011A E P35 BACK 20 12 05 15 22 39...

Page 40: ...J3U84011A SH 06 02 X 3U84011A E P35 BACK 20 12 05 15 22 40...

Reviews: