background image

IMPORTANT SAFETY INFORMATION

(Continued)

This unit has been produced according to all current safety regulations. The following safety
tips should safeguard users against careless use and the dangers connected with such use.

x

Although this appliance has been carefully manufactured and rigorously checked

prior leaving the factory, as with all electrical appliances it is possible for problems to
develop. If you notice smoke, an excessive build up of heat or any other unexpected
phenomena, you should disconnect the plug from the mains power socket
immediately.

x

Ensure that the unit is sufficiently ventilated! Never place next to or underneath

curtains!

x

The mains plug or appliance coupler is used as the disconnect device, the disconnect

device shall remain readily operarble.

x

This set should only be connected to a mains power supply which matches that

stated on the label on the rear of the TV – do not attempt to connect it to any other
type of supply.

x

The socket – outlet must be installed near the equipment and easily accessible.

x

To prevent overload, don’t share the same mains supply socket with too many other

items of equipment.

x

Apparatus with Class 1  construction shall be connected to a mains socket outlet with

     a protective earthing connection.

x

Keep away from rodents. Rodents enjoy biting into electric flexes.

x

Always hold the plug when pulling out the plug from the mains supply socket. Do not

pull on the flex, the flex can become overloaded and cause a short circuit.

x

Set up the unit so that no one is able to trip over the flex.

x

Do not place heavy items on the flex, which may damage it.

x

Take note that the flex cannot be reached and pulled by young children, avoiding

injury.

x

Do not set up the unit near to heat sources. The casing and the flex could be

damaged by the impact of heat.

x

The screen is made of plastic and can break if damage is done to it. Be careful when

collecting sharp edged plastic splinters to avoid injury.

x

Avoid placing the unit on any surfaces that may be subject to vibrations or shocks.

x

To protect the unit during a thunderstorm unplug the AC power cable and disconnect

the aerial. Caution: Do not touch the aerial (RF) connector.

x

When you leave your home for long periods of time, unplug the AC power cable for

safety reasons.

x

The unit becomes warm when in operation. Do not place any covers or blankets on

the unit in order to prevent overheating. The ventilation holes are not to be blocked.
Do not set up near radiators. Do not place in direct sunshine. When placing on a
shelf leave 5 cm (2”) free space around the whole unit.

x

Do not allow water or moisture to enter the TV. Do NOT use in wet or moist areas

such as Bathrooms, steamy kitchens or near swimming pools.

x

Do not use this unit when moisture condensation may occur

x

Any repairs must be carried out by qualified personnel only.

x

Do not open this unit. A non – expert attempting to repair the unit could be dangerous

and potentially cause a fire hazard.

 2

Summary of Contents for LED-2250

Page 1: ...22 55 5cm 24 61cm HD Full HD LED TV with DVBT Model No LED 2250 2450 For information and support www lenco eu ...

Page 2: ......

Page 3: ...nection Connecting external devices Common Interface slot Auto installation setup Source menu Menu settings 5 6 Unit 4 7 8 11 12 13 14 15 22 1 3 SAFETY INFORMATION TROUBLE SHOOTING GUIDE TECHNICAL SPECIFICATIONS 23 24 Contents ...

Page 4: ...p these instructions Do not use this TV near water Clean only with a slightly damp cloth Do not block any ventilation openings Install in accordance with the supplied Quick Start Guide and this User Guide Protect the power chord from being walked on or pinched particularly at plugs and the point where it exits from the TV Do not allow the power chord to overhang the edge of a table Unplug this TV ...

Page 5: ... the mains supply socket Do not pull on the flex the flex can become overloaded and cause a short circuit x Set up the unit so that no one is able to trip over the flex x Do not place heavy items on the flex which may damage it x Take note that the flex cannot be reached and pulled by young children avoiding injury x Do not set up the unit near to heat sources The casing and the flex could be dama...

Page 6: ...away from direct sunlight and strong lights soft indirect lighting is recommended for comfortable viewing Use curtains or blinds to prevent direct sunlight falling on the screen Place the TV on a sturdy platform of which the surface should be flat and steady This will prevent it from falling over Make sure the television is located in a position where it cannot be pushed or hit by objects as press...

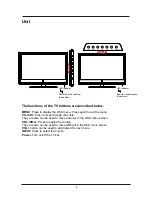
Page 7: ...p in the OSD menu screen VOL VOL Press to adjust the volume They are also can be used to move left right in the OSD menu screen VOL button can be used to skip forward to next menu INPUT Press to select the source Power Turn on off the TV set 4 LED Indicator Remote Control window Keep clear INPUT MENU CH CH VOL VOL POWER INPUT MENU CH CH VOL VOL POWER LED Indicator Remote Control window Keep clear ...

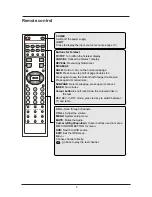
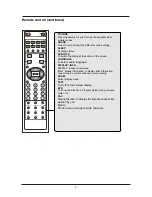
Page 8: ...ess to see top half of page double size Press again to see the bottom half of page double size Press again for normal size SUBPAGE Selects subpage press again to cancel INDEX Go to index Colour buttons short cuts follow the coloured links in the text RED KEY In DTV mode press red key to switch between TV and radio CH Scan through channels VOL Adjust the volume MENU System setup menu MUTE Mutes the...

Page 9: ...Y INFO DISPLAY display current mode INFO Means information to display brief information concerning the current channel you are viewing ZOOM Select display mode TEXT Turn off on the Teletext display EPG To show the Electronic Program Guide during no menu state only FAV Means favorite to display the favorite channel list defined by you FAV Press to scan through favorite channels INPUT POWER NICAM A2...

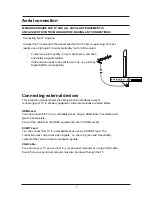
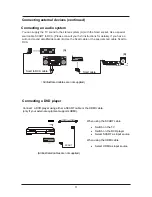
Page 10: ...es This instruction manual shows the simplest and most effective way of connecting your TV to ancillary equipment Alternate methods are listed below HDMI Lead You can connect this TV to a compatible device using a HDMI lead This method will give the best picture Connect the cable from the HDMI equipment to the TV HDMI socket SCART Lead You can connect this TV to a compatible device using a SCART l...

Page 11: ...al to receive TV signal R L in Connect them to the audio output terminal of DVD shared with YPbPr VIDEO Connect it to video output terminal of DVD YPbPr Connect them to the YPbPr video output terminal of DVD used in component source POWER Connect to the mains adaptor USB For DVB T software upgrade only HDMI Connect it to the HDMI of DVD or other equipment VGA For PC display Connect it to the D Sub...

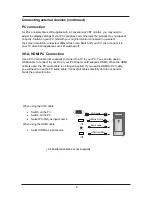
Page 12: ...PC VGA cable not supplied to connect the TV to your PC You can also use an HDMI cable to connect to your PC if your PC Graphic card supports HDMI When the HDMI cable is used the PC audio cable is no longer required If you use the HDMI to DVI cable you will need to use the PC audio cable Connect all cables carefully and do not bend or break the connector pins When using the VGA cable x Switch on th...

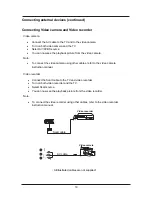
Page 13: ...er cables refer to the video camera instruction manual Video recorder x Connect the Scart cable to the TV and video recorder x Turn on both video recorder and the TV x Select Scart source x You can now see the playback picture from the video recorder Note x To connect the video recorder using other cables refer to the video recorder instruction manual Video camera Video recorder AV cable Scart cab...

Page 14: ...x Switch on the DVD player x Select SCART as input source When using the HDMI cable x Select HDMI as input source HDMI to HDMI SCART All illustrated cables are not supplied Connecting external devices continued You can supply the TV sound to the stereo system A with the Scart socket Use a special scart cable SCART to RCA Please consult your hi fi instructions for details If you have a surround sou...

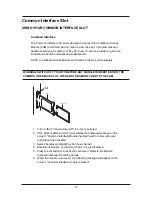
Page 15: ... INTO THE COMMON INTERFACE SLOT THEN ADD THE SMART CARD TO THE CAM 1 Turn on the TV and ensure DTV Source is selected 2 If the CAM is detected the TV will display the following message on the screen Common Interface Module inserted wait for a few moments until the card is activated 3 Select the relevant digital Pay Per View channel 4 Detailed information on the Smart Card in use is displayed 5 Pre...

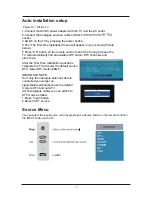
Page 16: ...4 The The First time installation menu will appear on your screen Picture below IMPORTANT NOTE So if only the analogue antenna cable is connected you will get no signal below picture because the default mode is DTV and not ATV ATV Analogue cable you can switch to ATV mode as follow 1 Press input button 2 Select ATV source 5 Press OK button on the remote control to start the Tuning process The TV w...

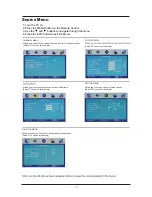
Page 17: ...of lock time and setup options SETTING MENU Allows you to setup a variety of setup options CHANNEL MENU Allows you to search channels and set up a variety of channel options Select DTV source for example Allows you to customize the sound options and effects Select DTV source for example Select DTV source for example Select DTV source for example Select DTV source for example Bas c Use Source Menu ...

Page 18: ...enu Program Select the program you want to edit Color Sys Select the color system for the program you want to edit Sound Sys Select the sound system for the program you want to edit Manual Search Use and button to manual search AFT Turn on off the Auto Frequency Tuning function for Manual Search Fine Use and button to fine tune Skip Select Yes to skip the program when you scan the programs by CH A...

Page 19: ...ay the frequency of the channel it found Manual Program menu for DTV Program Edit menu for DTV Program Edit menu for ATV TV List 07 05 09 00 45 No Program Name Status 001 7 Digital 002 7 Digital 1 003 7 Digital 2 004 7 Digital 3 005 7 HD Digital 006 LUXE TV SD 007 LUXE TV UK HD 008 LUXE TV HD 009 BBC ONE Exit Switch MENU Ch5 177500 Khz PID V 1025 A 1026 Lock Fav ALL FAV LOCK EDIT Â8VH WKH Ÿź EXWWR...

Page 20: ...buttons 2 to select between a b c and 2 and useǏOKǐbutton to save Use the cursor buttons to select the chan nel you want to Skip UseǏOKǐbutton and will be shown at the channel selected To remove the skip function by usingǏOKǐ button again When a channel has been selected to Skip you still may select that channel with the numeric buttons Use the cursor buttons to select the channel you wish to dele...

Page 21: ... be selected in ATV mode Sharpness Colour Temp Noise Reduction Increase this setting to see crisp edges in the picture decrease it for soft edges Choose from Normal Cool and Warm Reduce any interference noise by selecting ON Note Contrast Brightness Color and Sharpness can only be adjusted in the Personal mode option in the Picture Mode Settings Use the and buttons to select the PICTURE menu as th...

Page 22: ... is set to User Controls the relative intensity of higher pitched sounds Balance To adjust the balance of the left and right sound track or turn off the volume of the left and right sound track AVL Control the volume of the program automatically when you turn on the function by selecting On Application Use the and buttons to select the SOUND menu as the picture above press button to enter the menu...

Page 23: ...plays on the screen Transparence Allows you to select the transparence for OSD menu displays on the screen Turn on off the overscan funciton Can be selected in HDMI mode Overscan Reset Press button to restore factory default Use the and buttons to select the SETTING menu as the picture above press button to enter the menu Menu Settings continued 20 ...

Page 24: ...Aspect Allows you to select the screen display mode Can be selected in DTV mode Can be selected in ATV mode Can be selected in ATV mode System Lock Press button and enter the code to enter the submenu The original code is 0000 FTI First Time Installation Press button to enter the First Time Installation menu System Lock Turn on off the system lock function Child Lock Lock the channel you have to e...

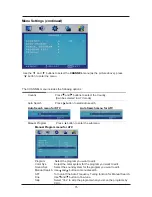
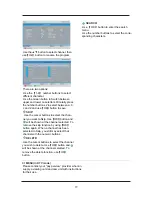
Page 25: ...enter the menu Menu Settings continued H Position Clock Adjust the pixel clock frequency until the image size is maximized for the screen Phase Adjust the phase of the ADC sampling clock relative to the sync signal until a stable image is obtained V Position Adjust the vertical position of the screen Auto Adjust Press button to setup the parameter of the screen automatically 22 ...

Page 26: ...e MUTE button and check if Mute mode is set Switch to another channel and see if the same problem occurs Press V button to see if the problem can be solved No picture on some channels Check that correct channel is selected Adjust the antenna No colour on some channels black white Check if the same problem exists on other channels Ensure the correct picture settings are selected Noisy Snowy Ghostin...

Page 27: ...nformation in this table due to technical innovations TV Specifications TV System PAL BG DK I Audio System BG DK I L L Screensize 22 24 Diagonal Resolution 1920 x 1080Pixels RGB Aerial input 75 unbalanced Audio output power 2 x 3W Power requirements 12V 3 33A Power consumption 40W 24 SECAM L L BG DK ...

Page 28: ...I LENCO II LED 2250 22 55 8 43 29 I LENCO II LED 2450 24 60 9 47 32 ...

Page 29: ......

Reviews: