background image

- 5 - 

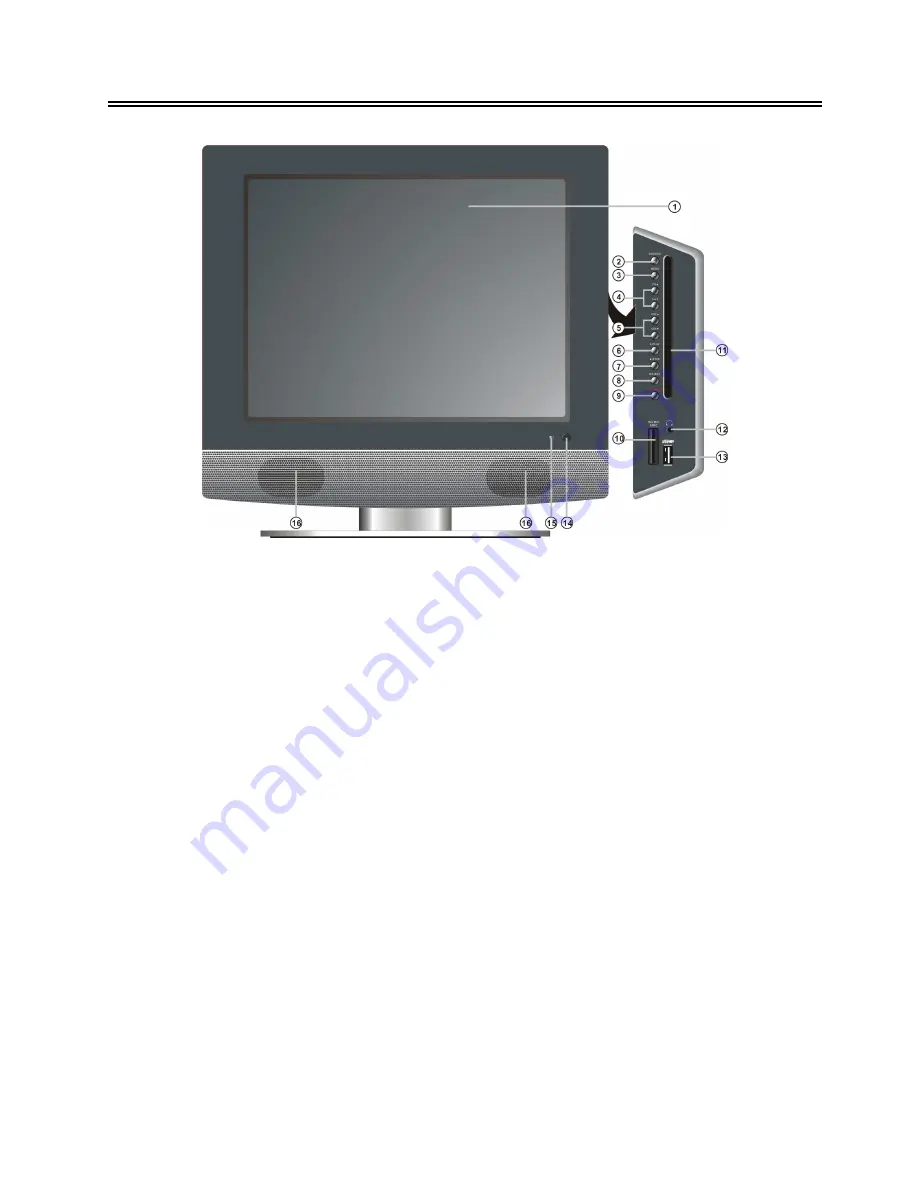
Front Panel                                                     


1.  Colour TFT screen 

2.  SOURCE button 

Press 

this button

 repeatedly to select input, 

choose  from:  TV,  SCART,  Composite, 

S-VIDEO,  COMPONENT,  VGA,  DVD  or 

DVB mode. 

In setup menu, use the ENTER button for 

the same function.   

3.  MENU button 

Press 

this button

 to enter or exit the setup 

menu. 

4.  CH 

/

  button 

In  TV 

or  DVB  mode

,  press 

it

  to  select 

channels. 

In  setup  menu,  use  the 

/

  direction 

buttons for the same function.   

5.  VOL 

/

  button 

Press 

it

 to increase or decrease the volume; 

In  setup  menu,  use  the 

/

  direction  for 

the same function. 

6. 

PLAY button 

Press 

it

 to play the disc in DVD mode. 

7. 

 STOP button 

Press 

it

 to stop disc playback. 

8.  EJECT button 

Press 

it

 to eject the disc out. 

9.  POWER button 

Press 

it

 to enter or exit the standby mode. 

10.  SD/MS/MMC Card Port 

Insert the SD/MS/MMC card into the port. 

11.  Disc Tray Slot 

Used to load 

the

 disc. 

12.  Earphone Jack


When  connected  to 

an

  earphone,  the 

internal speakers will automatically turn off. 

13.  USB Connecting Port 

To connect an external USB device. 

14.  Remote Sensor 

15.  Power Indicator 

During  normal  operation,  it  is  blue;  in 

standby mode, it is red. 

16.  Speakers 


Summary of Contents for DVT-1541

Page 1: ...dio Setting 19 Timer Setup Setting 20 TELETEXT Function 25 NICAM Function 26 DVB T Setup 27 System Setting 27 Channel Setting 31 Channel Favorite List 33 System Info EPG 35 DVD Playback Operation 37 D...

Page 2: ...hout authorisation from the manufacturer s or authorised service agent WARNING The apparatus shall not be exposed to dripping or splashing and that no objects filled with liquids such as vases shall b...

Page 3: ...stallation and interconnection of the apparatus 10 The apparatus shall not be exposed to dripping or splashing and that no objects filled with liquids such as vases shall be placed on the apparatus 11...

Page 4: ...playback of CD R or CD RW discs created on a computer requires proper formatting and finalization of the disc for audio playback Some computers and or software programs may not be capable of creating...

Page 5: ...decrease the volume In setup menu use the direction for the same function 6 PLAY button Press it to play the disc in DVD mode 7 STOP button Press it to stop disc playback 8 EJECT button Press it to e...

Page 6: ...O signal source In COMPOSITE mode connect the external video signal source The L R audio input jacks can be used in both S VIDEO and COMPOSITE modes 3 SCART Input Jack To connect a SCART signal source...

Page 7: ...n the remote is not in use for a long time Using of Remote control Point the remote control unit from no more than about 7 meters from the remote control sensor and within about 60 degrees of the fron...

Page 8: ...ion about the current program in TV or DVB mode 9 SET FAV button Press to set the current channel as your favourite channel in TV or DVB mode 10 0 9 Number buttons Press to select numbers 11 FAV butto...

Page 9: ...ess to play a disc when in DVD mode 27 STOP button Press to stop disc playback in DVD mode 28 EJECT button Press to eject the disc 29 button In DVD mode press to search backward or forward In teletext...

Page 10: ...ayback function in DVD mode Press to exit the setup menu in DVB mode 37 CARD AUDIO button In teletext mode press to select four groups of 3 digit numbers that are displayed in different colours at the...

Page 11: ...Connecting to an External AV Signal Source Use the AV cables to connect the external AV signal source to the AV input jacks on the rear panel of the unit Use a S VIDEO cable not supplied to connect t...

Page 12: ...After connection turn on the power of the unit and external AV signal source and then press the INPUT button to select COMPONENT mode Note Ensure the AV signal source is also switched to component vid...

Page 13: ...ht side of the unit s rear panel and the other to the PC 2 Connect one end of the audio cables to the PC audio input jack on the right side of the unit s rear panel and the other to the PC audio outpu...

Page 14: ...matically after the earphones have been connected Note Excessively loud volume could damage your hearing Turn down the volume before you connect the headphones and then raise the volume to a comfortab...

Page 15: ...search and store the channels by following the steps on pages 20 21 22 and 23 1 For 0 9 channel Press one of the number buttons to select the desired channel and wait several seconds and it will go t...

Page 16: ...our selection Press the MENU button to return to the previous menu Picture Setup Press the button to select Picture and press the ENTER button to enter Press the button to select the desired item and...

Page 17: ...and press the button to adjust the value Press the MENU button to return to the previous menu Sharpness Setup Press the button to select Sharpness and press the button to adjust the value Press the ME...

Page 18: ...tton to select Phase and press the button to adjust the value Press the MENU button to return to the previous menu Clock Press the button to select Clock and press the ENTER button to enter it s menu...

Page 19: ...n to the previous menu Auto Volume Setup Press the button to select Auto Volume and press the ENTER button to access the menu Press the button to select On or Off and press the ENTER button to confirm...

Page 20: ...on to return to the previous menu Press the MENU button once to enter the setup menu Press the button to select Setup and press the ENTER button to enter the menu as show on the right In the Setup men...

Page 21: ...ng press the menu button Prog Organizer Press the button to select the Prog Organizer and press the ENTER button to enter the menu shown on the right In the Prog Organizer setup menu press the button...

Page 22: ...ap from Ch and press the ENTER button to enter Press the number buttons to select program number Repeat the above operations to Swap To Ch Then Press the button to select Perform Swap and press the EN...

Page 23: ...rn to the previous menu Store Press the button to select Store and press the ENTER button to store the above operations Note The CH NO and Store items only function when the program has stopped search...

Page 24: ...ton to reset your unit to the original status or cancel Press the MENU button to return to the previous menu SCART Mode Press the button to select SCART Mode and press the ENTER button to enter Press...

Page 25: ...letext display and wait for page updates and press again to resume 3 button Press this button to select the index page 4 button Press this button once to display the concealed information such as solu...

Page 26: ...dio signals press the STEREO AUDIO button on the remote control repeatedly to shift the sound tracks between Nicam Mono and Mono and the screen will show the corresponding display as shown below Under...

Page 27: ...ERROR stackunderflow OFFENDING COMMAND STACK...

Reviews: