LENCO DVP-74 Owner'S Manual Download Page 13

~ 11 ~

Cautions in Using Battery Pack

Danger!

Strictly follow these safety information when using the battery pack, Otherwise, a short circuit, overheating, smoke, fire, 
or damage to the product may result.

   Never disassemble or modify the battery pack in any way. Do not touch the terminal of the battery pack with a metal object.
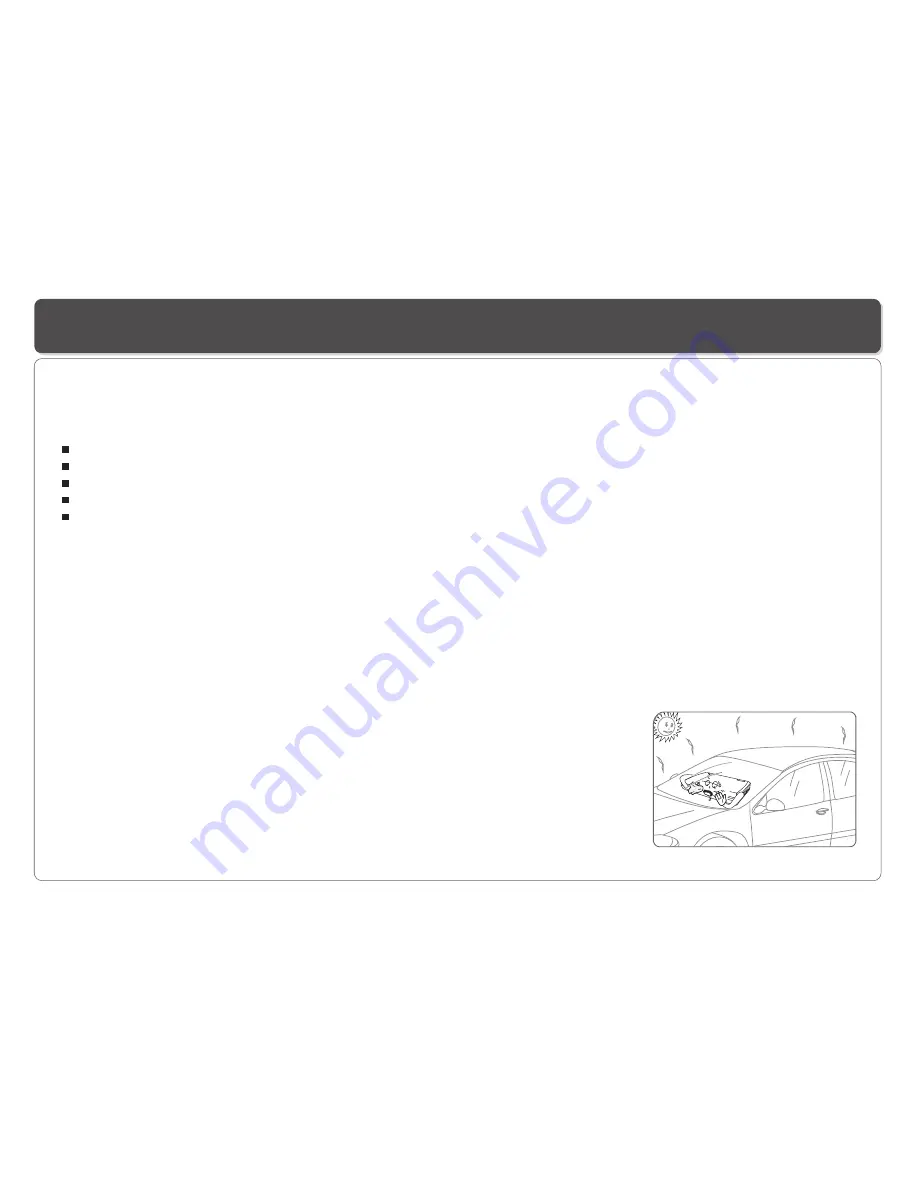
   Do not place the battery pack in direct sunlight, dashboard of a vehicle, or high temperature place. It can cause explosion or fire.
   Do not expose the battery pack to water, fire, or heat.
   Always use the included AC adaptor when charging the battery pack.
   This battery pack is designed exclusively for your portable DVD player. Do not use it with other devices.

Warning!

1. Do not drop or subject to strong vibration.
2. Keep out of reach of children.
3. The battery pack may leak fluid that is harmful to your eyes.
If this fluid gets in your eyes, wash eyes immediately with large amounts of running water and get medical attention immediately.
If the fluid gets on your skin or clothing, wash immediately with water.

x

Caution!

1. If you do not plan to use the player for a month or longer, remove the battery, but charge the 
    battery every three months. This will extend the battery life as well as prevent the battery from 
    leaking chemicals and having other safety issues.
2. Do not use the AC adaptor or battery pack for a prolonged period of time during recharging. 
3. Keep the battery pack free from smoke, steam, moisture, and dust.

o

o

o

o

4. Using the battery pack under 0 C (32 F) or over  40 C(104 F) can cause reduced battery life.

Summary of Contents for DVP-74

Page 1: ...ENGLISH PORTABLE DVD PLAYER PORTABLE DVD PLAYER PORTABLE DVD PLAYER Please read this manual before operating OWNER S MANUAL OWNER S MANUAL OWNER S MANUAL OWNER S MANUAL...

Page 2: ......

Page 3: ...in Using Battery Pack 11 Installing Carrying Bag Car Harness Kit Optional Accessory 12 Playing a Disc 13 15 Playing MP3 and Regular Audio CD 16 Playing Picture CD 17 Displaying and Sorting Files 18 Se...

Page 4: ...age your hearing 5 The Player should be connected to a power supply only of the type described in the operating instructions or as marked on the Player Please read all of the safety and operating inst...

Page 5: ...ack starts each time when the MARK button is pressed later on 1 MENU PBC Button 2 L R Button 3 P N Button 4 TITLE Button 5 SUBTITLE Button 6 Number Buttons 0 1 9 7 SETUP Button 10 SKIP FORWARD Button...

Page 6: ...T 1 2 2 REMOTE CONTROL SENSOR 3 USB Slot 1 LED LIGHT Description 1 OPEN 2 DISC COVER 3 LCD 4 SPEAKER 2 DC IN 12V 7 MENU PBC 9 DVD USB 8 SETUP LCD adj 11 PLAYBACKBUTTONS FAST REVERSE SKIP PREVIOUS FAST...

Page 7: ...control Point the remote control directly at the remote sensor on the front of the DVD Player 5 6 1 Press the locking tab in the arrow direction 1 2 3 4 2 Pull out the battery tray 3 Insert a 3V lithi...

Page 8: ...essory Note When the earphone is connected to the Phone Jack the speaker will be disconnected Earphone is an optional accessory You can attach an earphone with a stereo mini jack plug to the phone jac...

Page 9: ...rn off DVD player and TV 2 Connect the audio and video cables as illustrated below 3 Turn on DVD player and TV 4 Repeatedly press TV Video button on your TV to select the input from the DVD player You...

Page 10: ...device simply grasp the end of the USB and remove it from the slot Playing a USB device The player accepts most USB devices such as MP3 DSC USB drive Digital Camcorder etc The USB in this Player supp...

Page 11: ...of time the adaptor may heat up this is normal and is not a cause for concern When not using the adaptor unplug it from the outlet This portable DVD player can be powered by AC through the supplied sw...

Page 12: ...tery pack 1 Attach the battery pack to the Player 2 Use the AC adapter to charge the battery pack Make the connection as illustrated below 3 Slide POWER to OFF The Player must be turned off to charge...

Page 13: ...devices Warning 1 Do not drop or subject to strong vibration 2 Keep out of reach of children 3 The battery pack may leak fluid that is harmful to your eyes If this fluid gets in your eyes wash eyes i...

Page 14: ...Accessory 1 Connect the Car Adaptor between your car cigarette lighter and the Player 2 Turn on the Player s power 3 To flip the image upside down a Press and hold SETUP LCD adj to bring up screen ad...

Page 15: ...OP button is pressed again or the player is turned off the RESUME function will be lost Resume You can skip chapters on DVD Video tracks on CDs and Video CDs 1 To skip forward press during play it ski...

Page 16: ...marked scene The Playback continues until the end of the disc Repeat the above to play the other marked scenes B To play from a specific point of time 1 Press GOTO twice to move to the time display an...

Page 17: ...ess TITLE it takes you to the very beginning of the title and play or to the MENU if it has title menu DISPLAY Repeatedly press DISPLAY during playback to display various playback information such as...

Page 18: ...ISO 9660 or JOLIET format Valid MP3 CD Play In most cases when a MP3 or audio disc is placed into the player the first song file of the first folder plays In other cases the file manager appears Use...

Page 19: ...ears Use direction keys and to select the picture and press PLAY on the Player or on the remote control to start the slide show plays photos automatically To return to file manager press MENU PBC To d...

Page 20: ...file types 1 Press STOP and select FILE TYPE and press to confirm 2 Select the file type you do not want to display and repeatedly press so the check mark disappears 3 Repeat STEP2 to hide the other f...

Page 21: ...Changing menu language Changing voice language Changing subtitle language Select OSD Language Setup English French German Italian Spanish OSD Menu Audio Subtitle Select OSD Language Setup English Chi...

Page 22: ...the screen are cut off and displays the central portion of the 16 9 screen 1 Press SETUP on the remote control 2 Use the direction keys to select Screen Setup and its sub menu 3 Press to confirm your...

Page 23: ...Downmix 1 Press SETUP on the remote control 2 Use the direction keys to select Audio Setup and its sub menu 3 Press to confirm your selection 4 Press SETUP to exit Change Downmix Select OSD Audio Setu...

Page 24: ...ENTER to confirm 2 Key in your old password 8888 if this is the first use 3 Key in new password and again to verify Select OSD Custom Setup Parental Ctrl Password Angle Mark Default Old New Verify Tur...

Page 25: ...to display the menu 2 Use to select the Brightness Contrast Color and use to make the adjustment Press ENTER to confirm 3 To reverse the screen select REVERSE and press ENTER to confirm 4 To reset th...

Page 26: ...ly The batteries may be dead Replace them with new batteries Check that the signal transmission is directed at the remote control sensor on the DVD player Check that the disc is a DVD DVD RW VIDEO CD...

Page 27: ...DVD or battery pack is overheated you will not be able to charge the battery pack LED charging indicator quickly turns to Green Charging LED indicator does not light Disconnect the AC adaptor and rec...

Page 28: ...inal Voltage SPECIFICATION 7 2V Max Charge Current 2 5HR 2A 2 0HR Use Time Charge time in Full Battery Specifications Operating environment Charge 0 C 45 C Discharge 20 C 45 C Store less than 1 month...

Page 29: ......

Reviews: