background image

TECHNICAL SPECIFICATIONS

Specifications of the TV that you have just purchased may vary from the information in this

table due to technical innovations.
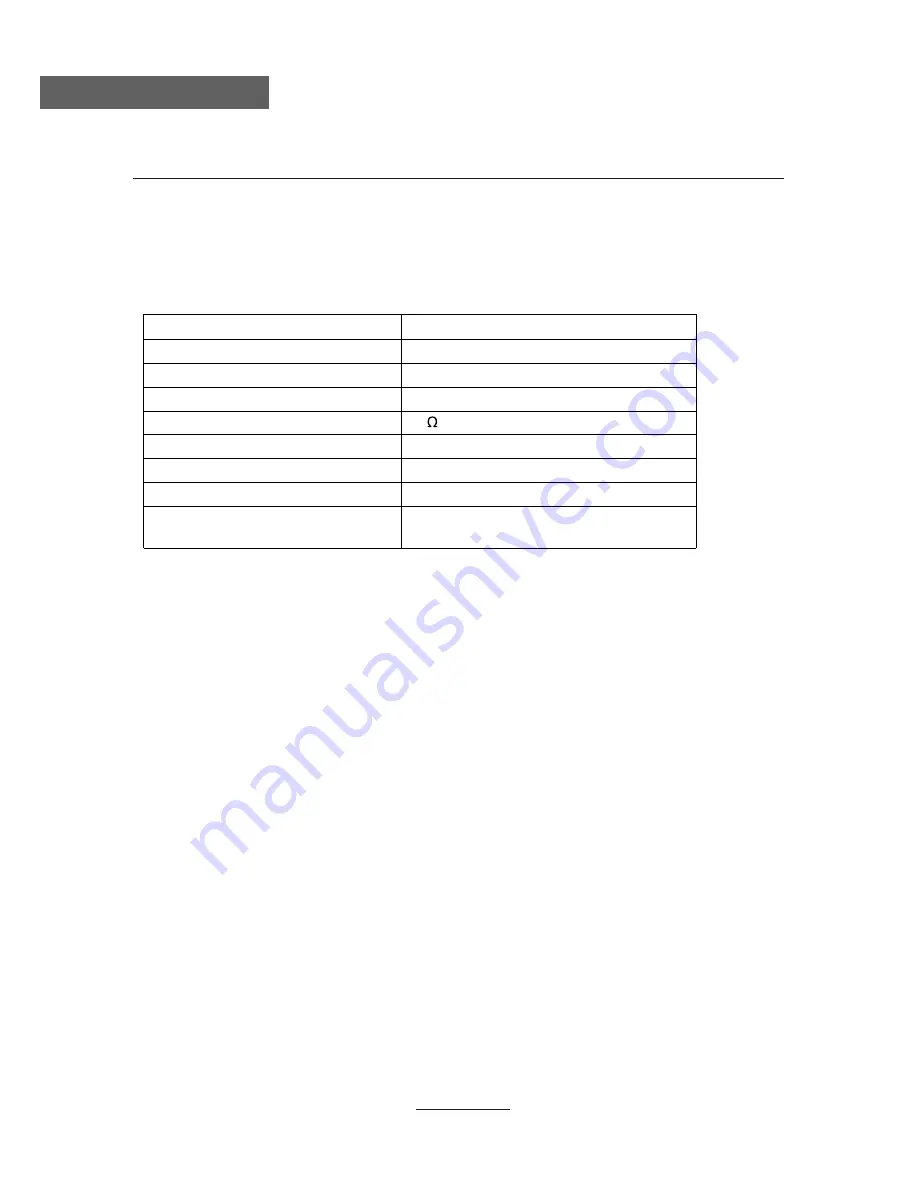
TV Specifications

TV System

PAL / BG / DK / I ;

Audio System

BG / DK / I /

SECAM /BG /DG / L/L’

Screensize

26”(Diagonal)

Resolution

1920 x 1080Pixels(RGB)

Aerial input

75

(unbalanced)

Audio output power

2 x 8W

Power requirements

Power consumption

80W

 33

USB File System

Hi speed fs,FAT32,FAT16
(max supported size 1TB)

AC 100-240V~ 50/60Hz

Technical specifications

L/L’

Summary of Contents for DVL-2493

Page 1: ...66cm 26 LED TV with DVD DVBT Model No DVL 2690 For information and support www lenco eu ...

Page 2: ......

Page 3: ... INFORMATION TROUBLE SHOOTING GUIDE TECHNICAL SPECIFICATIONS 32 DVD Operation 9 16 33 Contents OSD Menu Channel menu 9 Picture menu 11 Sound menu 12 Time menu 13 Option menu 14 Lock menu 15 17 19 Multimedia Operation Recording Operation 20 22 24 31 Simple Troubleshooting 23 4 Front View Hotel menu 16 ...

Page 4: ...p these instructions Do not use this TV near water Clean only with a slightly damp cloth Do not block any ventilation openings Install in accordance with the supplied Quick Start Guide and this User Guide Protect the power chord from being walked on or pinched particularly at plugs and the point where it exits from the TV Do not allow the power chord to overhang the edge of a table Unplug this TV ...

Page 5: ...from the mains supply socket Do not pull on the flex the flex can become overloaded and cause a short circuit Set up the unit so that no one is able to trip over the flex Do not place heavy items on the flex which may damage it Take note that the flex cannot be reached and pulled by young children avoiding injury Do not set up the unit near to heat sources The casing and the flex could be damaged ...

Page 6: ...away from direct sunlight and strong lights soft indirect lighting is recommended for comfortable viewing Use curtains or blinds to prevent direct sunlight falling on the screen Place the TV on a sturdy platform of which the surface should be flat and steady This will prevent it from falling over Make sure the television is located in a position where it cannot be pushed or hit by objects as press...

Page 7: ...on standby the TV set DVD Insert a 12cm disc according to the silk IR Infrared Receiver Receives IR signals from the remote control Power on Standby LED indicator Press POWER to turn on and off The effective receiving range for the signal is 5 8 metres from the front of the remote control window and 300 to the left or right side and 200 above or below the control window Indicator on Blue Standby m...

Page 8: ...yback and PVR Do not use USB extension cable to connect any USB device HDMI1 2 3 Connect it to the HDMI of DVD or other equipment VGA For PC display Connect it to the D Sub 15 pins analog output connector of the PC PC IN Connect it to the audio output terminal of PC SCART Connect them to the SCART video output terminal of DVD used in component source Headphone Connect it to your headphone or other...

Page 9: ... Turn on off the subtitle display in DTV mode and DVD mode EPG To show the Electronic Program Guide during no menu state only in DTV mode REP Repeat playing the title or chapter Load eject DVD disc CURSOR KEYS OK Allows you to navigate the on screen menus and adjust the system settings to your preference NUMBER BUTTONS Press0 9 to select a TV channel directly when you are watching TV Return to the...

Page 10: ...nd end of it GOTO Play your favorite title chapter track SLOW Play DVD programs at slow speed Colour buttons Short cuts follow the coloured links in the text CH Scan through channels VOL Adjust the volume PICTURE Select the picture mode NICAM A2 TV Nicam A2 select SOUND Select the sound mode SLEEP Standby timer SCREEN Turn on off the screen TV TXT Turn off on the Teletext display CANCEL Cancel the...

Page 11: ...lect the input source make sure the connections are prepared Basic OSD Menu operation Press MENU button to display the OSD menu as below Use Ĥ ĥ Ĥ ĥ button to select the main menu and press button to enter the submenu In the submenu use Ĥ ĥ ĥ or press OK button to enter the submenu Press MENU button to return to the upper menu Press EXIT button to exit the menu display Note1 Only when you input th...

Page 12: ...lect a DTV channel and press OK button to start searching ATV Manual Tuning Press OK button to enter the ATV Manual Tuning menu Storage To Select a position for storing the program System Select a TV system for searching Current CH Select the channel you want to manual tuning Search Press button to manual search Fine Tune Press button to fine tune Frequency Display the current frequency Note Press...

Page 13: ...ess menu to exit and it will automatically save the current set Skip Select a channel and press the BLUE button to label the channel as long as the channel has a skip label it will be skipped when searching through the channels with the CH buttons Rename Select an ATV channel and press the GREEN button to change the name of the channel by buttons FAV Select a program press FAV button to set or del...

Page 14: ...for soft edges Tint Controls the tint NTSC mode only Color Temperature Choose from Medium Cool User and Warm Note Red Green and Blue are only available in PC VGA mode when in Colour Temperature Mode Red Controls the red colour of the picture Green Controls the green colour of the picture Blue Con trols the blue colour of the picture Aspect Ratio Choose from 4 3 16 9 Zoom1 Zoom2 Just Scan and Panor...

Page 15: ...e sound mode is set to User Controls the relative intensity of lower pitched sounds Balance To adjust the balance of the left and right sound track or turn off the volume of the left and right sound track Auto Volume Control the volume of the program automatically when you turn on the function by selecting On Surround Sound Turn on off the surround sound function by selecting off on SPDIF MODE All...

Page 16: ...er the submenu you could set the time when the TV set will be turned on automatically you could also set the Source Channel Volume Sleep Timer Allows you to setup the sleep timer among 10min 20min 30min 60min 90min 120min 180min 240min and off Auto Sleep Turn on off the auto standby function Time Zone Allows you to select the time zone 4 TIME menu Description No Action Auto Stanbdy According to th...

Page 17: ... be selected in DTV mode Allows you to select first and second subtitle language OSD Duration Allows you to setup the time of the menu display on the screen among 5s 10s 15s 20s 25s 30s 35s 40s Country Display the current Country and you should select the Country when you want to auto tuning Restore Factory Default Press OK button to restore factory default 5 OPTION menu Description 14 OSD Duratio...

Page 18: ...ode has been changed you must enter the present code New Enter the new password Confirm Enter the new password Block Program Lock the channel you have to enter the code to view the channel Use and buttons to select the channel and press the GREEN button on the remote control to lock the channel or cancel Parental Guidance Allows you to select the Parental Guidance mode 6 LOCK menu Hotel model ...

Page 19: ...OSD Menu OSD Menu 7 Hotel Mode 16 DTV Input Source ATV SCART YPBPR PC HDMI1 HDMI2 AV USB CADTV DVD HDMI3 ...

Page 20: ...ect the kind of the files in the device you want to program from PHOTO MUSIC MOVIE and TEXT Press button to select the device and press OK button to enter 1 Press the INPUT button on the remote control to display the input source menu select USB source by the buttons and press OK button to enter the Multimedia menu seen below MAINS MENU PHOTO MUSIC MOVIE TEXT MAINS MENU PHOTO MUSIC MOVIE TEXT Prev...

Page 21: ...hoto clockwise counterclockwise Zoom Out In Zoom out in the photo Move View Move the photo in Zoom in mode Press button to select the option on the table and press OK button to change Press button to select the music and press OK button to program Repeat Select the repeat mode from Repeat All Repeat 1 Repeat None Goto Time Program the music form the time you set Press OK button to display the time...

Page 22: ...s button to cancel Step Step the programs by OK button press button to cancel Goto timer Program the movie form the time you set Zoom out in Zoom out in the movie screen Aspect Ratio Select the aspect ratio of the screen display Move View Move the photo in Zoom in mode Press button to select the option on the table and press OK button to change Prev Next page Turn to previous next page of the text...

Page 23: ...you select Recording Operation 20 Recording Operation 2 Recording Mode TITLE Display the name of the recording program MODE Select the record mode Start Time Select the start recording time End Time Select the end recording time Press OK button to save the setting and exit the menu Set the recorded mode The TV will record the program automatically according to your settings Recording Timer Recordi...

Page 24: ...the remote control 4 PVR File System Setup the PVR File system before you start recording Select Disk Select the device for the Record files Check PVR File System USB Disk Display the USB state Format Format the USB device for PVR operating Time Shift Size Display the size of the USB device The device has been formated Speed Display the speed of the USB device The device has been formated Recordin...

Page 25: ...mode c Press PLAY button to play the program you are recording from the beginning 5 Record Start PAUSE Press to enter the timeshift mode When you press REC button the screen will display the recording menu as below Press PAUSE button to enter the Timeshift mode and the picture will be paused the recording will begin Playback Recording list Press to display the recording list Stop Press to stop rec...

Page 26: ...re quality Check the aerial connections Check that the channel is tuned in properly Adjust the picture settings brightness colour sharpness contrast hue Make sure that the TV is not located close to electrical appliances that may emit radio frequency interference No colour Adjust the colour setting Check that the programme is broadcast in colour Check that the cannel is tuned properly TV does not ...

Page 27: ...ying surface Hold the disc around the outside with your fingers and place the disc into the slot The player will automatically draw the disc into the player To Eject the disc press the EJECT button on the TV or the button on the remote control Insert Disc according to picture next to disc slot Audio DVD Operation DVD Operation 4 3 Pan Scan 4 3 Letter Box Wide 4 3 PanScan 4 3 Letter Box Wide ...

Page 28: ...25 DVD Operation DVD Operation ...

Page 29: ...26 DVD Operation DVD Operation ...

Page 30: ...27 Spdif Setup DVD Operation DVD Operation ...

Page 31: ...28 or NO disc DVD Operation DVD Operation ...

Page 32: ...29 DVD Operation DVD Operation ...

Page 33: ...30 DVD Operation DVD Operation ...

Page 34: ...3 DVD Operation DVD Operation 1 ...

Page 35: ...on and check if Mute mode is set Switch to another channel and see if the same problem occurs Press V button to see if the problem can be solved No picture on some channels Check that correct channel is selected Adjust the antenna No colour on some channels black white Check if the same problem exists on other channels Ensure the correct picture settings are selected Noisy Snowy Ghosting picture C...

Page 36: ...tions TV Specifications TV System PAL BG DK I Audio System BG DK I SECAM BG DG L L Screensize 26 Diagonal Resolution 1920 x 1080Pixels RGB Aerial input 75 unbalanced Audio output power 2 x 8W Power requirements Power consumption 80W 33 USB File System Hi speed fs FAT32 FAT16 max supported size 1TB AC 100 240V 50 60Hz Technical specifications L L ...

Page 37: ...I LENCO II DVL 2690 26 66 58 4 40 ...

Page 38: ......

Reviews: