background image

IMPORTANT SAFETY INFORMATION

(Continued)

This unit has been produced according to all current safety regulations. The following safety
tips should safeguard users against careless use and the dangers connected with such use.

x

Although this appliance has been carefully manufactured and rigorously checked

prior leaving the factory, as with all electrical appliances it is possible for problems to
develop. If you notice smoke, an excessive build up of heat or any other unexpected
phenomena, you should disconnect the plug from the mains power socket
immediately.

x

Ensure that the unit is sufficiently ventilated! Never place next to or underneath

curtains!

x

The mains plug or appliance coupler is used as the disconnect device, the disconnect

device shall remain readily operarble.

x

This set should only be connected to a mains power supply which matches that

stated on the label on the rear of the TV – do not attempt to connect it to any other
type of supply.

x

The socket – outlet must be installed near the equipment and easily accessible.

x

To prevent overload, don’t share the same mains supply socket with too many other

items of equipment.

x

Apparatus with Class 1  construction shall be connected to a mains socket outlet with

     a protective earthing connection.

x

Keep away from rodents. Rodents enjoy biting into electric flexes.

x

Always hold the plug when pulling out the plug from the mains supply socket. Do not

pull on the flex, the flex can become overloaded and cause a short circuit.

x

Set up the unit so that no one is able to trip over the flex.

x

Do not place heavy items on the flex, which may damage it.

x

Take note that the flex cannot be reached and pulled by young children, avoiding

injury.

x

Do not set up the unit near to heat sources. The casing and the flex could be

damaged by the impact of heat.

x

The screen is made of plastic and can break if damage is done to it. Be careful when

collecting sharp edged plastic splinters to avoid injury.

x

Avoid placing the unit on any surfaces that may be subject to vibrations or shocks.

x

To protect the unit during a thunderstorm unplug the AC power cable and disconnect

the aerial. Caution: Do not touch the aerial (RF) connector.

x

When you leave your home for long periods of time, unplug the AC power cable for

safety reasons.

x

The unit becomes warm when in operation. Do not place any covers or blankets on

the unit in order to prevent overheating. The ventilation holes are not to be blocked.
Do not set up near radiators. Do not place in direct sunshine. When placing on a
shelf leave 5 cm (2”) free space around the whole unit.

x

Do not allow water or moisture to enter the TV. Do NOT use in wet or moist areas

such as Bathrooms, steamy kitchens or near swimming pools.

x

Do not use this unit when moisture condensation may occur

x

Any repairs must be carried out by qualified personnel only.

x

Do not open this unit. A non – expert attempting to repair the unit could be dangerous

and potentially cause a fire hazard.

 2

Summary of Contents for DVL-2253 BLACK

Page 1: ...22 55cm LED TV with DVD DVBT Model No DVL 2253 BLACK For information and support www lenco eu...

Page 2: ......

Page 3: ...ing external devices Common Interface slot Auto installation setup Source menu Menu settings 5 6 Unit 4 7 8 11 12 13 14 15 22 options 1 3 SAFETY INFORMATION TROUBLE SHOOTING GUIDE TECHNICAL SPECIFICAT...

Page 4: ...these instructions Do not use this TV near water Clean only with a slightly damp cloth Do not block any ventilation openings Install in accordance with the supplied Quick Start Guide and this User Gu...

Page 5: ...the mains supply socket Do not pull on the flex the flex can become overloaded and cause a short circuit x Set up the unit so that no one is able to trip over the flex x Do not place heavy items on th...

Page 6: ...way from direct sunlight and strong lights soft indirect lighting is recommended for comfortable viewing Use curtains or blinds to prevent direct sunlight falling on the screen Place the TV on a sturd...

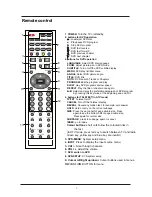
Page 7: ...through channels They are also can be used to move down up in the OSD menu screen VOL VOL Press to adjust the volume They are also can be used to move left right in the OSD menu screen VOL button can...

Page 8: ...LANGUAGE Select DVD disc language ZOOM Adjust picture size in DVD mode SUBTITLE Turn on off the DVD subtitle display MENU DVD play list Disc menu ANGLE Select DVD picture angle TITLE DVD title GOTO D...

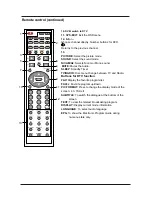
Page 9: ...tion LANGUAGE To select audio language EPG To show the Electronic Program Guide during no menu state only INPUT SYS MENU SYS EXIT DVD DVB FAV FAV FAV DISPLAY LANGUAGE 1 3 6 8 4 9 11 12 5 7 10 13 2 10...

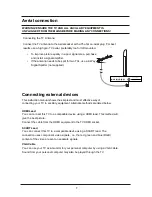
Page 10: ...s This instruction manual shows the simplest and most effective way of connecting your TV to ancillary equipment Alternate methods are listed below HDMI Lead You can connect this TV to a compatible de...

Page 11: ...signal R L in Connect them to the audio output terminal of DVD shared with YPbPr VIDEO Connect it to video output terminal of DVD YPbPr Connect them to the YPbPr video output terminal of DVD used in...

Page 12: ...C VGA cable not supplied to connect the TV to your PC You can also use an HDMI cable to connect to your PC if your PC Graphic card supports HDMI When the HDMI cable is used the PC audio cable is no lo...

Page 13: ...r cables refer to the video camera instruction manual Video recorder x Connect the Scart cable to the TV and video recorder x Turn on both video recorder and the TV x Select Scart source x You can now...

Page 14: ...Switch on the DVD player x Select SCART as input source When using the HDMI cable x Select HDMI as input source HDMI to HDMI SCART All illustrated cables are not supplied Connecting external devices...

Page 15: ...INTO THE COMMON INTERFACE SLOT THEN ADD THE SMART CARD TO THE CAM 1 Turn on the TV and ensure DTV Source is selected 2 If the CAM is detected the TV will display the following message on the screen Co...

Page 16: ...Make sure your Remote is in TV mode by pressing INPUT button switch on the TV by pressing POWER You will see the first time installation menu Auto installation setup Source Menu Power On Off the LCD T...

Page 17: ...f lock time and setup options SETTING MENU Allows you to setup a variety of setup options CHANNEL MENU Allows you to search channels and set up a variety of channel options Select DTV source for examp...

Page 18: ...nu Program Select the program you want to edit Color Sys Select the color system for the program you want to edit Sound Sys Select the sound system for the program you want to edit Manual Search Use a...

Page 19: ...ency Display the frequency of the channel it found Manual Program menu for DTV Program Edit menu for DTV Program Edit menu for ATV TV List 07 05 09 00 45 No Program Name Status 001 7 Digital 002 7 Dig...

Page 20: ...uttons 2 to select between a b c and 2 and use OK button to save Use the cursor buttons to select the chan nel you want to Skip Use OK button and will be shown at the channel selected To remove the sk...

Page 21: ...be selected in ATV mode Sharpness Colour Temp Noise Reduction Increase this setting to see crisp edges in the picture decrease it for soft edges Choose from Normal Cool and Warm Reduce any interferenc...

Page 22: ...is set to User Controls the relative intensity of higher pitched sounds Balance To adjust the balance of the left and right sound track or turn off the volume of the left and right sound track AVL Con...

Page 23: ...lays on the screen Transparence Allows you to select the transparence for OSD menu displays on the screen Turn on off the overscan funciton Can be selected in HDMI mode Overscan Reset Press button to...

Page 24: ...ng ON Aspect Allows you to select the screen display mode Can be selected in DTV mode Can be selected in ATV mode Can be selected in ATV mode System Lock Press button and enter the code to enter the s...

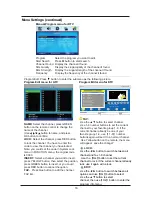
Page 25: ...nter the menu Menu Settings continued H Position Clock Adjust the pixel clock frequency until the image size is maximized for the screen Phase Adjust the phase of the ADC sampling clock relative to th...

Page 26: ...INPUT 23...

Page 27: ...24...

Page 28: ...25...

Page 29: ...26...

Page 30: ...DVD SETUP 27...

Page 31: ...OK 28...

Page 32: ...12 3 4 5 67 8 9 5 12 3 4 5 9 8 3 2 9 6 7 9 8 8 7 4 0 1 2 3 4 67 8 9 55 5 12 3 4 6 7 8 9 8 3 2 9 A 9 9 9 F 29...

Page 33: ...MUTE button and check if Mute mode is set Switch to another channel and see if the same problem occurs Press V button to see if the problem can be solved No picture on some channels Check that correc...

Page 34: ...m the information in this table due to technical innovations TV Specifications TV System PAL BG DK I Audio System BG DK I SECAM L L Screensize 22 Diagonal Resolution 1920 x 1080Pixels RGB Aerial input...

Page 35: ......

Page 36: ......

Reviews: