background image


Table of content  

What’s in the box? ...................................................................................................... 3


Safety Precautions ..................................................................................................... 4


Exploring the device ................................................................................................... 7


Front view ............................................................................................................... 7


Back view................................................................................................................ 7


Exploring the remote control....................................................................................... 8


Installing the device .................................................................................................. 10


Installing the remote control...................................................................................... 12


Basic operation......................................................................................................... 13


Turning the unit on and off .................................................................................... 13


Selecting the source (Disc, USB, AUX in, FM)...................................................... 13


Adjusting the master volume................................................................................. 13


Navigating through menu’s ................................................................................... 13


Entering digits ....................................................................................................... 13


Playing a disc ........................................................................................................... 14


DVD playback ....................................................................................................... 14


CD Playback ......................................................................................................... 17


Playing a USB device ............................................................................................... 18


JPEG Disc or JPEG USB device playback ............................................................... 20


AUX In mode ............................................................................................................ 21


FM Mode .................................................................................................................. 21


Other functions on the remote control ...................................................................... 22


Advanced speaker settings....................................................................................... 22


Advanced settings .................................................................................................... 23


Advanced connections.............................................................................................. 27


Primary system connections: ................................................................................ 27


Video connections in detail: .................................................................................. 28


Advanced audio connections: ............................................................................... 29


Troubleshooting........................................................................................................ 30


Service and support.................................................................................................. 30


Specifications: .......................................................................................................... 31


Personal notes:......................................................................................................... 32


End of life.................................................................................................................. 33


Summary of Contents for DVD-519 H

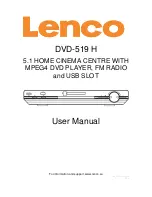
Page 1: ...DVD 519 H 5 1 HOME CINEMA CENTRE WITH MPEG4 DVD PLAYER FM RADIO and USB SLOT User Manual For information and support www lenco eu UM_DVD 519 H_GB V1 0 ...

Page 2: ... master volume 13 Navigating through menu s 13 Entering digits 13 Playing a disc 14 DVD playback 14 CD Playback 17 Playing a USB device 18 JPEG Disc or JPEG USB device playback 20 AUX In mode 21 FM Mode 21 Other functions on the remote control 22 Advanced speaker settings 22 Advanced settings 23 Advanced connections 27 Primary system connections 27 Video connections in detail 28 Advanced audio con...

Page 3: ... Remote control 6x Connection cables for the speakers and subwoofer 2x AAA Batteries for the remote control 1x Audio video cable lotus wire Note This user manual is printed prior to the product development When a part of the product specification must be changed to improve operability or other functions priority is given to the product specification itself In such instances the instruction manual ...

Page 4: ...the user manual Protect the power cord from being walked on or pinched particularly at plugs and the point where it exits the unit Do not place heavy items on the power cord which may damage it Take note that the power cord cannot be reached and pulled by young children avoiding injury Unplug this unit during lightning storms or when unused for a long period of time Keep the unit away from heat so...

Page 5: ... that may be subject to vibrations or shocks To protect the unit during a thunderstorm unplug the AC power cable and disconnect the aerial Caution Do not touch the aerial RF connector When the unit is not used for long periods of time unplug the AC power cable for safety reasons Take good care of the remote control do not drop To clean the unit use a soft dry cloth Do NOT use solvents or petrol ba...

Page 6: ...n the batteries will not be used for a few weeks or more remove them to avoid damage that can be caused by battery leakage or corrosion Battery shall not be exposed to excessive heat such as sunshine or fire IMPORTANT NOTE The USB memory stick should be plugged into the unit directly Don t use an USB extension cable because it can cause interference resulting in failing of data Where to install Lo...

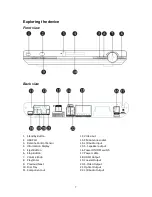
Page 7: ...Display 5 Eject Button 6 Stop Button 7 Volume Knob 8 Play Enter 9 Previous Next 10 Disc Tray 11 Component out 12 Video out 13 FM Antenna socket 14 L R Audio input 15 5 1 speaker output 16 Power ON OFF switch 17 Power cable 18 HDMI Output 19 Coaxial Output 20 S Video Output 21 Optical Output 22 L R Audio Output ...

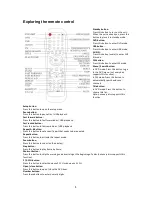
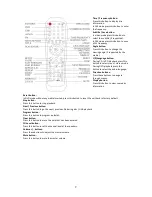
Page 8: ... Setup button Press this button to open the setup menu Pause button Press this button to pause Disc USB playback Fast forward button Press this button to fast forward disc USB playback Fast rewind button Press this button to fast rewind disc USB playback Repeat A B button Press this button to set a specific part that needs to be repeated Repeat button Press this button to activate the repeat mode ...

Page 9: ...ge Direction buttons Press these buttons to navigate through menus Display button Press this button to view some disc information Reset button In DVD mode without any media inserted press this button to reset the unit back to factory default Stop button Press this button to stop playback Next Previous button Press this button to go the next previous file during disc USB playback Program button Pre...

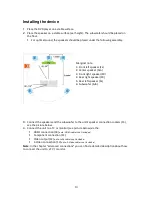
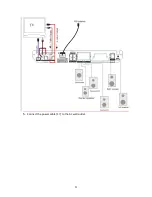
Page 10: ... right speaker SR 5 Rear left speaker SL 6 Subwoofer Sub 3 Connect the speakers and the subwoofer to the unit s speaker connection sockets 15 see the picture below 4 Connect the unit to a TV or monitor see picture below via the HDMI connection 18 note HDMI cable is not included Component connection 11 Video output 12 note tulip cable is not included S Video connection 12 note S Video cable is not ...

Page 11: ...11 5 Connect the power cable 17 to the AC wall outlet ...

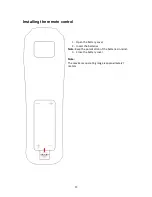
Page 12: ...lling the remote control 1 Open the battery cover 2 Insert the batteries Note Keep the polarization of the batteries in mind 3 Close the battery cover Note The maximum operating range is approximately 7 meters ...

Page 13: ...M mode Adjusting the master volume The master volume can be adjusted in several ways Press the volume button on the remote control to increase the volume Turn the volume knob 7 on the unit to the right to increase the volume Press the volume button on the remote control to decrease the volume Turn the volume knob 7 on the unit to the left to decrease the volume The master volume can be switched of...

Page 14: ...yback To completely stop the playback press the stop button on the remote control or the stop button on the main unit 6 twice Pause playback During playback press the pause button on the remote control to pause the playback Press the pause button on the remote control again to resume normal playback Fast forward During playback press the fast forward button on the remote control to fast forward th...

Page 15: ...he repeat A B mode press the REP AB button on the remote control again The unit will now resume normal playback Zoom function During playback press the zoom button on the remote control to zoom The available zoom formats are 2 times 3 times 4 times time and time Playback frame by frame During playback press the step button on the remote control to freeze the current frame Press the step button on ...

Page 16: ...is function is blocked Title list DVD discs that contain more than one movie background data and or songs have more than 1 title Sections under the title are called Chapters Chapter can contain musical or video clips During playback press the title button on the remote control to open the title list Navigate to the desired title and press the play enter button on the remote control to select the d...

Page 17: ...yback Rewind During playback press the rewind button on the remote control to rewind the playback Press the play enter button on the remote control to resume normal playback Next track During playback press the next button on the remote control or the next button on the main unit 9 to go to the next track Previous track During playback press the previous button on the remote control or the previou...

Page 18: ...control the program menu will open In this menu press stop to cancel the playlist Press exit to close the menu Jump to function MP3 files only Press the T F button on the remote control Now you can enter the desired track number where you want to jump to Press play enter to confirm Press the T F button on the remote control twice now you can enter the desired time within the current track where yo...

Page 19: ...ng modes Mono L Mono R Mix mono and Stereo Repeat function During playback press the repeat button on the remote control to activate the repeat function The display will show the active repeat mode Single play current song once the song is at his end the playback stops Repeat one repeat current track continually Repeat folder repeat all track in the current folder Repeat a specific section It is p...

Page 20: ...yback Press the stop button on the remote control or the stop button on the main unit 6 to stop the playback and go back to the root menu Pause playback During playback press the pause button on the remote control to pause the playback Press the pause button on the remote control again to resume normal playback Next picture During playback press the next button on the remote control or the next bu...

Page 21: ...now output the audio of the external audio device over the speakers Note In aux in mode it is only possible to adjust the volume FM Mode Turn the unit on 1 Press the FM button on the remote control to enter FM mode Automatic search Press the menu search button on the remote control to auto scan and auto save all the available channels Jump to frequency To jump to a frequency press the T F button o...

Page 22: ...erted no disc on screen press the reset button on the remote control to restore the factory settings Advanced speaker settings Output channel level control During playback of a DVD or audio file you can adjust the output of every speaker individually with a range of 10 up to 10 of the master volume It is also possible to adjust the bass and treble output of the master volume To adjust press the CH...

Page 23: ...t menu language Notes multi language DVD only Only works if the preset language is available on the DVD PBC This is a last memory function for certain disc formats like VCD SVCD Video setup page Video output If connected to a TV via the YUV of S Video connection this setting must be adjusted to the way that the unit is connected to the monitor TV display This option must match with the TV where th...

Page 24: ...vate the subwoofer Dual Mono This option is used to set the line out see chapter advanced connections signal to stereo left mono right mono or mix mono both channels mono Dolby dynamic Use this option to adjust the linear compression ratio if the line out is active this option is not available when under surround 5 1CH is selected Digital audio here the digital output setting can be set Digital ou...

Page 25: ...kers o Centre width Use this option to change the sound angle DSP Mode Adjust this setting to the option that best fits to the room where the unit is installed System Setup page Angle mark DVD videos when recorded with more than one video track may allow viewers to select a different available camera angle from which to view the recording or film The term multi angle describes the filming producti...

Page 26: ... other media a password must be entered PG 13 approve media up to level not recommend for children under 13 for all other media a password must be entered PGR approve media up to level parental guidance but with some minor violence for all other media a password must be entered R Restricted violence adult language and situation unsuitable for young viewers NC17 Adult theme or content not suitable ...

Page 27: ...27 Advanced connections Primary system connections ...

Page 28: ...28 Video connections in detail ...

Page 29: ...29 Advanced audio connections ...

Page 30: ... referring to the illustration instructions Discontinuous sound or The disc is not clean or the disc is scratched please clean distorted pictures clean the disc Service and support Lenco offers service and warranty in accordance to European law which means that in case of repair both during and after the warranty period you should contact your local dealer Please note It is not possible to send re...

Page 31: ...Video format NTSC PAL Auto Video output 1 0V p p Audio Stereo 1 2V RMS Output connections Video RCA S video Audio RCA 5 1CH YUV Coaxial Optical Input connections USB Audio RCA Power supply AC 230V 50Hz Max power consumption 75 Watt Frequency range 20Hz 20KHz 3dB S N ratio for audio signal 80 dB Operation condition Temperature 35 C MAX ...

Page 32: ...___________________________ ________________________________ ________________________________ ________________________________ ________________________________ ________________________________ ________________________________ ________________________________ ________________________________ ________________________________ ________________________________ ________________________________ _________...

Page 33: ...icable local laws of requirement for disposal of electrical equipment or batteries In so doing you will help to conserve natural resources and improve standards of environmental protection in treatment and disposal of electrical waste Waste Electrical and Electronic Equipment Directive When you see a crossed out wheeled waste container on the product It means that the product falls under the EU di...

Reviews: