
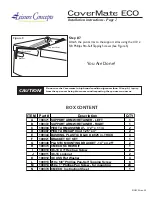
Step #7
Attach the pivot arms to the support arms using the #10 x
5/8 Phillips Pan-Self Tapping Screws (See Figure 5).
Figure 5
CAUTION!
Do not use the Covermate in high wind condition (greater than 10 m.p.h). Injury
from the spa cover being blown over and impacting the spa user can occur.
Installation instructions - Page 2
01DEC08 rev.00
You Are Done!
BOX CONTENT
ITEM
Part #
Description
QTY
A
100371 SUPPORT ARM W/RETAINER - LEFT
1
B
100372 SUPPORT ARM W/RETAINER - RIGHT
1
C
100004 PIVOT ARM ASSEMBLY- 3' 2" x 1 1/4
2
D
100007 PIVOT ARM CAP Vinyl 1.25" x 3"
2
E
100344 BUSHING, PLASTIC BLACK .8825 in. THICK
4
F
100021 BRACKET KIT SET
1
G
100348 PLASTIC MOUNTING BRACKET - 14" x 4.25"
2
H
100373 CM ECO SCREW KIT
1
I
100010 3/8-16 X 3"Hex Cap Screw
2
J
100011 3/8-16 Locknut
2
K
100012 3/8 USS Flat Washer
4
L
100013 #10 x 5/8" Phillips Pan-Self Tapping Screw
6
M
100014 #10 x 1" Phillips Pan Screw - for mounting
24
N
100374 CM ECO Instruction Sheet
1
Support Arm
Bracket
Pivot Arm
L


