background image

CONTROLLED COPY 

 Centre for Biological Engineering 


Standard Operating Procedure    


SOP194 


Title:  Use and maintenance of Leica RM2125 RTS rotary microtome.


Location: 

H27 


Version 001 

Effective Date: 24.05.2021 

Review 24.05.2023 


Written by: Sotiria Toumpaniari 


Reviewed by:  

Approved by: C.Kavanagh 


Page 9 of 11 


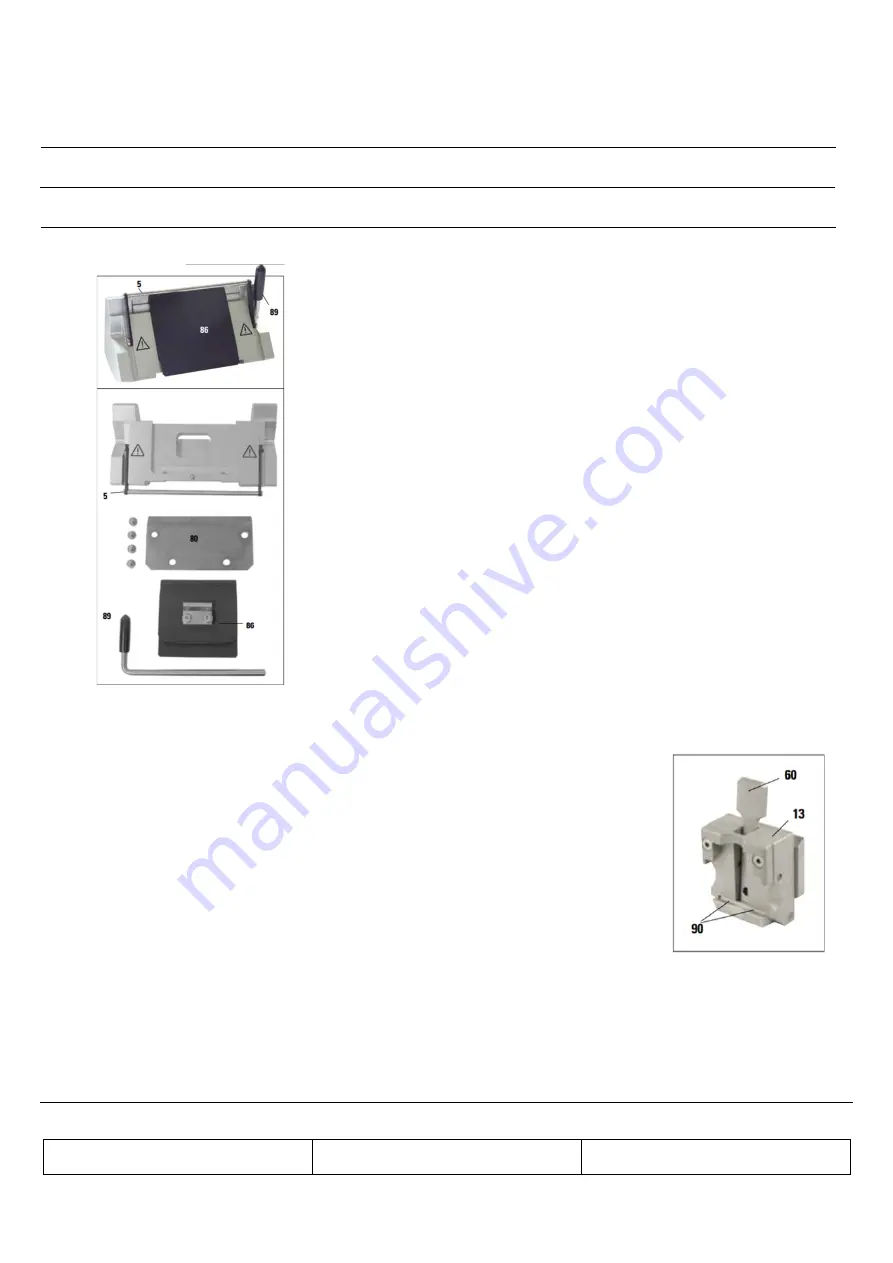
Knife holder E 

Take the knife holder apart for cleaning. The front pressure plate can be 

removed for cleaning. To do so, proceed as follows: 

1. 

Fold knife guard (5) downward. 

2. 

Rotate the blade clamping lever (89) downward. 

3. 

Carefully remove the blade and dispose of it properly. 

4. 

Pull out the clamping lever (89) sideways. 

5. 

Remove pressure plate (86). 

6. 

Clean all parts of the knife holder. 

Note:

 If several knife holders are cleaned at the same time, the parts must NOT be 

mixed up! Failure to adhere to this may result in sectioning problems! 

For cleaning and removal of paraffin, do not use xylene or cleaning fluids 

containing alcohol (e.g. glass cleaner). 

7. 

Lay the removed parts on an absorbent cloth into the drying 

chamber (up to a max. of 65 °C) and let the paraffin contamination run off. 

Note: There is a burn hazard when removing the parts from the drying 

chamber (65 °C). Wearing safety gloves is recommended! 

8. 

After cleaning the moving parts, apply a thin coat of drive part oil 

to them. 

9. 

Reassembly takes place in reverse order. 

10. 

When performing the installation, make sure that the upper edge 

of the pressure plate (86) is parallel and level with the upper edge of the 

rear pressure plate (80). If necessary, adjust the pressure plates. 


Universal cassette clamp 


1.  Detach cassette clamp (13) for a thorough cleaning, removing all 

paraffin residues. 

2.  For cleaning, do not use xylene. Use xylene substitutes or paraffin 

removers such as "Para Gard." 

3.  The cassette clamp (13) can also be placed in a drying chamber 

heated to a maximum of 65 °C, until the liquid wax escapes. 

Note:

 There is a burn hazard when removing the parts from the drying chamber 

(65 °C). Wearing safety gloves is recommended! 


4.  Remove paraffin residues with a dry cloth. 

5.  After such a cleaning procedure in an oven, always be sure to 

lubricate the axle and spring of the clamping lever (60). 


5.4.2.  Maintainance  

Note:

 Only authorized and qualified service personnel may access the internal components of the 

instrument for service and repair! 

The instrument is basically maintenance-free. To ensure trouble-free operation of the instrument over a 

long period of time, the following is recommended: 

Summary of Contents for RM2125RTS

Page 1: ...laboratory staff shall i Work in accordance with the instructions for operation and maintenance detailed in this SOP Risk Assessment and the operator manual ii Carry out the routine inspection cleani...

Page 2: ...the system The Leica RM2125 RTS is a manually operated rotary microtome for creating thin sections of specimens of varying hardness for use in routine and research laboratories in the fields of biolo...

Page 3: ...lly or vertically as required 6 To clamp the cassette release the lever Note Before clamping the cassette into the universal cassette clamp remove excess wax on the outside of the cassette to ensure t...

Page 4: ...the Allen screw to release the clamp by turning Allen key No 4 9 counterclockwise 4 When using the knife holder base with lateral movement rotate the lever on the right side of the knife holder base c...

Page 5: ...ies to the rocking mode during which the specimen is trimmed by rocking motion no complete rotation of the handwheel Carry out rocking mode ONLY in the sectioning phase NEVER in the retraction phase 5...

Page 6: ...clockwise see curved arrow means the specimen advances Turning the coarse feed wheel clockwise means the specimen retracts away from the knife 2 Red dot at 12 o clock turning the coarse feed wheel clo...

Page 7: ...has 3 click stops 0 m 10 m and 50 m The points 23 mark the two trimming stages 10 m 50 m 1 To activate the trimming function press the lever downwards into the desired position and keep it pressed do...

Page 8: ...cimen clamp and mount a new specimen 4 Run the object clamp with the coarse feed back far enough until the new specimen can start being cut 5 4 Cleaning and Maintenance 5 4 1 Cleaning Note Always remo...

Page 9: ...ing the parts from the drying chamber 65 C Wearing safety gloves is recommended 8 After cleaning the moving parts apply a thin coat of drive part oil to them 9 Reassembly takes place in reverse order...

Page 10: ...e holder N The clamping lever 89 on knife holder E Shaft 90 of the clamping lever of the cassette clamp see Fig 36 Special Safety Note Equipment contains sharp edges Ensure you are wearing PPE have be...

Page 11: ...pproved by C Kavanagh Page 11 of 11 6 DOCUMENTATION 6 1 Equipment Maintenance Log 6 2 Microtome Training Agreement This form can be found on the Loughborough University LEARN module for the Centre of...

Reviews: