background image

Leica DMS300 User Manual 

Operation 53

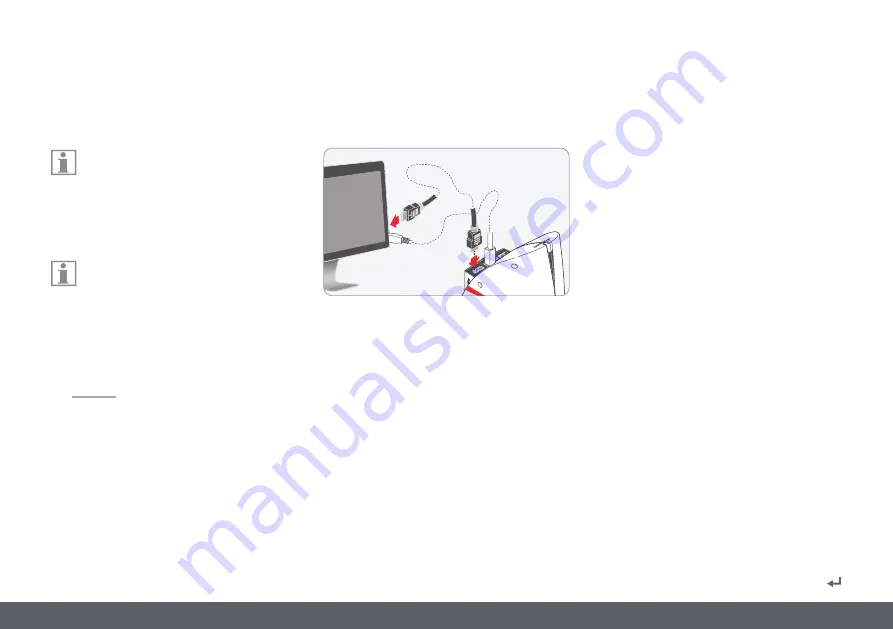
Additional Use of a HD Monitor in PC Mode

General instructions


In PC mode, the microscope image is 
always shown in the preview window of 

Leica Application Suite. In addition, another HD 
monitor can be connected via the HDMI inter-
face.


The resolution on the connected HD 
monitor is limited by the live image reso-

lution of the LAS EZ software. Due to technical 
limitations, it is not possible to display a Full 
HD live image on the connected HD moni-
tor. In order to do this, you have to switch 
the Leica DMS300 to HD mode (standalone)  
(see page 45).

Connecting the HD monitor

1.  Connect the Leica DMS300 to the HD moni-

tor using the HDMI cable.

1

1

Summary of Contents for DMS300

Page 1: ...Leica DMS300 User Manual...

Page 2: ...stallation 22 Installing the Leica Ring Light 23 Leica DMS300 With Incident Light Stand 25 Incident Light Base and Focusing Column 25 Microscope Carrier and Leica DMS300 26 10 Monitor 27 Illumination...

Page 3: ...ching on the Leica DMS300 52 Additional Use of a HD Monitor in PC Mode 53 User Menu Calling up the User Menu 55 Automatic White Balance 56 Manual White Balance 57 Exposure 58 Resolution 59 Camera Sett...

Page 4: ...Leica DMS300 User Manual General Instructions 4 General Instructions...

Page 5: ...icals or techniques for cleaning O Never use chemicals to clean colored surfaces or accessories with rubberized parts This could damage the surfaces and specimens could be contaminated by abraded part...

Page 6: ...eica microsystems com This operating manual describes the special functions of the Leica DMS300 digital micro scope system and contains important instruc tions for its operational safety maintenance a...

Page 7: ...es or damaged instruments Warning of hazardous electrical voltage This symbol indicates information that must be read and observed Failure to comply can cause the following O Hazards to personnel O Fu...

Page 8: ...n with non Leica components that are outside of the scope of this manual Unauthorized alterations to the instrument or noncompliant use shall void all rights to any warranty claims Place of use O Refe...

Page 9: ...on in third party products O Refer to Safety Concept booklet Disposal O Refer to Safety Concept booklet Legal regulations O Refer to Safety Concept booklet EC Declaration of Conformity O Refer to Safe...

Page 10: ...Leica DMS300 User Manual Introduction 10 Introduction...

Page 11: ...pplication Suite EZ Your Leica DMS300 digital microscope system includes the Leica Application Suite EZ LAS EZ software It allows additional scenarios to be implemented in which an HD monitor and comp...

Page 12: ...ction for footswitch 6 USB cable for connecting to a computer or to a power supply unit for supplying power 7 HDMI cable for connecting to an HD monitor 8 SD memory card 9 Protective cover 10 Objectiv...

Page 13: ...5 6 This overview shows the Leica DMS300 in an exampleapplicationwithadditionalcomponents 1 HD monitor or computer with LAS EZ software 2 Horizontal arm 3 Cross member 4 Safety ring 5 Column 6 Basepla...

Page 14: ...14 300 1 Card holder for SD card 2 Front button 3 Status light 4 IR receiver for remote control 5 Zoom knob 6 Click stop slider 7 Leica DMS300 mounting fixture in the microscope carrier 8 Protective...

Page 15: ...Standard Column Configuration 1 2 4 3 5 6 This overview shows the Leica DMS300 in an example application with additional components 1 Leica DMS300 2 Microscope carrier 3 Illumination 4 Focusing colum...

Page 16: ...and the final captured image may not show the same section depending on the sensor size in the microscope 1 Live image in 16 9 format displayed on the HD monitor 2 Captured image in 4 3 format display...

Page 17: ...Leica DMS300 User Manual Assembly 17 Assembly...

Page 18: ...mage to the surrounding area For safety reasons use two people for this part of the setup Assembling the column 1 Push the tapping screw through the base plate from below 2 Fit the serrated lock washe...

Page 19: ...the column 2 Securely tighten the clamping screw The safety ring is the most important safety element of the entire configura tion It protects the horizontal arm from acci dentally falling down 1 2 1...

Page 20: ...screw 2 Install the monitor holder on the horizontal arm 3 Fasten the monitor holder to the clamping screw 4 Reinstall the clamping screw Install on the vertical arm 1 Install the monitor holder on t...

Page 21: ...rew Assembling the Leica DMS300 1 Unscrew the clamping screw 2 Place the Leica DMS300 in the microscope carrier so that the notch in the microscope housing and the lower clamping screw overlap 3 Faste...

Page 22: ...ive firmly during assem bly and disassembly so that it does not fall onto the stage plate Remove all specimens from the stage plate first Assembly 1 Remove the protective cap on the optics carrier by...

Page 23: ...Leica ring light illuminator 2 Attach the Leica ring light illuminator to the objective from below 3 Tighten the locking screw Ensure that the locking screw of the illuminator and the locking screw o...

Page 24: ...diffuser is attached and screwed in below the ring light illuminator We recommend assembling the diffuser on the Leica ring light illuminator on a table in reverse and then mounting them on the objec...

Page 25: ...al notes This chapter shows an example of assem bly of the Leica DMS300 on an incident light base Images and descriptions may vary when using another incident light base Assembling the column 1 Take t...

Page 26: ...atively the microscope carrier can also be installed upside down recom mended variant for objectives with a large working distance Assembling the Leica DMS300 1 Unscrew the clamping screw 2 Place the...

Page 27: ...the thumb screw so that the mount ing pins rotate 90 clockwise 4 Slightly pull out on the thumb screw so that the mounting pins remain in place 5 While pulling out on the thumb screw rotate clockwise...

Page 28: ...h the Leica LED3000 RL to the objec tive from below 3 Tighten the locking screw The supported working distance is between 60 mm and 150 mm Ensure that the locking screw of the illu minator and the loc...

Page 29: ...ll metal plate is used as a fastening aid in the process Installing optional accessories 1 The optional diffuser is attached and screwed in below the ring illuminator We recommend assembling the acces...

Page 30: ...Leica DMS300 User Manual Installation 30 Installation...

Page 31: ...00 Power supply and monitor 1 Connect the Leica DMS300 to a suitable power socket using the USB cable and power supply 2a Connect the Leica DMS300 to the HD moni tor using the HDMI cable Or 2b Connect...

Page 32: ...able Activating PC mode 1 Set the mode switch to PC in order to set the Leica DMS300 to PC mode Leica Application Suite has to be installed on the computer in order to use the Leica DMS300 in PC mode...

Page 33: ...se kinds of devices just with black on the screen edges Limitations in PC Mode 4 3 Operation The Leica DMS300 is controlled entirely via the computer in PC mode The front button the remote control and...

Page 34: ...Leica DMS300 User Manual Startup Procedure 34 Startup Procedure...

Page 35: ...in PC mode O the remote control does not respond in other words the user menu does not appear O On the HD monitor a live image is shown in 4 3 aspect ratio with black bars right and left O The menu do...

Page 36: ...ator can be adjusted in 10 increments When pressing the buttons hold the keypad between your thumb and index finger Avoid tapping the keypad with just one finger if possible Use 1 Switch on the illumi...

Page 37: ...jective Adjusting the resistance Is the focusing drive too loose or too tight Does the equipment tend to slide downwards The resistance can be adjusted individually depend ing on the equipment weight...

Page 38: ...agnification changer can optionally be operated either with or without click stops enabled Continuous zoom is possible when the click stops are disabled which many users find convenient Parfocality Th...

Page 39: ...witch depending on the configuration can be used to trigger the Leica DMS300 Description Remote Control 1 Start stop video recording 2 Save still image to SD card 3 Stop continue live image pause play...

Page 40: ...Because the microscope s chip also responds to the infrared range you can see how the LED on top of the remote control lights up on the HD monitor If this is not the case the batteries need to be cha...

Page 41: ...e performed within 4 seconds If a timeout is displayed after 4 seconds press the Pair button again to start the process 2 Press and hold the button on your remote control representing the channel that...

Page 42: ...ontrol as defined by the user The default setting is CAPTURE for capturing an image The Leica DMS300 s front button and footswitch do not work in PC mode Configuring 1 Point the remote control towards...

Page 43: ...of the most recently acquired image O MOVIE Start video recording or stop a video recording that is in progress Saved to the SD card as an MP4 file O OVERLAY Show crosshair or overlay Press ing this b...

Page 44: ...Leica DMS300 User Manual Operation 44 Operation...

Page 45: ...can substantially damage the Leica DMS300 Power supply and HD monitor 1 Check that the Leica DMS300 is properly supplied with power via the USB power supply 2a Check whether the Leica DMS300 is connec...

Page 46: ...ive is screwed onto the microscope the mode switch is set to HD and the HD monitor is switched on 1 Set the on off switch to ON to switch on the Leica DMS300 2 The status light s LED switches from red...

Page 47: ...m has to be used so that the SD card works correctly and is detected by the Leica DMS300 Most memory cards are factory formatted with FAT so that they can be used immediately An SD card cannot be form...

Page 48: ...ocus on the specimen 2 Push the SD memory card into the slot on top of the Leica DMS300 until it clicks into place The Leica DMS300 s status light is illuminated in green The microscope is now ready t...

Page 49: ...ay image in full size and zoomed in 1 2 3 when pressing repeatedly Next previous image 3 For an MP4 video clip Play video Stop play video Rewind fast forward video 4 In order to return to the live ima...

Page 50: ...white balance can also be carried out using the front button or the footswitch The white balance of the microscope is factory set to automatically provide opti mum results when used in conjunction wi...

Page 51: ...e LAS modules are available Leica DMS300 and computer connection 1 Check whether the Leica DMS300 and the computer have been connected properly via the USB cable provided The Leica DMS300 is powered b...

Page 52: ...2 Start Leica Application Suite EZ 3 The status light s LED switches from red to green a signal tone sounds and the live image is displayed on the computer the Leica DMS300 is ready to use 4 Follow t...

Page 53: ...connected via the HDMI inter face The resolution on the connected HD monitor is limited by the live image reso lution of the LAS EZ software Due to technical limitations it is not possible to display...

Page 54: ...Leica DMS300 User Manual User Menu 54 User Menu...

Page 55: ...n the remote control Check to ensure that the Leica DMS300 is in HD mode and that a live image is shown on a connected HD monitor Calling up and closing the user menu 1 Point the remote control toward...

Page 56: ...r transmitted light specimens configuring the white balance to the pure transmitted light at moderate brightness is recommended without the specimen Activating automatic white balance 1 Press the butt...

Page 57: ...balance is cali brated and saved to the camera Alternatively you can also calibrate the white balance using the user menu 1 Press the button on the remote control 2 Call up the COLOR entry 3 Select th...

Page 58: ...Correct the values for EXPOSURE GAIN and GAMMA until you obtain the desired results for the image Automatic exposure 1 Press the button on the remote control 2 Call up the EXPOSURE entry 3 Set the val...

Page 59: ...VE Defines the resolution of the live image The following resolutions are available O HD720 50 and HD720 60 1 280 720pixels at 50Hz or 60Hz image refresh rate O HD1080 24 and HD1080 30 1 920 1 080pixe...

Page 60: ...the recommended default resolution of HD1080 50 Resolution of the captured image CAPTURED Defines the resolution of the captured image saved directly to the SD card The following resolutions are avai...

Page 61: ...d the reset button down for at least 5 seconds until a signal tone sounds Set the date and time SET DATE TIME This command sets the date and time as well as the format for display ing them The followi...

Page 62: ...right corner of the image Ifyousavethefilenameorthedateandtimeintoimages theycannot be deleted later even if you rename the files or change the date Rotate image FLIP IMAGE Rotates the image by 180 Si...

Page 63: ...larized light This can save the current camera settings for recurring acquisition situations and retrieval again at any time Press to select illumination mode 1 2 or 3 Press to save the current camera...

Page 64: ...ain menu if you have unintentionally selected an Asian language that uses logograms and want to return to a menu display that is alphanumeric The menu entry for selecting the language is always added...

Page 65: ...selected overlay and leave the menu If you want to quickly display other overlays press when the live image is displayed to show the next or previous respective overlay Configure an overlay CONFIG OVE...

Page 66: ...eica logo a cross hair over the entire live image and a small crosshair in the middle of the live image Set transparency TRANSPARENCY The overlay s edges are more or less prominent depending on the se...

Page 67: ...tion mode The microscope imme diately switches the illumination mode and sets the stored parameters 3 Wait until the displayed illumination mode disappears from the monitor This means that illuminatio...

Page 68: ...Leica DMS300 User Manual Service 68 Service...

Page 69: ...cope will continue to work as well as it did on the very first day Warranty benefits The guarantee covers all faults in materials and manufacture It does not however cover damage resulting from carele...

Page 70: ...The lint free cloth lens cloth or cotton swab should be soaked with solvent but not so wet that solvent runs over the lens O Protect your microscope from moisture fumes and acids and from alkaline cau...

Page 71: ...so use ethanol industrial alcohol When doing so follow the corresponding safety regulations O Remove dust with a pneumatic rubber bulb or with a soft brush O Clean the objectives with special optics c...

Page 72: ...er Designation 1 19 004 872 HDMI cable 2m 2 19 004 871 USB cable 1 8m 3 13 302 708 946 915 5 W USB adapter with interchangeable connector 4 19 003 658 25 W power supply for Leica ring light illuminato...

Page 73: ...Leica DMS300 User Manual Specifications 73 Specifications...

Page 74: ...1 000V to 100V Engageable zoom notches Eight switchable positions for repetitive tasks Standard objective Achromatic objective 0 8 Optical data Leica DMS1000 Max resolution 142lp mm Max FoVx 32mm Max...

Page 75: ...68 1 1megapixels 1 216 912 Video resolution HD1080 1 090 1 920 HD720 1 280 720 Pixel size 3 34 m 3 34 m Sensor grade Aptina 1 2 3 CMOS Sensor size 6 1mm 4 6mm Exposure time 0 5msec 500msec Gain 1 to 1...

Page 76: ...n reset firmware upload Remote control RC3 infrared remote control with 2 AAA batteries Remote trigger optional 12 730 229 Hand and foot trigger with 1 5 m cable SD card Secure Digital SD HC compatibl...

Page 77: ...14 5 0 97 2 0 18 2 0 69 2 5 22 7 0 50 3 2 29 1 0 36 4 0 36 3 0 28 5 0 45 4 0 22 6 0 54 5 0 18 19 0 75 13 0 5 45 1 0 17 3 2 10 1 25 21 6 1 45 1 6 27 6 0 97 2 0 34 5 0 69 2 5 43 2 0 50 3 2 55 3 0 36 4...

Page 78: ...Leica DMS300 User Manual Specifications 78 Dimensional Drawings Leica DMS300 LEICA DMS 300 LEICADMS300 152 123 123 42 238 111 26 M60x1 26...

Page 79: ...Leica DMS300 User Manual Specifications 79 Leica DMS300 With Incident Light Stand 278 301 278 119 116 301 244 324 24 max 444 66 255 LEICA DMS 1000 LEICADMS1000 152 181 468...

Page 80: ...Leica DMS300 User Manual Specifications 80 Leica DMS300 With Swing arm Stand 152 192 500 LEICADMS1000 220 178 402 max 640 130 771 266 LEICA DMS 300...

Page 81: ...to modifications LEICA and the Leica Logo are registered trademarks of Leica Microsystems IR GmbH CONNECT WITH US www leica microsystems com Leica Microsystems Schweiz AG Max Schmidheiny Strasse 201...

Reviews: