background image

5

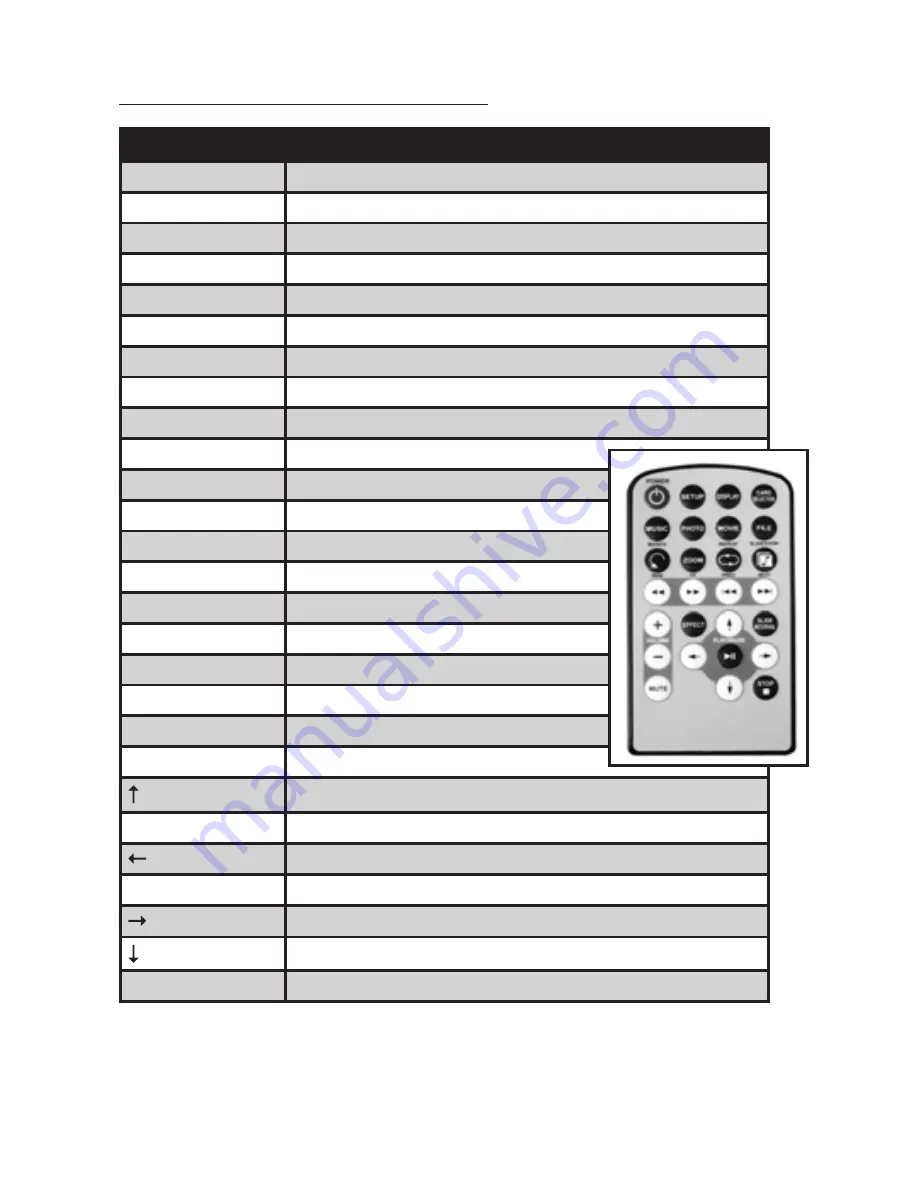
usIng your remote control

Button

Description

POWER

Turn Digital Picture Frame on or off

SETUP

Open menu for changing settings

DISPLAY
CARD SELECTION Choose a different memory card
MUSIC

Go to and display music files

PHOTO

Go to and display photo files

MOVIE

Go to and display movie files

FILE

Go to file library (all files)

ROTATE

Rotate photo 90 degrees clockwise on screen

ZOOM

Zoom x4 (photo only)

REPEAT

Play file repeatedly until stopped

SLIDESHOW

Start/stop photo slideshow

REW

Rewind movies

FF

Forward movies

PREV

Go to previous file

NEXT

Go to next file

+ (VOLUME)

Raise volume

– (VOLUME)

Lower volume

MUTE

Mute volume

EFFECT

Change slideshow effects

Move up when selecting on your screen

SLIDE INTERVAL

Change slideshow delay 1, 3, 5, or 10 seconds

Move left when selecting on your screen

PLAY/PAUSE

Play/pause; confirm selections on your screen

Move right when selecting on your screen
Move down when selecting on your screen

STOP

EXIT (Return to Main Menu)

Summary of Contents for TXDPF9

Page 1: ...User Manual TXDPF9 9 inch Digital Picture Frame ...

Page 2: ...check all the accessories contained in the package The Digital Picture Frame comes with the following items Digital Picture Frame x1 Stand x1 AC adapter x1 Remote Control x1 USB mini to USB adapter cable x1 User Manual x1 Features Photo format JPEG BMP Music format MP3 WMA Video format MPEG1 2 4 AVI Image slide show with background music Card Formats SD MMC MS XD CF USB Calendar Clock alarm clock ...

Page 3: ...3 Get to know your picture frame 1 LCD Screen 5 Menu 9 USB Port 2 Decorative Frame 6 Up Arrow 10 CF 3 Wall Mount Slots 7 Down Arrow 11 SD MMC MS XD 4 Auto 8 Power button 12 Power input ...

Page 4: ...ns KEY FUNCTION Press release Press hold Auto Exit or go back Menu Play Pause UP Up Right Increase music video volume DOWN Down Left Decrease music video volume Power Power on off Memory cards that can be used in your digital picture frame 4 ...

Page 5: ...ZOOM Zoom x4 photo only REPEAT Play file repeatedly until stopped SLIDESHOW Start stop photo slideshow REW Rewind movies FF Forward movies PREV Go to previous file NEXT Go to next file VOLUME Raise volume VOLUME Lower volume MUTE Mute volume EFFECT Change slideshow effects Move up when selecting on your screen SLIDE INTERVAL Change slideshow delay 1 3 5 or 10 seconds Move left when selecting on yo...

Page 6: ...olarity 4 Replace the cover Caution Only use a 3V CR2025 battery Dispose of used batteries according to local ordinance regulations Remove the battery when not using the remote for prolonged periods MAIN MENU The main menu has the following options clockwise from top Photo Music Photo Music Movie Setup Calendar Clock Alarm and Auto Power Press STOP to return to the main menu from any screen 6 ...

Page 7: ... by pressing the SETUP button The following illustration shows the initial screen in the settings mode and in the following section we will introduce the various functions of the settings mode Photo Setting Display Interval This option can be used to set the length of time for display of each image There are six options 5 seconds 10 seconds 15 seconds 30 seconds 1 minute or 3 minutes ...

Page 8: ...sition Effect This option is used to set the transition effect as images change Browse There are two kinds of Photo modes one is the File Manager mode and the other is the Thumbnail mode File Manager mode 8 ...

Page 9: ...on the photos will be auto played when turning on the power Music on off When you select on the music will be auto played when turning on the power Video on off When you select on the video will be auto played when turning on the power Slideshow on off When you select photo on and music on the slide show will be auto played when turning on the power ...

Page 10: ...Display Setup Brightness This option allows the user to set the brightness of the television screen They can choose from three different options normal bright and soft 10 ...

Page 11: ... divided into 15 different levels from 4 0 4 with larger numbers representing greater contrast TFT Brightness This option can be used to set the screen brightness The brightness is divided into 15 levels from 7 0 7 with the larger positive numbers representing greater brightness ...

Page 12: ...divided into 15 different levels from 7 0 7 with larger numbers representing greater contrast TFT Saturation This option can be used to set the saturation of the display The saturation is divided into 15 levels from 7 0 7 with larger numbers representing a higher degree of saturation ...

Page 13: ...ian Spanish Portuguese Dutch and Polish Repeat mode This option allows the user to set the play repeat mode There are four available options Off One Folder and All Off turns off the repeat mode One repeats the file that is currently playing Folder repeats the folder that is currently playing All repeatedly plays all of the files inside the storage medium ...

Page 14: ...he system will automatically detect whether or not a storage device has been connected USB drive or memory card If no storage device has been connected the system will go back to the main menu After the storage device has been connected and correct read write access has been confirmed the system will enter the mode chosen by the user If the user has selected File Mode for playlist management the s...

Page 15: ...ain menu press the PLAY key and the system will automatically detect whether or not a storage device has been connected USB drive or memory card If no storage device has been connected the system will go back to the main menu After the storage device has been connected and correct read write access has been confirmed the system will enter Media Manager for playlist management as shown in the illus...

Page 16: ...the system will go back to the main menu After the storage device has been connected and correct read write access has been confirmed the system will enter File Manager for playlist management as shown in the illustration Under Photo Music mode the system supports the displaying of pictures and the playing of music and the supported file types are JPG BMP MP3 and WMA If the user turns on the Photo...

Page 17: ... been connected and correct read write access has been confirmed the system will enter File Manager for playlist management as shown in the illustration Under Movie mode the system supports movie playback in the following formats MPG and AVI Calendar After selecting Calendar from the main menu press the PLAY button and you will enter the date setting mode ...

Page 18: ...endar display function The date displayed in the calendar is the current date set in the system In addition to displaying the current date the user can use the and keys to browse different months or use the and keys to browse different years ...

Page 19: ...his function allows users to set the system date Exit Exits date settings and goes back to the main menu Clock After selecting Clock from the main menu press the PLAY key and the system will enter time setting mode ...

Page 20: ...20 Display This option allows the user to choose if they want to display Time or Time Calendar or Analog Clock Select Time and press the PLAY key Select Time Calendar and press the PLAY key ...

Page 21: ...time Exit Exits the time settings and goes back to the main menu Alarm After selecting Alarm from the main menu press the PLAY button and the system will enter the alarm settings mode Enable This function allows users to activate On or de activate Off the alarm ...

Page 22: ...e This function allows users to set the alarm time When the alarm function has been activated a prompt will appear Press any key to exit the alarm mode Exit Exits the alarm settings and goes back to the main menu ...

Page 23: ...stem will enter the automatic power on power off settings mode Power On Enable This option allows the user to either activate On or de activate Off the automatic power on function Power off Enable This function allows the user to activate On or de activate Off the automatic power off function ...

Page 24: ...function allows users to set the automatic power on power off times The user can choose to set the Power on time or the Power off time Exit Exits the automatic power on power off settings and goes back to the main menu ...

Page 25: ...of purchase EXCEPT AS PROVIDED HEREIN LEI ELECTRONICS INC MAKES NO WARRANTIES EXPRESS OR IMPLIED INCLUDING WARRANTIES OF MERCHANTABILITY AND FITNESS FOR A PARTICULAR PURPOSE This warranty gives you specific legal rights and you may have other rights which will vary from province to province For product support please contact www leiproducts com or 1 800 449 3315 25 Custom Manufactured in China for...

Reviews: