background image

71

DAKER DK Plus

Armarios batería

ES

3.1 

Contenido del paquete

Controlar el contenido del embalaje:

- manual de instalación;

- hilos y cables de enlace (solamente para los armarios batería vacíos);

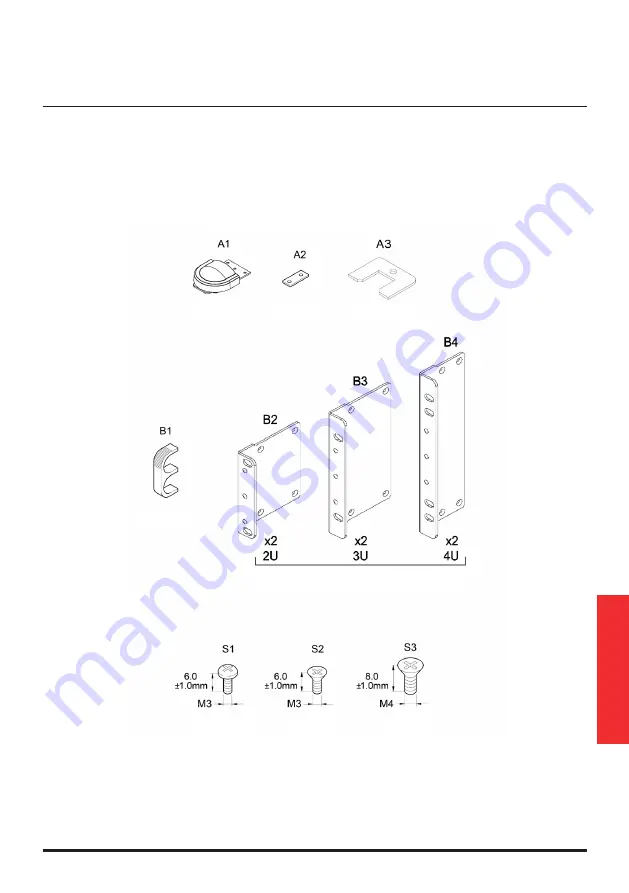
- kit de accesorios torre/bastidor como se muestra en la siguiente figura:

4 pcs

2 pcs

2 pcs

8 pcs

6 pcs

un juego según el modelo

1 pcs

1 pcs

3  Instalación

Summary of Contents for DAKER DK Plus 3 106 60

Page 1: ...Part LE09779AB 07 17 01 GF DAKER DK Plus Battery Cabinets Manuel d installation Installation manual ...

Page 2: ...2 FRANÇAIS 3 ENGLISH 19 ITALIANO 35 DEUTSCH 51 SPANISH 67 PУСCKИЙ 83 DAKER DK Plus Battery Cabinets FR DE ES RU IT EN ...

Page 3: ...urité 5 3 Installation 7 3 1 Contenu de l emballage 7 3 2 Configuration Tower 8 3 2 1 Armoire batteries 9 3 2 2 Onduleur armoire batteries option 9 3 3 Configuration Rack 10 3 4 Panneau arrière 12 3 5 Procédure d installation 13 4 Réglages 15 5 Stockage et démontage 16 5 1 Stockage 16 5 2 Démontage 16 6 Caractéristiques techniques 17 7 Changement des batteries 17 ...

Page 4: ...conditions de garantie peuvent varier selon le pays dans lequel l onduleur est vendu Contrô ler la validité et la durée auprès du référent commercial local LEGRAND Le constructeur décline toute responsabilité directe ou indirecte dans les cas suivants non respect des instructions d installation et utilisation d équipements qui ne répondraient pas aux caractéristiques indiquées dans le manuel d ins...

Page 5: ...la sortie service CA est correctement branchée à la terre L armoire batterie est alimentée par un câble CC Ne pas modifier ce câble Les bornes peuvent se trouver sous tension y compris quand l armoire batterie n est pas branchée à l onduleur Ne pas tenter d ouvrir ou de démonter l onduleur aucune pièce ne peut être changée par l uti lisateur L ouverture de l habillage annule la garantie et expose ...

Page 6: ...ctionnement dépassant l intervalle recommandé se traduisent par une moindre durée de vie des batteries et de moindres performances et réduisent ou annulent la garanties des batteries Veiller à ce qu aucun liquide ou objet étranger ne pénètre à l intérieur de l onduleur L armoire batterie est prévu pour une installation interne dans un environnement ventilé et contrôlé 0 C 32 F 40 C 104 F 20 80 en ...

Page 7: ...e 7 FR 3 Installation 3 1 Contenu de l emballage Contrôler le contenu de l emballage manuel d installation câbles et fixations uniquement pour armoires batteries vides kit accessoires tower rack comme indiqué sur la figure suivante ...

Page 8: ...8 3 Installation 3 2 Configuration Tower 3 2 1 Armoire batterie ...

Page 9: ...Armoire batterie 9 FR 3 2 2 Onduleur armoire batteries Phase 1 Phase 2 CETTE PARTIE PROVIENT DE L ARMOIRE DES BATTERIES CETTE PARTIE PROVIENT DE L ARMOIRE DES BATTERIES x8 DE L ONDULEUR x8 DE L ARMOIRE DES BATTERIES ...

Page 10: ...ck INDICATION Pour la configuration Rack il est également possible d utiliser le kit de soutien pour rack 3 109 52 Dans ce cas se reporter à la fiche des instructions fournie avec le kit 3 Installation Phase 1 Phase 2 Phase 3 ...

Page 11: ...DAKER DK Plus Armoire batterie 11 FR Phase 4 Phase 5 ...

Page 12: ...12 3 4 Panneau arrière 1 Interrupteur DC 2 Borne terre 3 Connecteur batteries 4 Câble d alimentation DC 3 Installation ...

Page 13: ...nstallation de l armoire batterie 1 Positionner l armoire batterie comme indiqué sur la figure suivante 2 S assurer que l onduleur n est pas en marche Brancher le câble d alimentation CC au connecteur ex terne batterie de l onduleur en respectant les opérations décrites sur les figures qui suivent Phase 1 Phase 4 Phase 2 Phase 5 Phase 3 Phase 6 ...

Page 14: ...vant les opérations décrites sur les figures précédentes 4 Retirer la fixation si présente de blocage de l interrupteur CC de l armoire batterie 5 Placer sur On l interrupteur CC de l armoire batterie 6 Allumer l onduleur INDICATION Dans le cas où il serait de remplacer ou d ajouter des batteries à l armoire batterie suivre les ins tructions jointes en chapitre 7 3 Installation ...

Page 15: ... pendant environ trois secondes jusqu à ce que l avertisseur sonore émette deux signaux faire défiler les différents réglages en appuyant jusqu à ce que le réglage Batterie s af fiche sélectionner le nombre des armoires batteries installées en appuyant sur après modification des réglages faire défiler jusqu à l écran Fin et ensuite appuyer sur pour sauvegarder tous les réglages l onduleur redémarr...

Page 16: ...dan gereux tels que les batteries Il est obligatoire de respecter les standards en vigueur dans le pays où l équipement est utilisé Veiller à éliminer chaque composant de l équipement dans le respect de l environnement Les batteries doivent être éliminées auprès d un site agréé pour les déchets toxiques Leur élimi nation comme déchets ordinaires est interdite S informer auprès des autorités compét...

Page 17: ...ries Nombre de batteries 12 12 12 20 20 Type batteries Plomb acide scellées sans entretien VRLA Tension unitaire V et capacité Ah 12 Vdc 7 Ah 12 Vdc 7 Ah 12 Vdc 9 Ah 12 Vdc 5 Ah 12 Vdc 9 Ah Tension Nominale des Batteries V 36 72 72 240 240 Nombre des chaînes de batteries 4 2 2 1 1 Extension batterie Oui Caractéristiques mécaniques Dimensions W x H x D mm 440 x 176 4U x 425 440 x 88 2U x 600 440 x ...

Page 18: ...doivent être de même type Les batteries doivent être neuves et l écart de tension entre les chaînes doit être inférieur à 1 V Si la marque des batteries utilisées est différente de celle des batteries d origine installées par Le grand l autonomie estimée des batteries indiquée sur l écran de l onduleur pourrait ne pas être fiable INDICATION Dans le cas où il serait de remplacer ou d ajouter des ba...

Page 19: ...tions 21 3 Installation 23 3 1 Package content 23 3 2 Tower configuration setup 24 3 2 1 Battery cabinet 24 3 2 2 UPS battery cabinet 25 3 3 Rack configuration setup 26 3 4 Rear panel 28 3 5 Installation procedure 29 4 Setting 31 5 Warehousing and dismantling 32 5 1 Warehousing 32 5 2 Dismantling 32 6 Technical specifications 33 7 Battery replacement 34 ...

Page 20: ...ary depending on the country where the battery cabinet is sold Check the validity and duration with LEGRAND s local sale representative The Manufacturer declines all indirect or direct responsibility arising from failure to observe the installation instructions and use of the equipment which differs from the specifications in the installation manual use by personnel who have not read and thoroughl...

Page 21: ...AC utility outlet is properly grounded The battery cabinet is supplied with a DC power plug Do not modify this cable The terminals may carry live voltage even when the battery cabinet is connected to the UPS Do not attempt to open or disassemble the battery cabinet there are no user replaceable parts Opening the case will void the warranty and introduces the risk of electric shock even when the in...

Page 22: ...ry cabinet is intended for indoor installation in a ventilated controlled indoor envi ronment 0 C 32 F 40 C 104 F 20 80 non condensing humidity Do not install battery cabinet in locations with sparks smoke and hazardous gas or where there is water and excessive humidity Dusty corrosive and salty environments can damage the battery cabinet To prevent damage or safety hazard keep the battery cabinet...

Page 23: ...y Cabinets EN 3 1 Package content Check for the following package content installation manual wires and cable ties only for the empty battery cabinets tower rack accessories kit as shown in the following figure 3 Installation ...

Page 24: ...24 3 2 Tower configuration setup 3 2 1 Battery cabinet 3 Installation ...

Page 25: ...DAKER DK Plus Battery Cabinets EN 25 3 2 2 UPS battery cabinet ...

Page 26: ...ack configuration setup INDICATION For the rack configuration setup it is also possible to use the rack support bracket kit 3 109 52 In this case follow the instruction sheet contained in the kit 3 Installation ...

Page 27: ...27 DAKER DK Plus Battery Cabinets EN ...

Page 28: ...28 3 4 Rear panel 1 DC breaker 2 Earth terminal 3 Battery connector 4 DC power cord 3 Installation ...

Page 29: ...instructions on chapter 2 before installing the battery cabinet 1 Position the battery cabinet visible in the following figure 2 Ensure the UPS is not functioning Connect the DC power cord to the external battery connector of the UPS respecting the steps illustrated in the following figure ...

Page 30: ...ery cabinet following the steps illustrated in the previous figure 4 Remove the bracket if present that blocks the DC breaker of the battery cabinet 5 Turn on the DC breaker of the battery cabinet 6 Turn on the UPS INDICATION If it is necessary to replace or add the batteries of the battery cabinet follow the instructions of chapter 7 3 Installation ...

Page 31: ... UPS settings press simultaneously and for approximately three seconds until the buzzer sounds twice scroll the different settings pressing until the setting Battery is visualized select the number of battery cabinets installed by pressing after changing settings scroll to the End screen and then press to save all changes the UPS restarts automatically However it is also suggested to remove the ma...

Page 32: ...eries It is necessary to strictly adhere to the standards in force in the country where the equipment is used Do not throw any component of the equipment in the ordinary rubbish Batteries must be disposed of in a site intended for the recovery of toxic waste Disposal in the traditional rubbish is not allowed Apply to the competent agencies in your countries for the proper procedure WARNING A batte...

Page 33: ...teries 12 12 12 20 20 Battery type Lead acid sealed without maintenance VRLA Unitary voltage V and capacity Ah 12 Vdc 7 Ah 12 Vdc 7 Ah 12 Vdc 9 Ah 12 Vdc 5 Ah 12 Vdc 9 Ah Rated Battery Voltage V 36 72 72 240 240 Number of battery strings 4 2 2 1 1 Battery extension Yes Mechanical characteristics Dimensions W x H x D mm 440 x 176 4U x 425 440 x 88 2U x 600 440 x 88 2U x 680 440 x 132 3U x 680 Net w...

Page 34: ... is mandatory the reading of chapter 2 Batteries may only be replaced with the same number and type Batteries must be brand new and the voltage difference between the strings must be less than 1V If the battery brand is different from the one originally installed by Legrand the estimated battery autonomy indicated on the display of the UPS may not be reliable INDICATION Follow the instructions in ...

Page 35: ...3 1 Contenuto della confezione 39 3 2 Impostazione configurazione tower 40 3 2 1 Armadio batteria 40 3 2 2 UPS armadio batteria 41 3 3 Impostazione configurazione rack 42 3 4 Pannello posteriore 44 3 5 Procedura d installazione 45 4 Impostazioni 47 5 Immagazzinamento e smontaggio 48 5 1 Immagazzinamento 48 5 2 Smontaggio 48 6 Specifiche Tecniche 49 7 Sostituzione batterie 50 ...

Page 36: ... I termini della garanzia potrebbero variare in funzione del Paese in cui l armadio batteria viene venduto Verificare validità e durata con la rappresentanza locale di LEGRAND Il Costruttore declina ogni responsabilità diretta o indiretta derivante da inosservanza delle istruzioni di installazione e utilizzo dell apparecchiatura diverso da quello previsto nel manuale di installazione utilizzo da p...

Page 37: ...odotto Prima di utilizzare l armadio batteria accertarsi che sia collegato all UPS e che la connessione alla rete abbia un adeguata messa a terra L armadio batteria viene alimentato con spina di alimentazione DC Non modificare questo cavo Nei terminali potrebbe essere presente tensione attiva anche quando l armadio batteria è col legato all UPS Non tentare di aprire o smontare l armadio batteria N...

Page 38: ...rata di vita e ridotte prestazioni della batteria e ridurranno o annulleranno la garanzia della batteria Evitare che qualsiasi liquido o oggetto estraneo possa entrare all interno dell armadio batteria L armadio batteria deve essere installato in ambiente ventilato e con temperatura controllata tra 0 C 32 F e 40 C 104 F con un umidità senza condensa tra 20 e 80 Non installare l armadio batteria in...

Page 39: ...e che nella confezione siano presenti manuale d installazione cavi e fascette solamente per gli armadi batteria vuoti kit accessori tower rack come illustrato nella seguente figura 4 pezzi 2 pezzi 2 pezzi 8 pezzi 6 pezzi 1 set in base al modello 1 pezzo 1 pezzo 3 Installazione ...

Page 40: ...40 3 2 Impostazione configurazione tower 3 2 1 Armadio batteria Fase 1 Fase 2 3 Installazione ...

Page 41: ...41 DAKER DK Plus Armadi batteria IT 3 2 2 UPS armadio batteria Fase 1 Fase 2 QUESTA PARTE VIENE DALL ARMADIO BATTERIA QUESTA PARTE VIENE DALL ARMADIO BATTERIA x8 DALL UPS x8 DALL ARMADIO BATTERIA ...

Page 42: ...urazione rack INDICAZIONI Per l impostazione della configurazione rack è possibile anche utilizzare il kit con staffe di supporto 3 109 52 In tal caso seguire le istruzioni contenute nel kit Fase 1 Fase 2 Fase 3 3 Installazione ...

Page 43: ...43 DAKER DK Plus Armadi batteria IT Fase 4 Fase 5 ...

Page 44: ...44 3 Installazione 3 4 Pannello posteriore 1 Interruttore DC 2 Morsetto di terra 3 Connettore batteria 4 Cavo di alimentazione DC ...

Page 45: ...ma di installare l armadio batteria 1 Posizionare l armadio batteria come illustrato nella seguente figura 2 Accertarsi che l UPS non sia in funzione Collegare il cavo di alimentazione DC al connettore della batteria esterna dell UPS rispettando i passaggi illustrati nella seguente figura Fase 1 Fase 4 Fase 2 Fase 5 Fase 3 Fase 6 ...

Page 46: ...stente rispettando i pas saggi illustrati nella figura precedente 4 Rimuovere la staffa se presente che blocca l interruttore DC dell armadio batteria 5 Portare in posizione ON l interruttore DC dell armadio batteria 6 Accendere l UPS INDICAZIONI Qualora fosse necessario sostituire o aggiungere batterie all armadio batteria seguire le istruzioni del capitolo 7 3 Installazione ...

Page 47: ...UPS premere simultaneamente e per circa tre secondi finché il buzzer suona due volte scorrere le varie impostazioni premendo finché non viene visualizzata la voce Batteria selezionare il numero di armadi batteria installati premendo dopo avere modificato le impostazioni proseguire fino alla schermata Fine e premere per salvare le modifiche l UPS si riavvia automaticamente Tuttavia si consiglia di ...

Page 48: ...iuti elettronici o pericolosi come le batterie E necessario attenersi alle normative vigenti nel Paese in cui l apparecchiatura viene utilizzata Non gettare alcun componente dell apparecchiatura nei rifiuti ordinari Le batterie devono essere smaltite in un sito predisposto per il ricovero dei rifiuti tossici Non smal tire come rifiuto ordinario Contattare gli Enti competenti sul territorio per con...

Page 49: ...12 20 20 Tipo Piombo acido sigillate senza necessità di manutenzione VRLA Tensione unitaria V e capacità Ah 12 Vdc 7 Ah 12 Vdc 7 Ah 12 Vdc 9 Ah 12 Vdc 5 Ah 12 Vdc 9 Ah Tensione nominale batteria V 36 72 72 240 240 Numero di blocchi batteria 4 2 2 1 1 Espansione batterie Sì Caratteristiche meccaniche Dimensioni L x A x P mm 440 x 176 4U x 425 440 x 88 2U x 600 440 x 88 2U x 680 440 x 132 3U x 680 P...

Page 50: ...bligatorio leggere il capitolo 2 Le batterie possono essere sostituite con altre dello stesso numero e tipologia Le batterie devono essere nuove e la differenza di tensione tra i blocchi deve essere inferiore a 1V SelamarcadellabatteriaèdiversadaquellaoriginariamenteinstallatadaLegrand l autonomiastimata per il funzionamento a batteria indicata sul display dell UPS potrebbe non essere affidabile I...

Page 51: ...itshinweise 53 3 Installation 55 3 1 Packungsinhalt 55 3 2 Tower Konfiguration Setup 56 3 2 1 Batterieschrank 56 3 2 2 USV Batterieschrank 57 3 3 Rack Konfiguration Setup 58 3 4 Rückseite 60 3 5 Installationsprozedur 61 4 Einstellungen 63 5 Lagern und entsorgen 64 5 1 Lagern 64 5 2 Demontage 64 6 Technische Spezifikationen 65 7 Anhang Batterie ersetzen 66 ...

Page 52: ... Überprüfen Sie die Gültigkeit und Dauer mit dem lokalen Vertreter von LEGRAND Der Hersteller übernimmt keinerlei Haftung weder direkt noch indirekt in folgenden Fällen Nichtbeachtung der Installationsanweisungen und Verwendung des Geräts auf eine andere Wei se als im Installationshandbuch angegeben Benutzung durch Personen die den Inhalt der Installationsanleitung nicht gelesen und gründlich vers...

Page 53: ...nk ist mit einem DC Netzstecker ausgestattet Dieses Kabel nicht ändern Die Klemmen könnten auch dann unter Spannung sein wenn der Batterieschrank an die USV angeschlossen ist Versuchen Sie nicht den Batterieschrank zu öffnen oder zu demontieren Der Batterieschrank enthält keine vom Benutzer austauschbaren Teile Beim Öffnen des Gehäuses erlischt die Garantie Zudem besteht Stromschlaggefahr auch wen...

Page 54: ...n keine Flüssigkeiten oder Fremdkörper in den Batterieschrank eindringen Der Batterieschrank ist für den gebrauch in Innenraum in einer beläfteten und kontrollierten umgebung zugelassen 0 C 32 F 40 C 104 F 20 80 nicht kondensierenden Feuchtig keit Installieren Sie den Batterieschrank nicht an Orten wo Funken oder Flammen Rauch oder gefährliches Gas durch andere Geräte entstehen können oder in über...

Page 55: ...rprüfen Sie folgenden Packungsinhalt Installationsanweisungen Verbinder und Kabelbinder nur für leere Batterieschränke Zubehörkit für die Tower Rack wie in der folgenden Abbildung gezeigt 4 St 2 St 2 St 8 St 6 St Ein Satz je nach Modell 1 St 1 St 3 Installation ...

Page 56: ...56 3 Installation 3 2 Tower Konfiguration Setup 3 2 1 Batterieschrank Schritt 1 Schritt 2 ...

Page 57: ...57 DAKER DK Plus Batterieschränke DE 3 2 2 USV Batterieschrank Schritt 1 Schritt 2 DIESES TEIL KOMMT VOM BATTERIESCHRANK DIESES TEIL KOMMT VOM BATTERIESCHRANK x8 VON DER USV x8 VOM BATTERIESCHRANK ...

Page 58: ...tup HINWEIS Um den Batterieschrank in ein Rack montieren zu können sollte das Rack Haltebügel Set 310952 verwendet werden In diesem Fall folgen Sie der Bedienungsanleitung des Bausatzes Schritt 1 Schritt 2 Schritt 3 3 Installation ...

Page 59: ...59 DAKER DK Plus Batterieschränke DE Schritt 4 Schritt 5 ...

Page 60: ...60 3 4 Rückseite 1 DC Sicherung 2 Erdungsanschluss 3 Batterieanschluss Bat Rack 4 DC Anschluss USV 3 Installation ...

Page 61: ...schrank installieren 1 Positionieren Sie den Batterieschrank wie in der folgenden Abbildung gezeigt 2 Stellen Sie sicher das die USV nicht in Betrieb ist Schließen Sie das Batteriekabel an den Batteriean schluss der USV an und folgen Sie dazu den nachfolgend beschriebenen Schritten Schritt 1 Schritt 4 Schritt 2 Schritt 5 Schritt 3 Schritt 6 ...

Page 62: ...SV an und folgen Sie dazu den oben beschriebenen Schritten 4 Entfernen Sie den Halteblech falls vorhanden der das Anschlusskabel des Batterieschranks sichert 5 Schalten Sie die DC Sicherung des Batterieschranks ein 6 Schalten Sie die USV ein HINWEIS Wenn die Batterien ersetzt oder andere Batterien hinzugefügt werden müssen folgen Sie den An weisungen des Kapitels 7 ...

Page 63: ...gen der USV zu ändern Drücken Sie gleichzeitig und etwa drei Sekunden lang bis der Summer zweimal ertönt Gehen sie mit Hilfe derTaste zum Menüpunkt Batterie Wählen Sie die Anzahl der installierten Batterieschränke durch Drücken der Taste Nach dem Ändern der Einstellungen gehen sie zum Menüpunkt End ab und drücken dann um alle Änderungen zu speichern die USV startet automatische erneut Wir empfehle...

Page 64: ...ischen oder gefährlichen Abfällen wie Batterien Die in dem Land in dem das Gerät installiert ist geltenden Normen sind genauestens einzuhalten Werfen Sie keine Bestandteile des Geräts in den Hausmüll Die Batterien müssen an einer für die Rückgewinnung von giftigen Abfällen vorgesehenen Stelle entsorgt werden Entsorgung Hausmüll ist nicht erlaubt Fragen Sie die zuständigen Stellen Ihres Lands um da...

Page 65: ... 20 Batterietyp Blei Säure verschlossen wartungsfrei VRLA Einheitliche Spannung V und Kapazität Ah 12 Vdc 7 Ah 12 Vdc 7 Ah 12 Vdc 9 Ah 12 Vdc 5 Ah 12 Vdc 9 Ah Nennspannung der Batterie V 36 72 72 240 240 Anzahl der Batterie stränge 4 2 2 1 1 Batterieerweiterung Ja Mechanische Eigenschaften Abmessungen B x H xT mm 440 x 176 4U x 425 440 x 88 2U x 600 440 x 88 2U x 680 440 x 132 3U x 680 Nettogewich...

Page 66: ...sen Die Batterien dürfen nur mit gleichen Batterien desselben Typs und in derselben Anzahl ersetzt werden Es dürfen nur neue Batterien eingesetzt werden und der Spannungsunterschied zwi schen den Zellen muss weniger als 1V betragen Wenn eine andere Batteriemarke als die Originalbatterie von Legrand installiert wird könnte die am Display angegebene Batterieautonomie nicht zuverlässig sein HINWEIS F...

Page 67: ... 1 Contenido del paquete 71 3 2 Ajuste de la configuración de la torre 72 3 2 1 Armario batería 72 3 2 2 SAI armario batería 73 3 3 Ajuste de la configuración del bastidor 74 3 4 Panel posterior 76 3 5 Procedimiento de instalación 77 4 Ajuste 79 5 Almacenaje y desmontaje 80 5 1 Almacenaje 80 5 2 Desmontaje 80 6 Especificaciones técnicas 81 7 Apéndice Sustitución de la batería 82 ...

Page 68: ...érminos de la garantía pueden variar dependiendo del país donde se venda el armario batería Controlar la validez y la duración con los agentes de venta locales de LEGRAND El Fabricante queda eximido de toda responsabilidad directa o indirecta derivada de incumplimiento de las instrucciones de instalación y uso del equipo sin seguir las especificacio nes del manual de instalación uso por personal q...

Page 69: ...sponga de una puesta a tierra adecuada Se suministra el armario batería con una clavija de potencia CC No modificar este cable En los terminales puede haber tensión incluso con el armario batería conectado al SAI No intentar abrir o desmontar el armario batería no contiene partes que puedan ser sustituidas por el usuario Abrir la carcasa anula la garantía y comporta el riesgo de choque eléctrico i...

Page 70: ...ería No permitir que líquidos u objetos extraños puedan entrar en el armario batería El armario batería se contempla para la instalación en el interior en un entorno ventilado y con trolado 0 C 32 F 40 C 104 F 20 80 y sin humedad de condensación No instalar el ar mario batería en lugares donde chispas humo y gas peligroso o en caso de presencia de agua y humedad excesiva Los entornos con polvo cor...

Page 71: ...ar el contenido del embalaje manual de instalación hilos y cables de enlace solamente para los armarios batería vacíos kit de accesorios torre bastidor como se muestra en la siguiente figura 4 pcs 2 pcs 2 pcs 8 pcs 6 pcs un juego según el modelo 1 pcs 1 pcs 3 Instalación ...

Page 72: ...72 3 Instalación 3 2 Ajuste de la configuración de la torre 3 2 1 Armario batería Paso 1 Paso 2 ...

Page 73: ...73 DAKER DK Plus Armarios batería ES 3 2 2 SAI armario batería Paso 1 Paso 2 ESTA PARTE PROCEDE DEL ARMARIO BATERÍA ESTA PARTE PROCEDE DEL ARMARIO BATERÍA x8 DE SAI x8 DE ARMARIO BATERÍA ...

Page 74: ...el bastidor INDICACIÓN Para el ajuste de la configuración del bastidor también se puede usar el kit abrazadera soporte bastidor 3 109 52 En este caso seguir la hoja de instrucciones contenidas en el kit Paso 1 Paso 2 Paso 3 3 Instalación ...

Page 75: ...75 DAKER DK Plus Armarios batería ES Paso 4 Paso 5 ...

Page 76: ...76 3 4 Panel posterior 1 Interruptor CC 2 Borne de tierra 3 Conector batería 4 Cable potencia CC 3 Instalación ...

Page 77: ...pítulo 2 antes de instalar el armario batería 1 Posizionare l armadio batteria come illustrato nella seguente figura 2 Asegurarse de que el armario batería no está encendido Conectar el cable de potencia CC al conector batería externo del SAI siguiendo los pasos ilustrados en la siguiente figura Paso 1 Paso 4 Paso 2 Paso 5 Paso 3 Paso 6 ...

Page 78: ...xistente siguiendo los pasos ilustrados en la figura anterior 4 Desmontar la abrazadera si presente que bloquea el interruptor CC del armario batería 5 Encender el interruptor CC del armario batería 6 Encender el SAI INDICACIÓN Si hay que sustituir o añadir las baterías del armario batería seguir las instrucciones del capítulo 7 3 Instalación ...

Page 79: ...áneamente y durante unos tres segundos hasta que se oiga el zumbador dos veces recorrer los varios ajustes presionando hasta visualizar el ajuste Batería seleccionar el número de armarios batería instalados presionando tras haber cambiado los ajustes recorrer la pantalla Final y luego presionar para guardar todos los cambios el SAI se reenciende automáticamente Sin embargo se sugiere asimismo cort...

Page 80: ...siduos electrónicos o peligrosos tales como baterías Es necesario cumplir estrictamente los estándares específicos vigentes en el país de uso del equipo No tirar componentes del equipo en los residuos ordinarios Las baterías se han de eliminar en un lugar destinado a la recuperación de residuos tóxicos No se permite la eliminación en los residuos domésticos Dirigirse a las agencias competentes del...

Page 81: ...as 12 12 12 20 20 Tipo de batería Sellado plomo ácido sin mantenimiento VRLA Tensión unitaria V y capacidad Ah 12 Vdc 7 Ah 12 Vdc 7 Ah 12 Vdc 9 Ah 12 Vdc 5 Ah 12 Vdc 9 Ah Tensión Batería Nominal V 36 72 72 240 240 Número de filas batería 4 2 2 1 1 Extensión batería Sí Características mecánicas Medidas A x A x P mm 440 x 176 4U x 425 440 x 88 2U x 600 440 x 88 2U x 680 440 x 132 3U x 680 Peso neto ...

Page 82: ...Antes de la sustitución es obligatorio leer el capítulo 2 Las baterías solamente se pueden sustituir por otras con el mismo número y tipo Las baterías han de ser nuevas y la diferencia de tensión entre las filas ha de ser inferior a 1V Si la marca de la batería no es la misma que la de la original instalada por Legrand la autonomía estimada indicada de la batería en la pantalla del SAI no es fiabl...

Page 83: ... безопасности 85 3 Монтаж 87 3 1 Комплект поставки 87 3 2 Монтаж в вертикальном положении 88 3 2 1 Батарейный модуль 88 3 2 2 ИБП батарейный модуль 89 3 3 Монтаж в стойке 90 3 4 Задняя панель 92 3 5 Процедура монтажа 93 4 Настройка 95 5 Хранение и утилизация 96 5 1 Хранение 96 5 2 Утилизация 96 6 Технические характеристики 97 7 Приложение замена батарей 98 ...

Page 84: ... которой был про дан батарейный модуль Проверьте объем и сроки действия гарантии в местном представитель стве LEGRAND Производитель отказывается от любой косвенной или прямой ответственности вследствие несоблюдения указаний по монтажу и использования оборудования характеристики ко торого отличаются от указанных в настоящем Руководстве эксплуатации оборудования специалистами не изучившими данное Ру...

Page 85: ... убедитесь в том что розет ка электросети правильно заземлена Батарейный модуль подключается через кабель питания постоянного тока Не изменяйте конструкцию этого кабеля На выводах модуля может присутствовать напряжение когда он подключен к ИБП Категорически запрещается вскрывать корпус и разбирать батарейный модуль он не со держит деталей заменяемых пользователем Вскрытие корпуса влечет за собой о...

Page 86: ...ускайте попадания внутрь батарейного модуля жидкостей и посторонних предметов Батарейный модуль предназначен для установки в вентилируемом помещении с контро лируемым микроклиматом при температуре 0 40 C и относительной влажности воздуха 20 80 без образования конденсата Запрещается устанавливать батарейный модуль в местах где возможно появление искр и дыма взрывоопасных газов наличие воды или чрез...

Page 87: ...руководство по эксплуатации провода и кабельные стяжки только для пустых батарейных модулей комплект для монтажа в вертикальном положении стойке показанный на следующем рисунке 4 шт 2 шт 2 шт 8 шт 6 шт один комплект размер в соответствии с моделью 1 шт 1 шт 3 Монтаж 6 0 4 мм 6 0 4 мм 6 0 4 мм ...

Page 88: ...88 3 Монтаж 3 2 Монтаж в вертикальном положении 3 2 1 Батарейный модуль Шаг 1 Шаг 2 ...

Page 89: ...DK Plus Батарейные модули RU 3 2 2 ИБП батарейный модуль Шаг 1 Шаг 2 ДАННАЯ ДЕТАЛЬ ИЗ КОМПЛЕКТА БАТАРЕЙНОГО МОДУЛЯ ДАННАЯ ДЕТАЛЬ ИЗ КОМПЛЕКТА БАТАРЕЙНОГО МОДУЛЯ х8 ИЗ КОМПЛЕКТА ИБП х8 ИЗ КОМПЛЕКТА БАТАРЕЙНОГО МОДУЛЯ ...

Page 90: ...таж в стойке УКАЗАНИЕ Для установки в стойке также можно использовать комплект кронштейнов для установки в стойке Кат 3 109 52 В этом случае руководствуйтесь инструкцией поставляемой с дан ным комплектом Шаг 1 Шаг 2 Шаг 3 ...

Page 91: ...91 ИБП DAKER DK Plus Батарейные модули RU Шаг 4 Шаг 5 ...

Page 92: ...92 3 4 Задняя панель 1 Выключатель постоянного тока 2 Вывод заземления 3 Разъем для подключения бата рейного модуля 4 Разъем подключения к ИБП 3 Монтаж ...

Page 93: ...очтите инструкцию по технике безопасности из раздела 2 1 Расположите батарейный модуль как показано на рисунке 2 Проверьте что ИБП не включен Подсоедините кабель питания постоянным током к разъ ему для подключения батарейного модуля на ИБП Порядок действий показан на рисунке Шаг 1 Шаг 4 Шаг 2 Шаг 5 Шаг 3 Шаг 6 ...

Page 94: ...лем питания постоянным током как показано на рисунке выше 4 Снимите скобу если имеется блокирующую выключатель постоянного тока батарейного модуля 5 Включите выключатель постоянного тока батарейного модуля 6 Включите ИБП УКАЗАНИЕ Порядок замены или добавления батарей в батарейный модуль описан в главе 7 ...

Page 95: ...на три секунды пока не раз дастся два сигнала зуммера прокрутить настройки нажимая кнопку пока не появится настройка Battery выбрать количество подключенных батарейных модулей нажимая после изменения настроек следует перейти к конечному экрану End и нажать кнопку чтобы сохранить все изменения ИБП перезапустится автоматически Однако рекомендуется не подключать его к электросе ти в течение не менее ...

Page 96: ...ия и опасных отходов к кото рым относятся аккумуляторные батареи Необходимо тщательно соблюдать нормативные документы действующие в стране применения оборудования Запрещается выбрасывать его компоненты вместе с бытовым мусором Батареи следует сдавать в организацию занимающеюся утилизацией опасных отходов За прещается выбрасывать их вместе с бытовым мусором По поводу утилизации батарей обращайтесь ...

Page 97: ...тареи свинцово кислотные герметичные необслуживаемые VRLA Напряжение и емкость одной батареи 12 В пост тока 7 Ач 12 В пост тока 7 Ач 12 В пост тока 9 Ач 12 В пост тока 5 Ач 12 В пост тока 9 Ач Номинальное напряжение группы батарей В 36 72 72 240 240 Количество групп батарей 4 2 2 1 1 Расширение числа батарей Sì Механические характеристики Размеры В х Ш х Г мм 440 x 176 4U x 425 440 x 88 2U x 600 4...

Page 98: ...батареи разрешается только персоналу имеющему соответству ющий допуск по электробезопасности Перед заменой батарей следует обязательно изучить главу 2 Батареи следует заменять бата реями такого же типа и емкости УКАЗАНИЕ Порядок замены или добавления батарей в батарейный модуль описан в Приложение в кон це данного Руководства ...

Page 99: ...99 DAKER DK Plus Battery Cabinets 3 106 60 3 106 65 Appendix Battery replacement ...

Page 100: ...erie nel blocco batterie DE Die Batterien in das Batteriepack einsetzen ES Situar las baterías en el paquete batería RU Поместите батареи в пластиковую упаковку PHASE2 STEP2 FASE2 SCHRITT2 PASO2 ШАГ2 FR S assurer de disposer de tous les câbles de branchement EN Ensure to have all the connecting wires IT Accertarsi di avere tutti i cavi di collegamento DE Kontrollieren Sie dass alle Anschlusskabel ...

Page 101: ...en wie in der Abbildung gezeigt an und achten Sie dabei auf die Polarität ES Conectar las baterías respetando la polaridad mostrada en la imagen RU Соедините батареи соблюдая полярность как показано на рисунке PHASE4 STEP4 FASE4 SCHRITT4 PASO4 ШАГ4 FR Poser les batteries en respectant l orientation indiquée sur l image EN Lay down the batteries according to the directions in the picture IT Posizio...

Page 102: ... ШАГ6 FR Assembler le support connecteur sur le pack batterie EN Assemble the connector holder on the battery pack IT Montare il porta connettore nel blocco batterie DE Montieren Sie den Steckerhalter am Batteriepack ES Ensamblar el soporte conector en el paquete batería RU Вставьте держатель разъема в пластиковую упаковку как показано на рисунке PHASE7 STEP7 FASE7 SCHRITT7 PASO7 ШАГ7 FR Fixer le ...

Page 103: ...teriezellen ES Seguir los pasos 1 7 para preparar las otras tres filas de baterías RU Выполните шаги 1 7 для всех групп батарей PHASE9 STEP9 FASE9 SCHRITT9 PASO9 ШАГ9 FR Introduire les packs batteries dans l armoire et brancher les connecteurs de batterie EN Insert the battery packs in the cabinet and plug all the battery connectors IT Inserire i blocchi batterie nell armadio e collegare tutti i c...

Page 104: ... 106 65 PHASE 10 STEP 10 FASE 10 SCHRITT 10 PASO 10 ШАГ 10 FR Installer le panneau frontal de l armoire EN Install the frontal cabinet panel IT Installare il pannello frontale dell armadio DE Montieren Sie die Fronttafel des Schranks ES Instalar el panel armario frontal RU Установите переднюю панель модуля Appendix Battery replacement ...

Page 105: ...105 DAKER DK Plus Battery Cabinets 3 106 61 3 106 62 3 106 66 3 106 67 ...

Page 106: ... the connecting wires IT Accertarsi di avere tutti i cavi di collegamento DE Kontrollieren Sie dass alle Anschlusskabel vorhanden sind ES Asegurarse de disponer de todos los cables de conexión RU Проверьте наличие всех соединительных проводов PHASE3 STEP3 FASE3 SCHRITT3 PASO3 ШАГ3 FR Brancher les batteries en respectant la polarité indiquée sur l image EN Connect the batteries respecting the polar...

Page 107: ...atterien wie in der Abbildung gezeigt hinein ES Situar las baterías en los sentidos mostrados en la imagen RU Положите батареи на плоскую сторону повернув в направлении показанном стрелками PHASE5 STEP5 FASE5 SCHRITT5 PASO5 ШАГ5 FR Fixer le pack batterie avec deux fixations de câble aux extrémités EN Fix the battery pack with two cable ties at the extremities IT Fissare il blocco batterie con due ...

Page 108: ...n Steckerhalter am Batteriepack und befestigen Sie den Batteriestecker ES Ensamblar el soporte conector en el paquete batería y fijar el conector batería RU Вставьте держатель разъема в пластиковую упаковку как показано на рисунке PHASE7 STEP7 FASE7 SCHRITT7 PASO7 ШАГ7 FR Suivre les phases 1 à 6 pour préparer la deuxième chaîne de batteries EN Follow steps 1 6 to prepare the second battery string ...

Page 109: ...erie nell armadio e collegare tutti i connettori delle batterie DE Legen Sie die Batteriepacks in den Schrank ein und schließen Sie alle Batteriestecker an ES Situar los paquetes batería en el armario y conectar todos los conectores batería RU Вставьте упаковки с батареями в модуль и соедините все разъемы батарейных проводов PHASE9 STEP9 FASE9 SCHRITT9 PASO9 ШАГ9 FR Installer le panneau frontal de...

Page 110: ...110 Appendix Battery replacement 3 106 63 3 106 68 ...

Page 111: ...ave all the connecting wires IT Accertarsi di avere tutti i cavi di collegamento DE Kontrollieren Sie dass alle Anschlusskabel vorhanden sind ES Asegurarse de disponer de todos los cables de conexión RU Соедините батареи соблюдая полярность как показано на рисунке PHASE3 STEP3 FASE3 SCHRITT3 PASO3 ШАГ3 FR Brancher les batteries en respectant la polarité indiquée sur l image EN Connectthebatteriesr...

Page 112: ...figura e posizionare i cavi DE Legen Sie die Batterien wie in der Abbildung gezeigt hinein beachten Sie die Richtung und verlegen Sie die Kabel richtig ES Situar las baterías en los sentidos mostrados en la imagen y arreglar los cables RU Зафиксируйте упаковку с батареями тремя кабельными стяжками PHASE5 STEP5 FASE5 SCHRITT5 PASO5 ШАГ5 FR Fixer le pack batterie avec trois fixations de câble EN Fix...

Page 113: ... Sie den Steckerhalter am Batteriepack ES Ensamblar el soporte conector en el paquete batería RU Выполните шаги 1 5 для остальных трех групп батарей PHASE7 STEP7 FASE7 SCHRITT7 PASO7 ШАГ7 FR Suivre les phases 1 à 5 pour préparer les trois autres chaînes de batteries EN Follow steps 1 5 to prepare all the other three battery strings IT Seguire le fasi 1 5 per preparare gli altri tre blocchi batteri...

Page 114: ...l armadio Collegare tutti i connettori delle batterie e fissarli ai porta connettori DE Legen Sie die Batteriepacks in den Schrank ein Schließen Sie die Batteriestecker an und befestigen Sie sie an die Halter ES Situar los paquetes batería en el armario Conectar todos los conectores batería y fijarlos en los soportes conectores RU Соедините все разъемы батарейных проводов и закрепите их в держател...

Page 115: ...115 DAKER DK Plus Battery Cabinets 3 106 64 3 106 69 ...

Page 116: ...blocco batterie DE Die Batterien in das Batteriepack einsetzen ES Situar las baterías en el paquete batería RU Поместите батареи в пластиковую упаковку PHASE2 STEP2 FASE2 SCHRITT2 PASO2 ШАГ2 FR S assurer de disposer de tous les câbles de branchement EN Ensure to have all the connecting wires IT Accertarsi di avere tutti i cavi di collegamento DE Kontrollieren Sie dass alle Anschlusskabel vorhanden...

Page 117: ...ie et brancher le câble rouge et noir sur les bornes disponibles de la batterie en respectant la polarité EN Collect the cover of the battery pack and connect the red and black cable on the available battery terminals respecting the polarity IT Rimuovere la copertura del blocco batterie e collegare il cavo rosso e nero nei morsetti disponibili della batteria rispettando la corretta polarità DE Neh...

Page 118: ...kungen des Batteriepacks mit Klebestreifen ES Fijar el paquete batería con cinta adhesiva RU Зафиксируйте упаковку с батареями клейкой лентой как показано на рисунке PHASE6 STEP6 FASE6 SCHRITT6 PASO6 ШАГ6 FR Assembler le support connecteur sur le pack batterie EN Assemble the connector holder on the battery pack IT Montare il porta connettore nel blocco batterie DE Befestigen sie den Stecker des B...

Page 119: ...as RU Выполните шаги 1 6 для остальных четырех групп батарей PHASE8 STEP8 FASE8 SCHRITT8 PASO8 ШАГ8 FR Introduire les packs batteries dans l armoire Brancher tous les connecteurs de batterie et les fixer aux supports de connecteur EN Insert the battery packs in the cabinet Plug all the battery connectors and fix them to the connector holders IT Inserire i blocchi batterie nell armadio Collegare tu...

Page 120: ...ll armadio DE Befestigen Sie den Batterieblock an den Schrank ES Fijar el bloque batería en el armario RU Вставьте упаковку с батареями в модуль PHASE 10 PHASE 10 FASE 10 SCHRITT 10 PASO 10 ШАГ 10 FR Installer le panneau frontal de l armoire EN Install the frontal cabinet panel IT Installare il pannello frontale dell armadio DE Montieren Sie die Fronttafel des Schranks ES Instalar el panel armario...

Page 121: ...121 ...

Page 122: ...122 ...

Page 123: ...123 ...

Page 124: ...roit de modifier à tout moment le contenu de cet imprimé et de communiquer sous n importe quelle forme et modalité les changements apportés LEGRAND Pro and Consumer Service BP 30076 87002 LIMOGES CEDEX FRANCE www legrand com ...

Reviews: