background image

Installation instructions 

Mounting 

Page 8 of 18


6


Mounting 

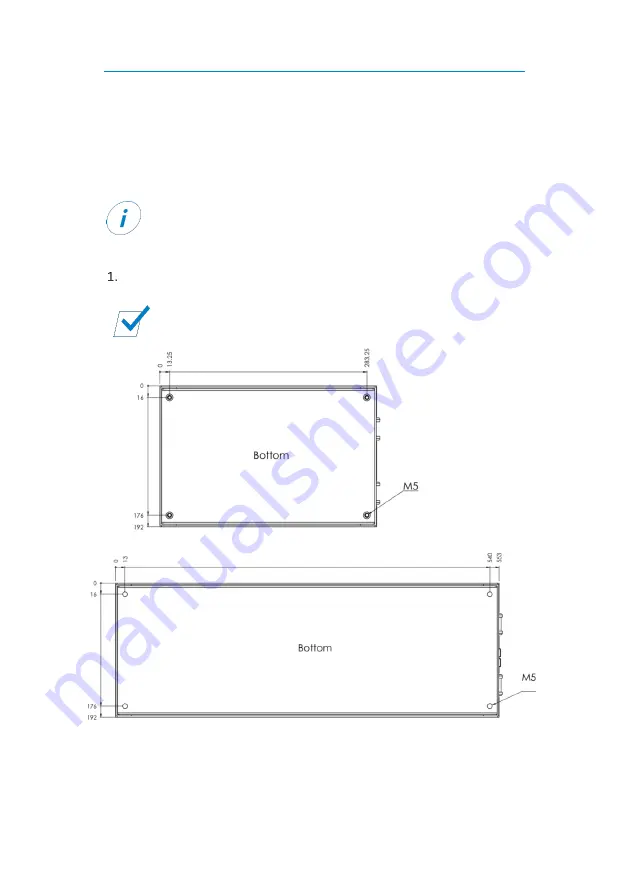
To mount the lithium-ion battery, perform the following step: 


Use screws to secure the device to the 4 holes on the underside of the 
battery (5 mm Ø). 


The device is mounted. 


Choose a cool, dry and well-ventilated mounting site. 


Always mount the lithium-ion battery upright or lying on its 
side, never upside down. 


Make sure the air circulation is unobstructed at the radiator. 

12 V /100 Ah 


24 V /100 Ah 


Summary of Contents for 012-00022GF

Page 1: ...LEAB Automotive GmbH Thorshammer 6 DE 24866 Busdorf User manual Version V 2 0 Issue date 16 09 2019 Lithium Ion Battery 12 V 100 Ah 24 V 100 Ah With integrated battery management system User manual ...

Page 2: ...9 Error code display 17 10 Maintenance 18 11 Disposal 18 12 EU Declaration of Conformity 18 1 About this Manual Read this manual carefully and keep it in a safe place This manual is intended for professionals in the automotive electrical field Throughout the manual you will be alerted to warnings and safety notices about potential hazards associated with handling the device The colours and signal ...

Page 3: ... tips and information about the device Indicates a mandatory requirement for the following instruction Shows the result of an instruction 2 General Safety This manual supports safe handling of the batteries Use the batteries solely in accordance with its intended use Lithium ion batteries are power sources with a particularly high energy density in a closed metal housing Any modifications to the d...

Page 4: ...fore use Only charge batteries in well ventilated rooms and away from ignition sources Fully charge the lithium ion battery every 6 months at the latest 3 Technical Specifications Battery type 12 V 100 Ah 24 V 100 Ah Part number 012 00022GF 012 00024GF Available capacity 80 Ah 80 Ah Rated voltage 12 V 24 V Lower operating voltage 9 2 V 18 4 V Charge voltage 15 V 30 V Min cell voltage 2 3 V Max cel...

Page 5: ...rating IP20 Connection Screws M8 Weight 16 52 kg 31 22 kg Dimension L x W x H 302 mm x 192 mm x 274 mm 558 mm x 192 mm x 274 mm Parallel connection CAN bus connection parameters Pin Signal Parameter Value 1 CAN WakeUp Output voltage Battery voltage Output impedance 10 kΩ Maximum input voltage 60 V Trigger voltage high low 3 5 V Input impedance 4 7 MΩ 2 CAN GND Maximum current 250 mA Rated fuse siz...

Page 6: ... Maximum input voltage 45 V Input voltage level High Low 3 8 V Input impedance at 5 VDC 2 MΩ SW DATA Connection speed 9600 Baud Output impedance at 12 VDC 1 kΩ Rated fuse size 300 mA thermal SW GND Maximum current 300 mA Rated fuse size 300 mA thermal GND Maximum current 300 mA Rated fuse size 300 mA thermal 4 Package Contents Package Contents No User manual 1 CAN communication cable 1 Lithium ion...

Page 7: ...e 6 of 18 5 About the battery Front of lithium ion battery No Part Name 1 Positive terminal 2 Negative terminal 3 DIP switch 4 Status indicator for more information see page 7 5 Status contacts for more information see page 7 6 CAN bus sockets RJ10 ...

Page 8: ...dy light 30 Flashing 20 30 20 red Steady light 10 Flashing 0 10 Signal contact Description Output 1 External alarm controller active at 10 SOC Output 2 Protection against overload by an external charger active at 4 1 V cell voltage Input 1 Wake up signal for vehicle ignition active operating voltage D signal Input 2 Wake up signal for remote control signal active operating voltage Input 3 Wake up ...

Page 9: ...screws to secure the device to the 4 holes on the underside of the battery 5 mm Ø The device is mounted Choose a cool dry and well ventilated mounting site Always mount the lithium ion battery upright or lying on its side never upside down Make sure the air circulation is unobstructed at the radiator 12 V 100 Ah 24 V 100 Ah ...

Page 10: ...ery in single operation to 12V or 24 V consumers you need a suitable power pack LEAB recommends an APP series power pack To connect the APP and the 12 V or 24 V consumers perform the following steps For installation you need an installation relay LEAB recommends the Eltako R12 110 230V relay part no 9905043791 Before installing make sure that the power pack is turned off The wiring diagram shows t...

Page 11: ...Connect the terminal 3 of the relay to ground Connect the L conductor of the AC wire of the power pack to the A1 terminal of the relay Connect the N conductor of the AC wire of the power pack to the A2 terminal of the relay Bridge the SW GND connection of the battery with the GND connection of the battery with a signal line Connect the negative lead of the 12 V or 24 V consumers to a ground Connec...

Page 12: ...a suitable inverter LEAB recommends the CLP combi inverter To connect the CLP combi and the 230 V consumers perform the following steps For installation you need an installation relay LEAB recommends the Eltako R12 110 230V relay part no 9905043791 Before installation make sure that the combi is switched off The wiring diagram shows the lithium ion battery connected to CLP combi ...

Page 13: ... Connect the L conductor of the AC wire of the combi to the A1 terminal of the relay Connect the N conductor of the AC wire of the combi to the A2 terminal of the relay Bridge the SW GND connection of the battery with the GND connection of the battery with a signal line Connect the 230 V consumer to the output of the combi Connect the negative lead of the 12 V or 24 V consumers to a ground Connect...

Page 14: ...sitive terminal of the starter battery Connect the remote port of the remote display to the input 2 of the lithium ion battery with a signal cable Use a signal cable to connect the SW data port of the remote display to the SW data port of the lithium ion battery The remote display is connected The wiring diagram shows the remote display connected to the lithium ion battery with CLP combi When inst...

Page 15: ...g steps Connect the negative terminal of the charge booster to a common ground Connect the positive terminal of the charge booster to the positive terminal of the starter battery Connect the other positive terminal of the charge booster to the positive terminal of the battery For the charge booster 12 12 Connect the CAN terminal of the charge booster to the CAN terminal of the battery with a signa...

Page 16: ...ommends the Eltako R12 110 230V relay part no 9905043791 You have connected the CLP combi You have connected a charge booster Make sure all devices are turned off before installation Connect a maximum of 20 lithium ion batteries in parallel Never connect the lithium ion batteries in series Do not connect lithium ion batteries from other manufacturers to the lithium ion battery The wiring diagram s...

Page 17: ... present for a wake up input The lithium ion battery switches off as soon as all wake up signals are removed Charging the battery in sleep mode To charge the lithium ion battery connect a suitable charger and start charging within 30 seconds The lithium ion battery protects itself against deep discharge by disconnecting the power ports and starting sleep mode In this mode the lithium ion battery c...

Page 18: ...d and restart Flashing x 4 Precharge error Battery starts in Sleep Mode after 30 s remove load and restart Flashing x 5 Battery overloaded Check charger battery is in compensation mode Flashing x 6 Internal error Cell voltage monitor Battery starts in Sleep Mode after 30 s contact dealer Flashing x 7 Internal error Cell temperature monitor Battery starts in Sleep Mode after 30 s contact dealer Fla...

Page 19: ...al Dispose of the lithium ion battery in accordance with the Waste Electrical and Electronic Equipment Regulations WEEE The lithium ion battery must not be disposed of with household waste Take it to a recycling point or send it to your point of sale 12 EU Declaration of Conformity The lithium ion battery types 12 V 100 Ah and 24 V 100 Ah complies with the requirements of the following directives ...

Page 20: ...LEAB Automotive GmbH Thorshammer 6 DE 24866 Busdorf Germany Tel 49 0 4621 9 78 60 0 Fax 49 0 4621 9 78 60 260 Email anfrage leab eu Web www leab eu ...

Reviews: