Installation
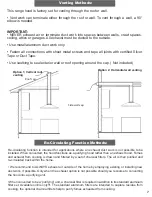
• Vent system must terminate to the outside (roof
or side wall).
• DO NOT terminate the vent system in an at- tic
or other enclosed area.
• DO NOT use 4” (10.2 cm) laundry-type wall
caps.
• Use metal /aluminum vent only. Rigid metal
(Not Included).
aluminum vent is recommended.
• DO NOT use plastic vent.
•Always keep the duct clean to ensure proper
airflow.
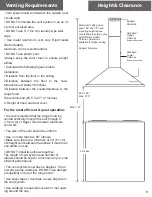
• Calculate the following figures before
installation:
1.Distance from the floor to the ceiling.
2.Distance between the floor to the coun-
tertop/stove (Usually 36 Inches).
3.Distance between the countertop/stove to the
range hood.
We recommend (25.5’ to 27 1/2’ Inches).
4. Height of hood and duct cover.
For the most efficient & quiet operation:
• It is recommended that the range hood be
vented vertically through the roof through 6”
(15.24 cm) or bigger round metal / aluminum
vent work.
• The size of the vent should be uniform.
• Use no more than two 90° elbows.
• Make sure there is a minimum of 24” (61 cm)
of straight vent between the elbows if more than
one elbow is used.
• DO NOT install two elbows together.
The length of vent system and number of
elbows should be kept to a minimum to pro- vide
efficient performance.
• The vent system must have a damper. If roof
or wall cap has a damper, DO NOT use damper
(if supplied) on top of the range hood.
• Use silver tape or duct tape to seal all joints in
the vent system.
• Use caulking to seal exterior wall or roof open-
ing around the cap.
1) Position the range hood on the center of cooking stove wall. For best results, the mounting height of the
range hood should be 65-75cm (25"-30") above the top of the range. Mark the position of the holes, which
need to be drilled in order to mount the range hood.
2) According to marks, drill two holes appropriate for heavy duty wall anchors and screws (not included).
Mount the range hood on the wall with the two screws and anchors and tighten.
3) Install the one-way valve on top of the range hood and assemble the exhaust pipe and decorative cover.
4) Affix the decorative cover with two M4 tapping screws on the hood body.
5) Make sure all switches are off and then insert the electrical plug into an outlet.
Technical Parameters
ITEM
Rated Voltage
Rated frequency
Motor input power
Lamp power
Air volume
Air pressure
Noise level
Air output diameter
unit
V
Hz
W
W
m3/min
Pa
dB(A)
mm
parameter
110
60
198
≤2X20
9.5~15
>160
<70
150
27.5”
10


