background image


IT 

Direttiva 2002/96/CE (Rifiuti di Apparecchiature 
Elettriche ed Elettroniche - RAEE): 
informazioni agli utenti: 

ai sensi dell’art. 13 del 

Decreto Legislativo 25 luglio 2005, n. 
151"Attuazione delle Direttive 2002/95/CE, 
2002/96/CE e 2003/108/CE, relative alla riduzione 
dell'uso di sostanze pericolose nelle 
apparecchiature elettriche ed elettroniche, nonché 
allo smaltimento dei rifiuti" questo prodotto è 
conforme. 

 
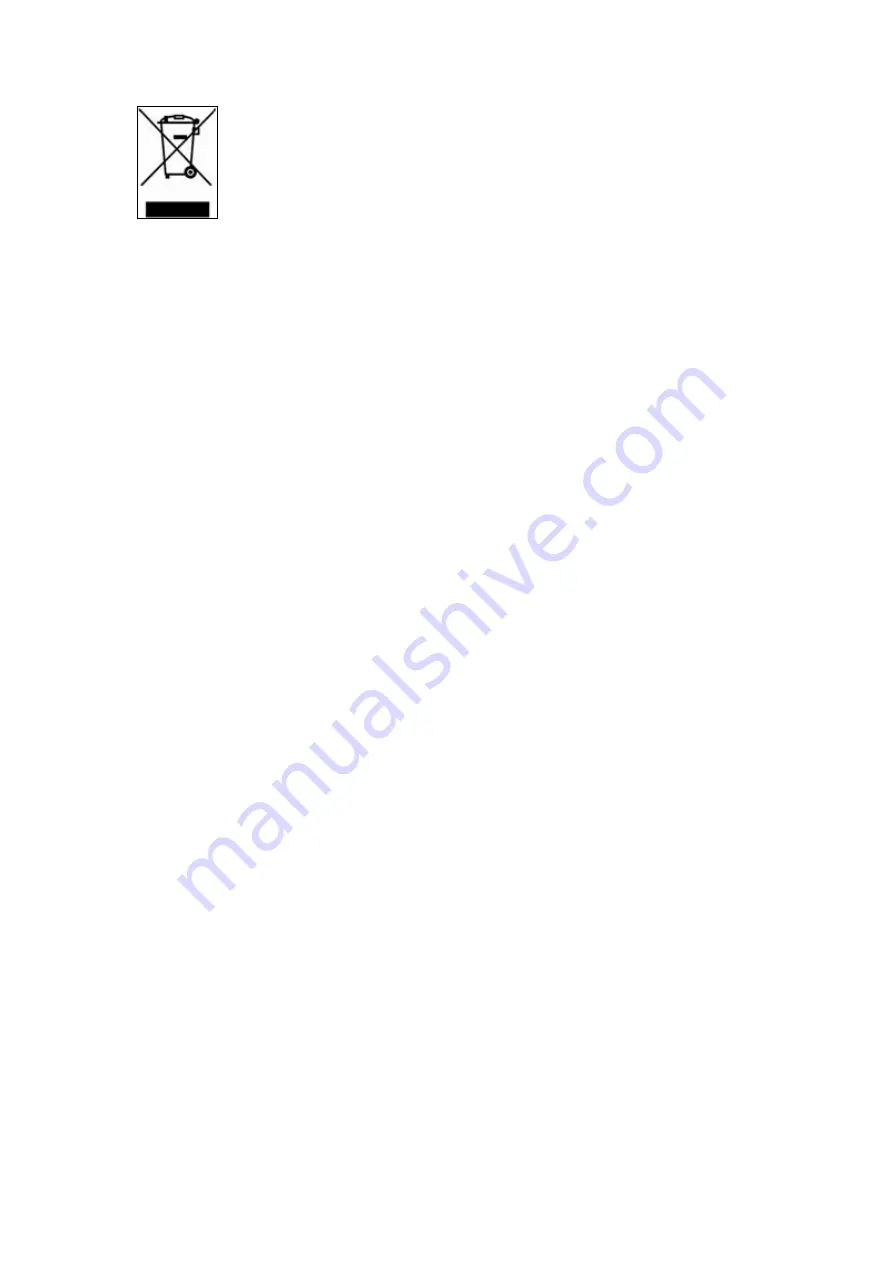
Il simbolo del cassonetto barrato riportato 
sull’apparecchiatura o sulla sua confezione indica che 
il prodotto alla fine della propria vita utile deve essere 
raccolto separatamente dagli altri rifiuti. L’utente dovrà, 
pertanto, conferire l’Apparecchiatura giunta a fine vita 
agli idonei centri di raccolta differenziata dei Rifiuti 
Elettronici ed Elettrotecnici, oppure riconsegnarla al 
rivenditore al momento dell’acquisto di una nuova 
apparecchiatura di tipo equivalente, in ragione di uno a 
uno. L’adeguata raccolta differenziata per l’avvio 
successivo dell’apparecchiatura dismessa al 
riciclaggio, al trattamento ed allo smaltimento 
ambientalmente compatibile contribuisce ad evitare 
possibili effetti negativi sull’ambiente e sulla salute e 
favorisce il reimpiego e/o riciclo dei materiali di cui è 
composta l’apparecchiatura. Lo smaltimento abusivo 
del prodotto da parte dell’utente comporta 
l’applicazione delle sanzioni amministrative previste 
dalla normativa vigente. 
 
 
ES 

Directiva 2002/96/EC (Residuos de aparatos 
eléctricos y electrónicos - RAEE): 
Información para el usuario. 

Este producto es conforme con la Directiva EU 
2002/96/CE. El simbolo de la papelera barrada situado 
sobre el aparato indica que este producto, al final de 
su vida útil, debe ser tratado separadamente de los 
residuos domésticos. El usuario es responsable de la 
entrega del aparato al final de su vida útil a los centros 
de recogida autorizados. El adecuado proceso de 
recogida diferenciada permite dirigir el aparato 
desechado al reciclaje, a su tratamiento y a su 
desmantelamiento de una forma compatible con el 
medio ambiente, contribuyendo a evitar los posibles 
efectos negativos sobre el ambiente y la salud, 
favoreciendo el reciclaje de los materiales de los que 
está compuesto el producto. Para información más 
detallada inherente a los sistemas de recogida 
disponibles, dirigirse al servicio local de recogida o al 
establecimiento donde se adquirió el producto. 
 
 
FR 

Directive 2002/96/CE (Déchets d’équipements 
électriques et électroniques - DEEE):  
informations aux utilisateurs. 

Ce produit est conforme à la Directive ED 2002/96/CE. 
Le symbole de la corbeille barrée reporté sur l’appareil 
indique que ce dernier doit être éliminé à part lorsqu’il 
n’est plus utilisable et non pas avec les ordures 
ménagéres. L’utilisateur a la responsabilité de porter 
l’appareil hors d’usage à un centre de ramassage 
spécialisé. Le tri approprié des déchets permet 
d’acheminer l’appareil vers le recyclage, le traitement 
et l’élimination de façon écologiquement compatible. Il 
contribute à éviter les effets négatifs possibles sur 
l’environnement et sur la santé, tout en favorisant le 
recyclage des matériaux dont est constitué le produit. 
Pour avoir des informations plus détaillées sur les 
systèmes de ramassage disponibles, s’adresser au 
service local d’élimination des déchets ou au 
revendeur. 

 
DE 

Richtlinie 2002/96/EU (Elektro- und Elektronik- 
Altgeräte - WEEE): 
Benutzerinformationen. 

Dieses Produkt entspricht der EU Richtlinie 
2002/96/EU. Das Symbol des auf dem Gerät 
dargestellten, durchgestrichenen Korbes gibt an, dass 
das Produkt am Ende seiner Nutzungsdauer 
gesondert vom Hausmüll zu behandeln ist. Am Ende 
der Nutzungsdauer ist der Benutzer für die 
Überantwortung des Geräts an geeignete 
Sammelstellen verantwortlich. Die angemessene, 
getrennte Müllsammlung zwecks umweltkompatibler 
Behandlung und Entsorgung für den anschließenden 
Recycling beginn des nicht mehr verwendeten Geräts 
trägt zur Vermeidung möglicher schädlicher 
Wirkungen auf Umwelt und Gesundheit bei und 
begunstigt das Recycling der Materialien, aus denen 
das Produkt zusammengesetzt ist. Für nähere 
Informationen bezüglich der zur Verfügung stehenden 
Sammelsysteme, wenden Sie sich bitte an den 
örtlichen Müllentsorgungsdienst oder an das Geschäft, 
in dem der Kauf getäligt worden ist. 
 
UK 

Directive 2002/96/EC (Waste Electrical and 
Electronic Equipment - WEEE): 
information for users. 

This product complies with EU Directive 2002/96/EC. 
The crossed-out wastebasket symbol on the appliance 
means that at the end of its useful lifespan, the product 
must be disposed of separately from ordinary 
household wastes. The user is responsible for 
delivering the appliance to an appropriate collection 
facility at the end of its useful lifespan. Appropriate 
separate collection to permit recycling, treatment and 
environmentally compatible disposal helps prevent 
negative impact on the environment and human health 
and promotes recycling of the materials making up the 
product. For more information on available collection 
facilities, contact your local waste collection service or 
the shop where you bought this appliance. 
 
NL 

Richtlijn 2002/96/EG (Afgedankte Elektrische en 
Elektronische Apparaten - AEEA):  
informatie voor de gebruikers. 

Dit product voldoet aan de richtlijn EU 2002/96/EG. 
Het symbool van de vuilnisbak met een streep erdoor, 
dat op het apparaat staat, geeft aan dat het product, 
wanneer het wordt afgedankt, niet met het huisvuil kan 
worden meegegeven. Het is de verantwoordelijkheid 
van de gebruiker het product, op het moment dat dit 
wordt afgedankt, in te leveren bij een centrum voor 
gescheiden afvalverwerking. Een correcte gescheiden 
afvalverwerking, die gericht is op de recycling van het 
afgedankte product en die een milieuvriendeiijke 
behandeling en vernietiging mogelijk maakt, draagt 
ertoe bij mogelijk negatieve effecten op het milieu en 
op de gezondheid te voorkomen en bevordert het 
hergebruik van de materialen waaruit het product 
bestaat. Voor meer gedetailleerde informatie met 
betrekking tot de voorhanden zijnde 
afvalverwerkingsystemen dient u zich te wenden tot de 
plaatselijke vuilnisdienst of tot de winkelier waar u het 
product heeft gekocht. 
 
PT 

Directiva 2002/96/CE (Residuos de equipamentos 
eléctricos e electrónicos REEE): 
informações para os utilizadores. 

Este produto é conforme á Directiva EU 2002/96/CE. 
O simbolo do cesto barrado marcado no aparelho 
indica que o produto, no fim da própria vida útil, deve 
ser tratado separadamente do lixo doméstico. O 
utilizador é responsável pela entrega do aparelho. no 
fim da vida do mesmo, às apropriadas estruturas de 
recolha. A adequada recolha diferenciada para o 
encaminhamento sucessivo do aparelho à reciclagem, 
ao tratamento e ao escoamento ambientalmente 
compativel, contribui para evitar possiveis efeitos 
negativos sobre o ambiente e a saúde e favorece a 
reciclagem dos materiais que compõem o produto. 
Para informações mais detalhadas inerentes aos 
sistemas de recolha disponiveis, dirija-se ao serviço 

local de escoamento de residuos, ou a loja na 
qual efectuou a compra. 
 
 
NO 

WEEE-symbolet (Waste Electrical and 
Electronic Equipment). 

Bruken av WEEE-symbolet indikerer at dette 
produktet ikke kan behandles som 
husholdningsavfall. Du vil bidra til å beskytte 
miljøet ved å sørge for at dette produktet blir 
avhendet på en forsvarlig måte. Ta kontakt med 
kommunale myndigheter, renovasjonsselskapet 
der du bor eller forretningen hvor du kjøpte 
produktet for å få mer informasjon om 
resirkulering av dette produktet. 


Symbol för avfall från elektrisk och 
elektronisk utrustning (WEEE). 

Märkning med WEEE-symbolen visar att 
produkten inte får behandlas som hushållsavfall. 
Genom att slänga den här produkten på rätt sätt 
bidrar du till att skydda miljön. Mer information 
om återvinning av produkten kan du få av de 
lokala myndigheterna, din renhållningsservice 
eller i affären där du köpte produkten. 
 
 
FI 

WEEE-merkintä (sähkö- ja 
elektroniikkalaiteromu). 

WEEE-merkintä osoittaa, että tätä tuotetta ei voi 
käsitellä kotitalousjätteen tavoin. Kun huolehdit 
tämän tuotteen asianmukaisesta hävittämisestä, 
autat suojelemaan ympäristöä. Lisätietoa tämän 
tuotteen kierrättämisestä saat 
paikallisviranomaisilta, jätehuoltoyhtiöltäsi tai 
myymälästä josta ostit tämän tuotteen. 
 
 
DK 

Symbol for affald af elektrisk og elektronisk 
udstyr (WEEE) 

Brugen af WEEE-symbolet betyder, at dette 
produkt ikke må behandles som 
husholdningsaffald. Ved at sørge for korrekt 
bortskaffelse af produktet medvirker du til at 
beskytte miljøet. Du kan få flere oplysninger om 
genbrug af dette produkt hos de lokale 
myndigheder, dit renovationsselskab eller i 
forretningen, hvor du har købt produktet. 
 
 
HU 

Hulladék elektromos vagy elektronikus 
készüléket jelölö szimbòlum. 

Ez a szimbólum azt jelöli, hogy a terméket nem 
szabad háztartási hulladékként kezelni. A 
hulladékká valt termék megfeleló elhelyezésével 
hozzájárul a környezet védelméhez. A termék 
újrafelhasználásával kapcsolatban a helyi 
szerveknél háztartási hulladékokat elszállító 
vállalatnál vagy a terméket értékesítö üzletben 
tájékozódhat. 
 
 
CZ 

Symbol pro odpadní elektrický a elektronický 
materiál (WEEE). 

Použití symbolu WEEE ozna

č

uje, že tento 

produkt nelze likvidovat jako domovní 
odpad.Správnou likvidaci tohoto produktu 
p

ř

isp

ě

jete k ochran

ě

 životního prost

ř

edí. 

Podrobn

ě

jší informace o likvidaci tohoto produktu 

vám podaji místní ú

ř

ady, spole

č

nost pro likvidaci 

komunálního odpadu nebo obchod, kde jste 
zboži zakoupili. 

Summary of Contents for Astro 250

Page 1: ... istruzioni per l uso operating instructions Bedienungsanleitung instrucciones de manejo mode d emploi gebruiksaanwijzing Luci della Ribalta srl Via Berna 14 46042 Castel Goffredo mn Italy tel 39 0376 771 777 fax 39 0376 772 140 email info ldr it ...

Page 2: ...ponse page 9 10 9 Dimming behaviour page 9 10 10 Fan Setting page 9 10 11 LCD Screen Illumination page 10 10 12 Red colour intesity page 10 10 13 Green colour intensity page 10 10 14 Blue colour intensity page 10 10 15 White colour intensity page 10 10 16 Temperature control page 11 10 17 Software version page 11 10 18 Net page 11 10 19 Sub Net page 11 10 20 Universe page 11 10 21 Manual dimmer Ty...

Page 3: ...e battery page 27 17 Clamp on mobile digital dimmer page 27 18 Focusing page 27 19 Cleaning and maintenance page 27 20 Spare sparts page 28 21 Warranty page 28 22 Available accessories page 28 23 Summery of controls and functions page 30 24 DMX charts page 32 24 1 DMX CHART 1 16 bit dimmer and strobe disabled page 32 24 2 DMX CHART 2 16 bit dimmer inabled strobe disabled page 32 24 3 DMX CHART 3 s...

Page 4: ...indirect incidental special or consequential damages resulting from the customer s failure to follow the installation operating maintenance and safety procedures in this manual or those generally applicable to lighting equipment The limitation extends to damages for personal injury property damage loss of operations loss of profits loss of product or loss of time whether incurred in by the custome...

Page 5: ...702073 3 MOUNTING THE SPIGOT A spigot is supplied in standard delivery for you to tripod mount your followspot Make sure the tripod you are going to use can withstand the product load as indicated on the product s label Make sure the tripod you are going to use features a top aperture over 28mm dia Remove the M12 nut and the washer from the spigot Insert the spigot in the central hole of the yoke ...

Page 6: ...rectly aligned horizontally Tighten the 4 M5 screws 7 WIRING Before being connected to the mains power this unit may need to be wired with a suitable plug if not already installed Make sure the plug you are using is rated for the proper power load This fixture must be grounded Ensure the plug conforms to the relevant EU UL or local electrical standards To perform a correct wiring please note that ...

Page 7: ...and push to access or to confirm the selected data or functions To exit the selected menus without saving the data press the rotary selector for at least 1 second 10 1 Wi Fi DMX OR MANUAL Mode Colour control of the Astro is achieved through a totally innovative technology The Astro Wi Fi generates a proprietary Wi Fi access which will recognize one device only and whose range reaches 15m approxima...

Page 8: ...RESOLUTION 8 16b The dimming resolution can be controlled at 8 bits from one DMX channel to 16 bits with 2 DMX channels Factory setting is 8 Bit 10 4 LOST DMX SIGNAL DMXMem In case of signal failure this function allows to store in memory the last DMX value This function is forced ON in Wi Fi mode Factory setting is ON Three options are available 2 Addr 001 PRESS TO ACTIVATE THE MENU AN ARROW SHOU...

Page 9: ...is available Square and Linear Factoring setting is SQUARE 5 Strobe DISABLE 5 Strobe DISABLE 5 Strobe ENABLE TURN TO ENABLE OR DISABLE STROBE AND PRESS TO CONFIRM PRESS TO ACTIVATE THE MENU AN ARROW SHOULD APPEAR PRESS TO ACTIVATE THE MENU AN ARROW SHOULD APPEAR 6 SetStr OPEN PRESS TO ACTIVATE THE MENU AN ARROW SHOULD APPEAR 7 Curves SQUARE WITH STROBE ENABLED THE LIGHT IS SET TO ON 6 SetStr OPEN ...

Page 10: ...ed by the LED temperature In Silent mode the fan runs slowly to reduce noise In Steady mode the fan runs at constant speed halfway between the minimum and maximum speed In all cases if the LED temperature exceeds the maximum admitted value the LED is protected by a de rating security system Factory setting is AUTO PRESS TO ACTIVATE THE MENU AN ARROW SHOULD APPEAR 8 CutOff SLOW PRESS TO ACTIVATE TH...

Page 11: ... allows to set the intensity of the blue color for the manual mode By selecting the manual mode 100 is automatically set 10 15 WHITE COLOR INTENSITY White This function allows to set the intensity of white color for the manual mode By selecting the manual mode 100 is automatically set 11 BackL AutoOFF 11 BackL AutoOFF PRESS TO ACTIVATE THE MENU AN ARROW SHOULD APPEAR LCD BACKLIGHT OFF AFTER 1 MINU...

Page 12: ...Art Net 3 Port Address in a range between 0 an 15 Factory setting is 00 10 21 MANUAL DIMMER TYPE Manu This function allows to select the manual dimmer type when Astro is set in Manual mode see chapter 10 1 When in Wi Fi mode this setting is disregarded as dimming on the Astro will be achieved through the manually operated Digital Clamp on Dimmer A20702071 supplied or through the dimming function o...

Page 13: ...Net and Universe for Art Net Port Address Factory setting is PRO 10 23 B FACTORY SETTINGS Reset The RESET control is a special function which allows to RESET the product to factory settings 10 24 C ID REMOTO ID Rem It allows to select the ID number to connect the Wi Fi Astro to the REMOTO gateway to upload and download firmware To change the initial ID press the rotary switch until an arrow appear...

Page 14: ...ro Subnet Mask when operating in Wi Fi mode The Subnet Mask cannot be changed 10 28 G SERVICE SET IDENTIFIER SSID It allows to set the name of the network generated by the Astro Default SSID is Astro where is a value between 000 and 254 Because the SSID is assigned randomly you might experience the unlikely case of receiving different fixtures with identical SSID In order to avoid conflicts we str...

Page 15: ...ord to connect the controller to the network generated by Astro Default password is AstroNet We strongly recommend you change the password of your Astro should you have purchased more than one unit You will be allowed to create an 8 digit password of your choice NOTICE Reset see chapter 10 23 B doesn t restore the default settings of the password 10 30 I EXIT HIDDEN MENU Exit It allows to exit fro...

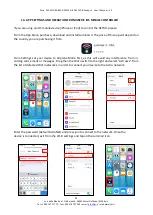
Page 16: ...le device please refer to chapter 12 and 13 of this manual for all the necessary steps needed to set up the control system under either Android or IOS Set the Operation Mode of the ASTRO to WI FI refer to chapter 10 1 Make sure the controller is connected to the network generated by Astro From the home screen tap Settings Wi Fi and check that the controller is connected to the Wi Fi network Astrox...

Page 17: ...2 3 of this manual 12 APP SETTINGS AND OPERATION FROM USER S ANDROID MOBILE CONTROLLER If you are planning to use an ANDROID mobile device of your own to control the ASTRO WI FI please carefully follow the here below described steps to ensure a correct configuration of your mobile device 12 1 SETTINGS From the Play Store download and install Art Net Controller and Art Net Controller Libraries Apps...

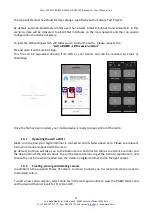
Page 18: ...info ldr it web www ldr it 17 Enter the password default AstroNet and press CONNECT When the device is connected to the network exit from the Wi Fi settings and tap on the Art Net Controller Libraries icon Please refer to chapter 10 28G and 10 29H to reset your SSID code and password if desired not complusory Tap Create Update Fixtures Library and wait until loading is completed ...

Page 19: ...t 18 Open the Art Net Controller app by default the app displays the Prog Programmer window Tap the three dots located on the upper left corner or lower right corner depending on models of the screen to open the main menu and select Patch Lib Scroll the fixtures library and select GENERIC_RGBW D4 Insert 1 in the following fields Start DMX n Fixtures and Start ID Tap Patch it and then exit the Patc...

Page 20: ...he main menu and select Settings Enter your ASTRO s IP address in the Art net broadcast unicast to fields Please refer to chapter 10 26 E of this user guide to know the IP address to be used Scroll the Settings window downwards enter 99 in the PlayBacks fields and confirm Apply In order to load on your device the LDR colour libraries and settings the Astro RGBW LDR revxxx show zip file is needed T...

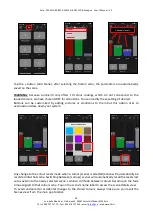
Page 21: ... Tap on the desired colour to get the Astro to reproduce it and choose the next one when needed A Rec function top right button above the colours is active by default If accidentally pressed it will cause the settings of your colours scenes to change We strongly recommend you de activate this function as follows Open the main menu 3 dots top left or bottom right and choose OPTIONS Tap on REC to ma...

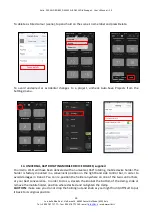
Page 22: ... you to create any desired colour and to store up to 99 different options at one time If you want to create and store a new colour or scene select Prog in the main app toolbar to view the RGBW faders and set each colour Red Green Blue White to the required level by sliding each fader to the right higher level or to the left lower level until you get the desired colour Select Pb 0v tap Rec and then...

Page 23: ...our Color Edit and confirm OK Your new colour has been stored In order to delete any of the stored colours scenes tap Rec briefly untili the button s name turns to Delete then the PB Button you want to delete To avoid undesired or accidental changes to the stored colours scenes carefully make sure the App is set to Play mode when operatin the ASTRO open the main menu and select Options Mode Play U...

Page 24: ...Store purchase download and install Luminair 3 The price of this app will depend on the country you are purchasing it from From Settings set your device to Airplane Mode first as this will avoid any interference from in coming calls emails or messages Drag then the Wi Fi switch to the right and select Astroxxx from the list of detected Wi Fi networks in order to connect your device to the Astro ne...

Page 25: ...rectly from LDR or your dealer and can be received by email or WhatsApp Once the file has been loaded your mobile device is ready to take control of the Astro 13 1 Operating the Astro WI FI Make sure the clamp on digital dimmer is connected and its fader above zero Please see relevant instruction manual supplied with the item By default Luminair will take you to the buttons area Each button carrie...

Page 26: ...tings if desired Buttons can be customized by adding pictures or emoticons to them but this option risks to overload and slow down your system Any change to the colour levels made when a colour scene is selected active will automatically be recorded into that scene Switching between colours scenes will automatically recall the levels last auto saved into the newly selected scene Luminair will fade...

Page 27: ...ILE DEVICE HOLDER supplied Your Astro Wi FI will have been delivered with an universal 360 rotating mobile device holder The holder is factory mounted in a convenient position on the right hand side control bar in order to avoid damages in transit You can re position the holder anywhere on one of the two control bars at your best convenience In order to do so slacken the knob at the bottom of the ...

Page 28: ...ton at the rear of the holder to release the arms open 16 RE CHARGING YOUR MOBILE S BATTERIES A USB Port is provided on the rear of the Astro This will allow you to re charge your device while the Astro is being operated without risking to run flat on batteries during a show or having to rely on an external power supply unit 17 CLAMP ON MOBILE DIGITAL DIMMER supplied The Astro Wi fi is supplied wi...

Page 29: ... unit 21 WARRANTY Our warranty covers all structural and manufacture defects from one year from the date you purchased this product In case of complaints we strongly recommend you use the complaint form at the end of this manual or contact the local dealer who supplied the product to you In any case you will be asked to report the serial number of the product so make sure you have noted it down be...

Page 30: ...www ldr it 29 A20107180 Flight case with braking wheels stackable A20202401 Set of 3 braking wheels for followspot tripod A20702071 Spare side handle clamp on digital dimmer A20702072 Remoto control unit for software upgrade A20702073 Spare universal mobile phone holder A20702074 Smartphone HONOR 7S BLACK with pre loaded app settings and libraries V90MLRT100FR Braking wheel 1pc for flight case ...

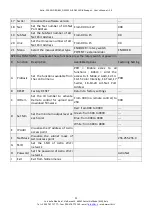
Page 31: ...be Activate the Strobe function ENABLE DISABLE DISABLE 6 SetStr Select the Strobe speed This menu is inactive when the Strobe function is disabled or when is remotely controlled through DMX OPEN ON SPEED select value from 01 slowest to 10 fastest CLOSED OFF OPEN 7 Curves Select the dimming curve SQUARE LINEAR SQUARE 8 CutOff Replicate the halogen lamp dimming behaviour at cut off FAST NOT ACTIVE S...

Page 32: ...tion Description Available Options Factoring Setting A ProBasic Set the functions available from the control menu PRO Enable acces to all functions BASIC Limit the access to 1 Mode 2 Addr 12 13 14 15 Color Intensity 16 Tled 17 SwVer 18 19 20 Art Net Port Address PRO B RESET Factory RESET Return to factory settings C ID Rem Set the ID number to activate Remoto control for upload and download firmwa...

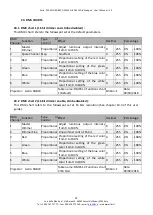
Page 33: ...0 100 6 White Proportional Proportional setting of the white color from 0 to 100 0 255 0 100 Projector Astro RGBW Table name DMX512 Functions chart 1 Default Edition 1 Date 03 09 2018 24 2 DMX chart 2 16 bit dimmer enable strobe disabled This DMX chart refers to the followspot set at 16 bits resolution See chapter 10 3 of this user guide DMX Channel Function Type of Control Effect Decimal Percenta...

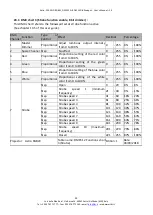
Page 34: ... red color from 0 to 100 0 255 0 100 4 Green Proportional Proportional setting of the green color from 0 to 100 0 255 0 100 5 Blue Proportional Proportional setting of the blue color from 0 to 100 0 255 0 100 6 White Proportional Proportional setting of the white color from 0 to 100 0 255 0 100 7 Strobe Step Open 0 20 0 8 Step Strobe speed 1 minimum frequency 21 40 9 15 Step Strobe speed 2 41 60 1...

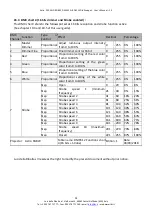
Page 35: ... 0 255 0 100 4 Green Proportional Proportional setting of the green color from 0 to 100 0 255 0 100 5 Blue Proportional Proportional setting of the blue color from 0 to 100 0 255 0 100 6 White Proportional Proportional setting of the white color from 0 to 100 0 255 0 100 7 Strobe Step Open 0 20 0 8 Step Strobe speed 1 minimum frequency 21 40 9 15 Step Strobe speed 2 41 60 16 24 Step Strobe speed 3...

Page 36: ...d que los productos aquì listados I sono conformi alle seguenti norme ed ai requisiti delle seguenti direttive CEE GB conform to the following standards and to the requirements of following EEC directives D den nachfolgend aufgeführten Normen und EEC Vorschriften entsprechen F sont conformes aux normes et prescriptions CEE ci aprés E cumplen de hecho con las siguientes normas y directivas CEE EN 6...

Page 37: ...t défectueux Producto defectuoso Descrizione del problema Problem found Beschreibung des Defekts Description du défaut Descripciòn del problema ________________________________________________________________________________________________________ ________________________________________________________________________________________________________ ______________________________________________...

Page 38: ...ble for delivering the appliance to an appropriate collection facility at the end of its useful lifespan Appropriate separate collection to permit recycling treatment and environmentally compatible disposal helps prevent negative impact on the environment and human health and promotes recycling of the materials making up the product For more information on available collection facilities contact y...

Page 39: ...Luci della Ribalta srl Via Berna 14 46042 Castel Goffredo mn Italy tel 39 0376 771 777 fax 39 0376 772 140 email info ldr it ...

Reviews: