IT
ALIANO
POLSKI
ESP
AÑOL
FRANCAIS
DEUTSCH
ENGLISH
13
69
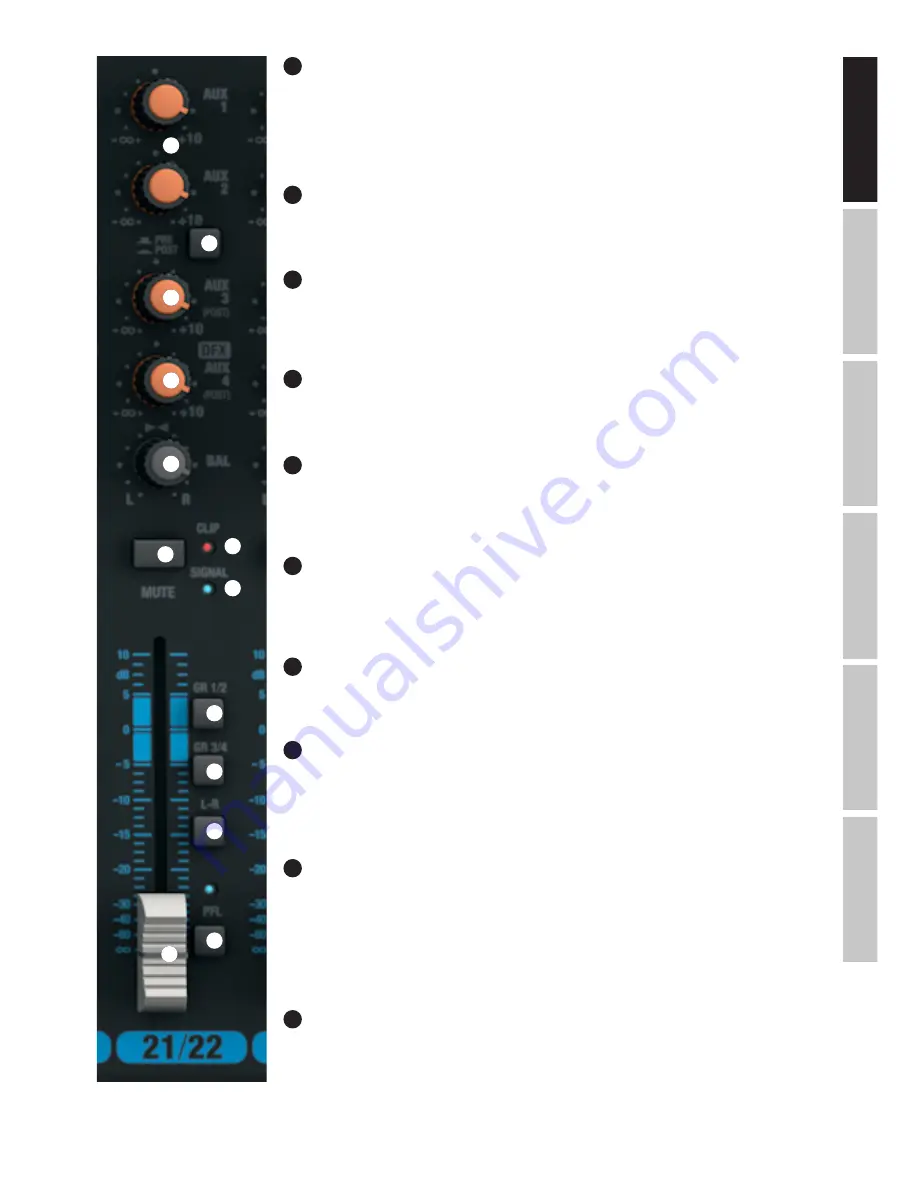
AUX 1 + AUX 2 PRE/POST CHANNEL 21/22 AND 23/24
When using AUX 1 or AUX 2 to control an external effects device, bring the switch to the down position POST.
The control signal is now picked up after the channel volume controller (N 74), it is therefore dependent on
the latter. To control a stage monitor, bring the switch to the up position PRE. The signal is picked up before
the channel volume controller (N 74) and the volume of the stage monitor can be adjusted independently of
the channel volume.
70
AUX 3 POST CHANNEL 21/22 AND 23/24
Volume controller for adding the signal from channel 21/22 and 23/24 to an external effects device (Effect
Send, Post Fader). Use the line output AUX SEND 3 (N 12) for activation.
71
LEVEL DFX / AUX 4 POST CHANNEL 21/22 AND 23/24
Volume controller for adding the signal from channel 21/22 and 23/24 to the internal digital effects device
(effect send, post fader). Use the line output AUX SEND 4 (N 12) for activating an external effect. When using
the AUX SEND 4 jack socket, the internal effects device is automatically bypassed, and is therefore not usable.
72
BAL CHANNEL 21/22 AND 23/24
Use the balance controller to set the relative volume between the left and right part of the connected stereo
signal.
73
MUTE CHANNEL 21/22 AND 23/24
To mute a channel, press down on the MUTE switch of the corresponding channel. The MUTE LED of the
selected channel then lights up.
When disabling the mute function, the MUTE LED goes out.
74
FADER CHANNEL 21/22 AND 23/24
Volume controller for channels 21/22 and 23/24. Push the Fader button upwards to increase the volume of
the corresponding channel and
downwards to decrease it.
75
SIGNAL-LED CHANNEL 21/22 AND 23/24
The signal LED lights up as soon as an audio signal is present at the corresponding channel (depending on
the input level and setting of the gain or input sensitivity - GAIN).
76
CLIP-LED CHANNEL 21/22 AND 23/24
Once the red Clip LED lights up, the corresponding channel is operating at the distortion limit. Adjust the Gain
controller (N 61) so that the Clip LED of the corresponding channel only lights up briefly when signal peaks
occur. Avoid the permanent lighting of the Clip LED by reducing the input gain or input sensitivity; if necessary,
reduce the volume of an external audio device.
77
GR 1/2 CHANNEL 21/22 AND 23/24
Press down on the GR 1/2 switch to add the corresponding channel to the channel group 1 (BAL all the way
to the left), to the channel group 2 (BAL all the way to the right), or to both groups of channel groups 1 and 2
in the same proportion (BAL in central position). The signals of the channels grouped together in one group
are routed simultaneously to the corresponding line outputs GROUP OUT 1/2. The total volume of the resulting
group is adjusted using the volume controller GROUP 1/2 (N 104); if the audio signals of the group are to be
routed to the MAIN MIX sum channel, press down on the L-R switch (N 105).
78
GR 3/4 CHANNEL 21/22 AND 23/24
Press down on the GR 3/4 switch to add the corresponding channel to the channel group 3 (BAL all the way
to the left), to the channel group 4 (BAL all the way to the right), or to both groups of channel groups 3 and 4
in the same proportion (BAL in central position). The signals of the channels grouped together in one group
are routed simultaneously to the corresponding line outputs GROUP OUT 3/4. The total volume of the resulting
group is adjusted using the volume controller GROUP 3/4 (N 106); if the audio signals of the group are to be
routed to the MAIN MIX sum channel, press down on the L-R switch (N 107).
68
69
70
71
72
73
76
75
77
78
79
80
74


