background image


DJ200 PROFESSIONAL POWER AMPLIFIER USER MANUAL PAGE

 11/19      V-   

2)  Short  circuit  protection:  Short  circuits  arising  as  a  result  of  operating  malfunctions  or  connection  to 

loudspeakers  with  incorrect  impedance  are  detected  quickly  and  accurately.  The  output  signal  is 
immediately  shut  off,  and  the  LED  indicator  lights  up  to  draw  attention  to  the  problem.  As  soon  as  the 
problem has been eliminated, normal operation is resumed automatically. 

3)  DC  fault  protection:  A  DC  output  of  more  than  1  V  is  detected  automatically  and  the  output  is 

simultaneously shut off, in order to prevent the speakers from being damaged. 

4. Low-noise intelligent cooling system: Low-noise fans with a long service life make the amplifier suitable for 

use  in  noise-critical  environments  such  as  audio  studios.  A  precise  temperature  sensor  measures  the 
exterior  temperature  of  the  heat  sink.  If  the  temperature  is  below  70 

°

C  the  fans  do  not  operate,  thus 

ensuring quiet working conditions. If the temperature reaches 70 

°

C the fans are automatically switched 

on, so that the temperature of the heat sink falls rapidly. 


3. Precautionary measures 


7)  Ensure that the power switch is switched off before connecting the cables to install the unit.   
8)  Ensure that the mains power supply corresponds to the rated voltage of the unit. 
9)  Ensure that there is an adequate source of power; do not switch on several amplifiers at the same time. 
10)  Ensure that all connectors are correctly and securely connected.   
11)  Ensure that the input level (volume) controls are set to the lowest level (to the left) before the power is 

switched on.   

12)  If the amplifier malfunctions, switch it off immediately. Do not attempt to repair it yourself; contact your 

dealer for service. 


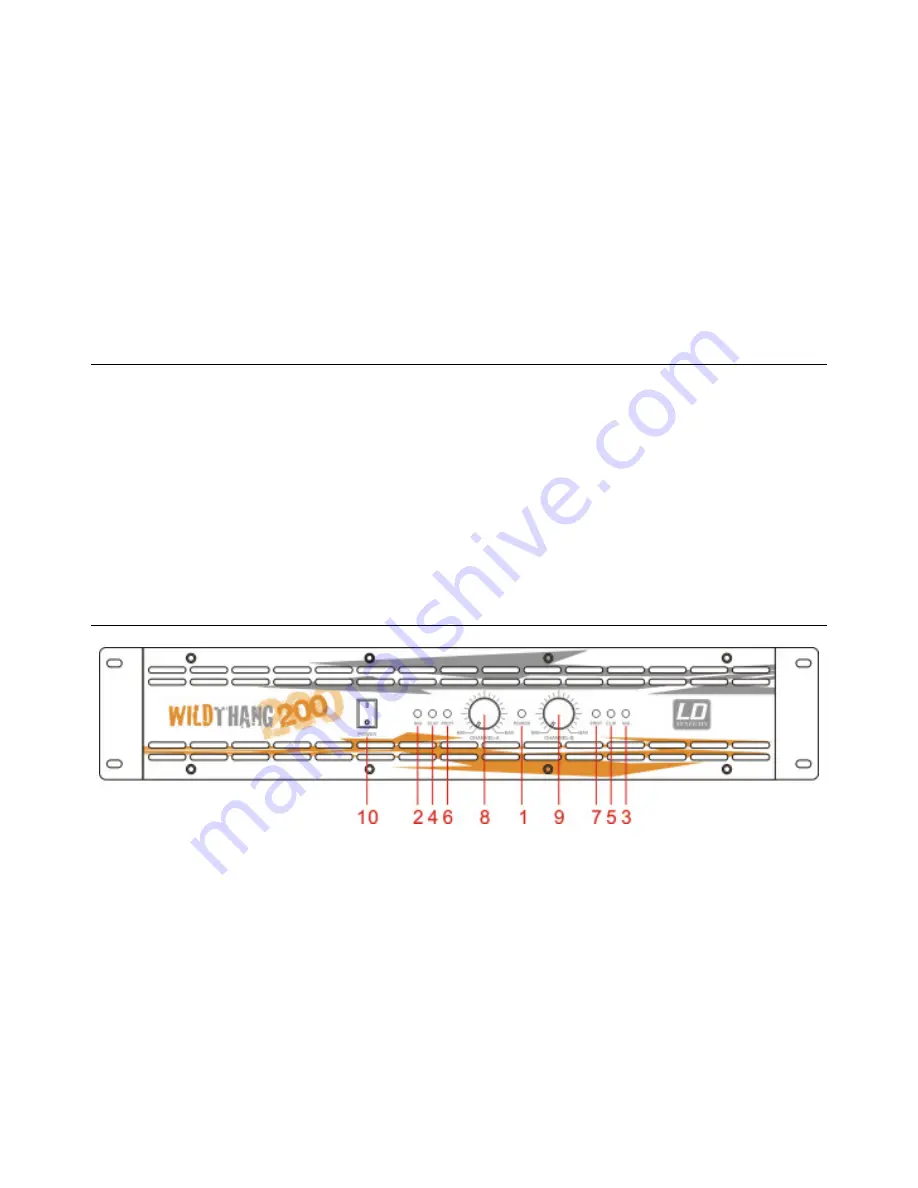
4. Front panel 


1) Power LED (green): 

This indicator lights up when the power is on. 

2/3) Channel A and B signal indicators (green LEDs): 
      These indicate that the amplifier is operating. 
4/5) Channel A and B output signal CLIP indicators (red LEDs): 

When the input signal voltage is too high, these LEDs light up. 

6/7) Channel A and B PROTect indicators (yellow LEDs): 

These LEDs light up under the following 3 conditions. 

1. during the first few seconds after switching the amplifier on or off, 
2. in the case of overheating of the power amplifier, and 
3. in the case of a technical malfunction, for DC fault protection. 

8/9) Channel A and B input level controls (volume) 

Summary of Contents for DJ200

Page 1: ...ienungsanleitung vor Inbetriebnahme des Verstärkers sorgfältig und bewahren Sie sie für spätere Referenzzwecke auf Inhalt Sicherheitshinweise 1 Anschlüsse Signalausgang 4 Grundfunktionen 1 Bedienung 5 Vorsichtsmaßnahmen 2 Wartung Pflege 5 Gerätefront 2 Erste Hilfe bei Problemen 6 Geräterückseite 3 Technische Daten 7 Anschlüsse Signaleingang 4 Hinweise zur Entsorgung 8 ...

Page 2: ...tzt werden Achten Sie darauf dass keine Flüssigkeiten oder Metallgegenstände in das Gehäuse gelangen da diese einen elektrischen Schlag verursachen oder zu Fehlfunktionen des Geräts führen können 3 Sorgen Sie zur Vermeidung von Überhitzung stets für ausreichende Luftzirkulation und verdecken Sie nicht die Lüftungsöffnungen Achten Sie auf Abstand zu anderen Wärmequellen Vermeiden Sie staubige und f...

Page 3: ...igentes nebengeräuscharmes Kühlsystem Für den Einsatz in geräuschkritischen Umgebungen wie Tonstudios verfügt der Verstärker über besonders leise arbeitende Lüfter mit hoher Lebensdauer sowie eine präzise Überwachung der Oberflächentemperatur der Kühlkörper Da sich die Lüfter erst bei Temperaturen über 70 C einschalten ist ein nebengeräuscharmer Betrieb des Verstärkers gewährleistet Steigt die Tem...

Page 4: ...nal B CHA CHB Mit diesen Drehreglern steuern Sie den Eingangspegel des Verstärkers 10 Netzschalter POWER Der Verstärker benötigt nach dem Einschalten ca 3 bis 4 Sekunden bis er betriebsbereit ist Soft Start Funktion 5 Geräterückseite 1 2 Eingänge Kanal A Kanal B CHA CHB 6 3 mm Klinkenbuchsen Symmetrische Belegung Sleeve Mantel Masse Tip Spitze Signal Ring Signal Unsymmetrische Belegung Sleeve Mant...

Page 5: ...e Abb 1 Abb 2 Cinch Eingänge Anschluss über Cinch Stecker Tip Spitze Signal Ring Masse Abb 2 2 Symmetrisch Abb 3 6 3 mm Klinkeneingänge Stereo Anschluss über Stereo Klinkenstecker Sleeve Mantel Masse Tip Spitze Signal Ring Signal Abb 3 Hinweis Beachten Sie bitte dass falsche Verbindungen zu Fehlfunktionen führen Stellen Sie vor Inbetriebnahme sicher dass sämtliche Verbindungen korrekt ausgeführt s...

Page 6: ...gewissern Sie sich dass der Verstärker auf die für Ihr Land geltende Netzspannung eingestellt ist 4 Schließen Sie die Signalquelle z B ein Mischpult an die Eingänge des Verstärkers an 5 Stellen Sie den Eingangspegel Lautstärke am Verstärker auf Minimum 6 Schalten Sie zuerst die Stromzufuhr der Signalquelle Mixer etc ein anschließend die des Verstärkers 7 Stellen Sie den Eingangspegel auf die gewün...

Page 7: ... dem Eingang des Verstärkers und schalten ihn ein 2 Lautsprecherverbindung en nicht korrekt ausgeführt oder Lautsprecher defekt 2 Prüfen Sie die Lautsprecherverbindungen und den Zustand des der Lautsprecher s 3 Verbindungen nicht korrekt ausgeführt 3 Überprüfen Sie die Verbindungen zwischen Verstärker und Lautsprecher n Kein Ton 4 Überhitzungsschutz aktiv 4 Vermeiden Sie Überlastung des Verstärker...

Page 8: ...eistung 8 Ω 1 kHz 55 dB Dämpfung f 1 kHz 8 Ω 100 Schutzschaltungen Soft Start Überhitzungsschutz Kurzschlussschutz Überlastungsschutz Gleichspannungsschutz Netzsicherung LED Anzeigen Power Signal Protect Limit Anschlüsse EINGÄNGE 2 x Klinkenbuchse 2 x Cinch Link AUSGÄNGE 2 x Speakon Polklemmen Lüfter geräuscharm 70 C Stromversorgung 230 V 240 V 50 Hz Abmessungen B T H Gewicht 483 x 240 x 88 mm 2 H...

Page 9: ...DJ200 PROFESSIONAL POWER AMPLIFIER USER MANUAL PAGE 8 19 V ...

Page 10: ...ge of this product please keep this manual for reference and refer to the operating instructions for detailed information Table of Contents Safety instructions 10 Signal output connectors 14 Key features 10 Operating instructions 14 Precautionary measures 11 Maintenance 14 Front panel 11 Troubleshooting 15 Rear panel 12 Specifications 16 Signal input connectors 13 Proper product disposal 17 ...

Page 11: ...the unit is not close to any heat source and avoid dusty and moist environments 5 Do not attempt to repair the unit yourself Maintenance checks and repairs must be carried out only by qualified personnel 2 Key features The DJ200 is a very cost effective compact easy to operate entry level power amplifier with outstanding voice intelligibility an excellent S N ratio clearly defined highs a full mid...

Page 12: ...apidly 3 Precautionary measures 7 Ensure that the power switch is switched off before connecting the cables to install the unit 8 Ensure that the mains power supply corresponds to the rated voltage of the unit 9 Ensure that there is an adequate source of power do not switch on several amplifiers at the same time 10 Ensure that all connectors are correctly and securely connected 11 Ensure that the ...

Page 13: ...is ready to operate 5 Rear panel 1 2 Channel A and B input jack connectors 6 3 mm 1 4 jack connectors Balanced Sleeve ground tip signal ring signal Unbalanced Sleeve ground tip signal 3 4 Channel A and B input RCA connectors Unbalanced Ring ground tip signal 5 6 Channel A and B output Speakon connectors 1 2 signal 1 2 signal 7 8 Channel A and B output pole terminals binding post Red signal black s...

Page 14: ...tor Tip signal Sleeve ground Fig 1 Fig 2 Signal input via RCA connector RCA connector Tip signal Ring ground Fig 2 2 Balanced Fig 3 Signal input via stereo jack connector Channel A and B signal input Sleeve ground Tip signal Ring signal Fig 3 Attention Improper connections will result in malfunctions Ensure that connections are correct before beginning operation ...

Page 15: ...10 Ensure that the mains power supply corresponds to the rated voltage indicated on the amplifier 11 Connect the signal source e g mixing console to the signal input of the amplifier 12 Set the input level volume of the amplifier to the lowest setting 13 First switch on the power for the signal source e g mixing console then switch on the power for the amplifier 14 Adjust the input level volume to...

Page 16: ...plifier input then turn on the power 2 Loose speaker connection or malfunctioning speaker 2 Ensure that the speaker is securely connected Check to see that the speaker is in good operating condition 3 Incorrect connection 3 Ensure that the speaker is correctly connected to the amplifier No sound 4 Overheating protection 4 Avoid overloading the amplifier for prolonged periods Do not attempt to oper...

Page 17: ...amping factor f 1 kHz at 8 Ω 100 Protection circuits Soft start overheating short circuit overload and DC fault protection AC power supply fuse LED indicators Power Signal Protect Limit Connectors Input 2 jack sockets 2 RCA connectors Output 2 Speakon connectors pole terminals binding post Cooling system Low noise cooling fans activated at 70 C Power supply 230 V to 240 V approx 50 Hz Dimensions W...

Page 18: ...DJ200 PROFESSIONAL POWER AMPLIFIER USER MANUAL PAGE 17 19 V ...

Reviews: