background image

USER MANUAL 


LCTVR6104-8208-8216 


www.hrcctv.com


pag.

17


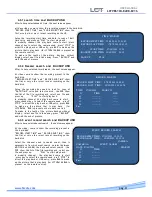
3.3   Camera  setup    


① 

CAM: used to select the channel to set up 

② 

 CAMERA NAME: put the name of camera wanted 

③ 

 BRIGHTNESS’: used to adjust brightness of 
picture. 

④ 

HUE(color): used to adjust color of picture 

⑤ 

CONTRAST: used  to  adjust  contrast 

⑥ 

SATURATION (livel): used to adjust intensity color. 

⑦ 

HORIZONTAL: used to adjust the horizontal 
position of picture. 

⑧ 

VERTICAL: used to adjust the vertical position of 
picture. 


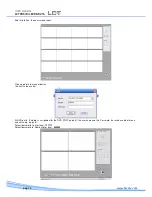
3.4  Record  SET 


① 

RESOLUTION: Select the resolution to like  for recording: CIF 352x288 o D1 704x576 

② 

 OVERWRITE: on/off the  overwrite of picture present on the  Hard Disk. 

③ 

 AUDIO ON/OFF: on/off the recording of audio . 

④ 

QUALITY: press ENTER to access of setup.   

I. 

 CAM:( all  channel  are single manageable ) used to select the channel to be set.    

II. 

QUALITY: set the level crossing wanted  between  high – low – normal. 

III. 

FRAME RATE: used to select the  frame rate wanted of each channel. 


**NB: 

set the mode of resolution CIF (352x288), the  frame rate it will be to the highest degree 25fps for channel (Real Time)  at 

type LCTVR6104 e LCTVR8208. 
Set the mode of resolution D1 (704x576), the  frame rate it will be to the highest degree 6fps for channel. 
 

3.5 Schedule  SET 


① 

CAM: Select the channel to set up. 

② 

 MODALITY: AUTO to turned on the time band  or  
MANUALE to turned on the recording. 

③ 

 GG: Select the date to set up. 

④ 

SEG 1-4: set up the time wanted. 

⑤ 

MODALITY: 

a.   TIME, turned on the recording  set.  
b.  MOTION :put into action only case of motion. 
c.  ALARM :put into action only in case contact 

alarm. 

d.  ALARM+MOTION  put into action recording  in 

case contact alarm or  motion.  

CAMERA  SETUP  


     CAM:  CAMERA 01 
 

CAMERA NAME:   CAM   01                  

BRIGHTNESS’:                  00 

                    HUE                 :                  00 

   CONTRAST     :                  00 

SATURATION  :                 00 

   IMAGE HDELAY:                 00 

        :           IMAGE VDELAY  :                 00 


SETUP RECORDING 


RESOLUTION         :      720 x 576 
OVERWRITE          :      ON 
AUDIO ON/OFF       :      OFF 
OTHER               :      ENTER 

RECORDING QUALITY  SETUP 


           CAM          :          1              2              3             4                                    
QUALITY        :      HIGH      HIGH       HIGH      HIGH    
FRAME RATE   :         25            25             25           25 

SCHEDULE SETUP 


CAM       :     CAMERA  01              REC  MODE:     AUTO                                    
TIME       :     SUN 
                   
                     START TIME    END TIME     ALARM TYPE 
SEG 1:             00:00       -     03:00            TIME 
SEG 2:             03:00       -     04:00            ALARM+MOTION 
SEG 3:             00:00       -     00:00            TIME 
SEG 4:             00:00       -     00:00            TIME 

Summary of Contents for LCTVR6104

Page 1: ...www hrcctv com DIGITAL VIDEO RECORDER USER MANUAL LCTVR6104 LCTVR8208 LCTVR8216...

Page 2: ...e debbono essere smaltite separatamente in altri contenitori in quanto contenenti sostanze altamente tossiche Il simbolo rappresentato in figura rappresenta il bidone dei rifiuti urbani ed tassativame...

Page 3: ...up 17 3 4 RECORD SET 17 3 5 SCHEDULE SET 17 3 6 MOtION SET 18 3 7 PTZ SET 18 3 8 netWORK SET 18 3 9 SPOT only 8 and 16 channel 18 3 10 DVD CD RW Backup 8 AND 16 cHANNEL 19 3 11 DISK manage 19 3 12 LOG...

Page 4: ...ice Exposition at light air do not cooling off the rear of DVR Package contents Control the next accessory 1 one power cable of 230 Vac 2 one power adequate 12Vdc 3 one user manual 4 one CD software p...

Page 5: ...vity high Normal low Velocity high Normal low Alarm input 4 input NA 8 input NA 16 input NA Alarm output 1 relay output NA NC COM Hard Disk Hard disk lodging 2 HD IDE no including 2 HD Sata no includi...

Page 6: ...IN Left Audio input Right Audio input LOUT ROUT Left Audio output Right Audio USB output VGA VGA Video output 800x600 60Hz USB Interface for Backup NET interface RJ 45 port DC12V Minijack power connec...

Page 7: ...some RS 485 wire line to along with make connection about the speed dome COM NC NO power relay by alarm output common normally close normally open 1 2 3 4 alarm input No alarm channel is coupled and p...

Page 8: ...evise outer side PTZ for alarm DC12V Minijack power and cook off and power off Air cooling For the top shape of the device outer side link the power cable as show carry back on top picture 485 A B lin...

Page 9: ...ice outer sider PTZ for alarm DC12V Minijack power and cook off and power off Air cooling For the top shape of the device outer side link the power cable as show carry back on top picture 485 A B link...

Page 10: ...e ESC key after exit from the main menu will lock the machine 13 MENU At running status enter the menu setting status at lock status lock light up press this key to remind for password input 14 Under...

Page 11: ...file further press key to pause the play finally press key to continue to play 31 At backup status press key to stop backup at video recording status press key to stop video recording at play status...

Page 12: ...data press the BAK key will backup such data to a U drive description to search operation is given in the later part at play status the BAK key is used to backup the currently played image and voice a...

Page 13: ...status 10 At play status press key to backward image at 2x speed further press key to backward image at 4x speed finally press key to return normal play status 11 At play status press key to backward...

Page 14: ...each channel may be revised under the system menu re press the PTZ key or press the ESC key will exit the PTZ control status 27 AUTO At PTZ control status this AUTO key used to let PTZ automatically r...

Page 15: ...ation Hard disk Resolution CIF 25 fps middle quality LCTVR6104 800MB H LCTVR8208 e LCTVR8216 1 3GB H 2 4 3 Hard Disk mounting The actions by right installation of hard disk 1 take out the cassette of...

Page 16: ...splay of date time high low OFF SPLIT LINE to select the split line color white black grey off BUZZER On Off used to turn on off the buzzer VIDEO STANDARD to select PAL o NTSC a borard the link of mon...

Page 17: ...of resolution CIF 352x288 the frame rate it will be to the highest degree 25fps for channel Real Time at type LCTVR6104 e LCTVR8208 Set the mode of resolution D1 704x576 the frame rate it will be to...

Page 18: ...greement to the net Default 192 168 001 001 SUBNETMASK start SM in agreement to the net Default 255 255 255 000 DVR PORT setup the gate language need to software Default 6802 IE PORT start the gate la...

Page 19: ...o use CANCEL Press ENTER to delete all recording present on the Hard Disk FORMAT Press ENTER for totaly format of Hard Disk and find the right working clear all date 3 12 LOG search The menu is used t...

Page 20: ...e DVR are not identify the picture movement of air set in the past at setup motion the symbol M seem on the video and symbol during the stillness ALARM MOTION used this modality the channel start not...

Page 21: ...camera need press STOP to arrest the play back or USB entry press BAK to make up the picture that is play back for LCTVR6104 BAK is present on the remote control To make in the teeth of the picture ba...

Page 22: ...ess IP address to machine of the address task bar At DVR for instance is setup address 192 168 1 133 press of the IE address task bar and screw http 192 168 1 133 The IE PORT setup of the menu and set...

Page 23: ...CTVR6104 8208 8216 www hrcctv com pag 23 Press up security and after made up personal level each other to open the next window Save and come back at input IP address for reboot of the Control installa...

Page 24: ...show Click up plug in to make at device the next screen show At DVR put in IP address assigned after the DVR PORT cap 3 8 the user name and the Password that are be setup of menu and net setup cap 3...

Page 25: ...ess Stop to stop the display or local Rec for recording the picture in the teeth of computer N B for LCTVR6104 the local recording is start sole for setup the recording parameters is necessary to stop...

Page 26: ...ag 26 www hrcctv com picture catch instrument PTZ instrument INFO instrument 5 3 Software anvplayer through connection Put in the CD rom software present a dowry provided Start the planning and wait f...

Page 27: ...and put in the good paramaters for the device connnection After to have set up IP address of DVR click link up and put in user name and authentication password After to have make the login all keys co...

Page 28: ...by play back Press Local to display the Live picture Press Stop to stop the display or local Rec for recording in the teeth of computer for setup the parameters of recording is fundamental to stop the...

Page 29: ...ile endowed smart phone 5 0 or Superior GPRS EDGE UMTS connection Display TFT 2 8 in case the DVR public static IP address with ADSL connection 1 1 2 Installation for be able to use the software is ne...

Page 30: ...TER Click the Connect Setup the remote DVR parameters connection give to ISP the user name and the password and the access port of DVR Wait for take place connection Click CAM to select camera then st...

Page 31: ...USER MANUAL LCTVR6104 8208 8216 www hrcctv com pag 31 Technical specifications can be modified without any preliminary notice...

Page 32: ...612601 TORINO sede operativa Via G B Feroggio 10 10151 Torino ITALIA Tel 39 011 453 53 23 Fax 39 011 453 70 49 SHANGHAI ufficio di rappresentanza Minhang Residence Room 506 N 50 Jinzhu Road 200336 Sha...

Reviews: