


5
taylormadeproducts.com/aquafi
574-534-7521
Rev:08.01.19
AquaFi
™
Installation and Owner’s Manual
(For Aftermarket Applications)
CCD-0002558
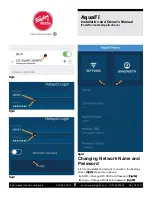
5 .
L aun ch th e A quaF i app.
6 .
E n ter th e U sern ame an d P assw ord
(Fig.8A)
prin ted on
th e product lab el
(Fig.7B)
.
7 .
A fter en terin g th e log in creden tials, tap th e L og in
b utton
(Fg.8B)
.
Aq uaFi S y stem Activ ation
A ctivation of th e A quaF i H otspot system can b e performed
on sh ore or on a w atercraft.
I f activatin g th e system on sh ore, th e 120V A C/DC
pow er supply
(Fig.1C)
is required. Refer to th e O n S h ore
U se section .
1 .
M ak e sure w atercraft is dry-dock ed or oth erw ise
supported ab ove w ater to avoid an un stab le con dition
created b y w aves.
2 .
M ak e sure th e A quaF i H otspot is securely seated in its
moun tin g dock . T h e dock sh ould sn ap on to th e h otspot.
N OT E :
A secured A quaF i H otspot w ill mak e g ood
electrical con n ection s across th e moun tin g dock an d
h otspot matin g con tact pin s.
3 .
T urn system pow er on .
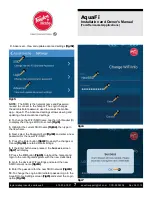
4 .
A ll L E Ds sh ould lig h t up
(Fig.9A)
.
N OT E :
T h e L E Ds w ill flash b lue as th e A quaF i system
b oots up, th en g reen in a steady state w h en th e system
con n ects to 3G /4G L T E .
Fig.8
B
A
A
N OT E :
I f L E Ds are red, th is in dicates on e of th e
follow in g con dition s ex ists: n o service, n o S I M card or a
2G less con n ection .
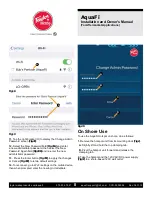
C onnecting to th e H otspot
1 .
A fter a successful con n ection h as b een estab lish ed, g o
to W
i-F i settin g s on th e mob ile device
(Fig.10A)
, th en select
th e h otspot’ s A quaF i S S I D
(Fig.11A)
from th e list of availab le
w ireless n etw ork s.
Fig.9
Fig.10
A
2 .
W
h en prompted, en ter th e usern ame an d passw ord
(Fig.12A)
located on th e product lab el
(Fig.7B)
.
3 .
A fter log in creden tials h ave b een en tered
(Fig.13A)
, press
th e L og in b utton
(Fig.13B)
.
4 .
T h e A quaF i H ome screen w ill display sh ow in g
S E T T I N G S
(Fig.14A)
an d B A N DW
I DT H
(Fig.14B)
option s.