background image

E N

20

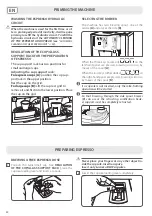
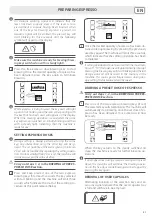
PRIMING THE MACHINE

WASHING THE ESPRESSO HYDRAULIC 
CIRCUIT 


When the machine is used for the first time or af-
ter a prolonged period of inactivity, it will require 
priming to refill the hydraulic circuit. To refill the 
hydraulic circuit start the AUTOMATIC CLEANING 
OF THE ESPRESSO GROUPHEAD (see 

“AUTOMATIC 

CLEANING OF THE ESPRESSO UNIT” 

25

).

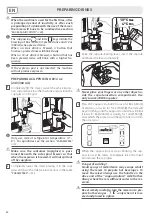
REGULATION OF THE CUP/GLASS 
SUPPORT RACK FOR THE PREPARATION 
OF ESPRESSO  

The cup support rack has two positions for 
small and larger cups. 

 Adjusting the cup support rack: 


For espresso cups [A]:

 position the cup sup-

port rack in the upper position.  
Rest the cup on the grid.

For large cups [B]:

 Lift the cup rest grid to 

remove it and fit it into the lower position. Place 
the cup on the grid.


A


B

SELECTING THE BREWER


 The machine has two brewing spout: one at the 
centre 

[A]

 and one at the side 

[B]

.


A

B


 When the three keys (espresso) 


 on the 

left-hand panel are pressed, brewing will occur by 
means of the spout 

[A]

.  


 When the four keys (other drinks) 


 on 

the right-hand panel are pressed, brewing will occur 
by means of the spout 

[B]

.

   I

GBDBQTVMFJTOPUJOTFSUFEPOMZUIFNJMLGSPUIJOH

PQFSBUJPOXJMMCFTUBSUFE

 4P UIBU CSFXJOH UISPVHI UIF TJEF TQPVU CSFXFS

<#> DBO PDDVS UIF SFUSBDUJOH TBOJmDBUJPO CFBL

-

er support must be completely retracted. 


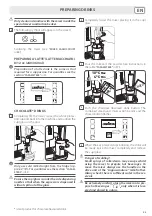
PREPARING ESPRESSO


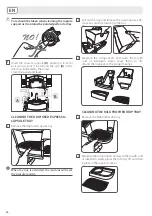
Never place your fingers or any other object in-
side the capsule-insertion space. 


Insert only Lavazza BLUE capsules.

2

   Lower the capsule-loading lever completely.

BREWING A FREE ESPRESSO DOSE

1


Position the large/small cup (see 

REGULATION 

OF THE CUP/GLASS SUPPORT RACK 

), raise the 

capsule-loading lever and insert a capsule.


Summary of Contents for LB 1200 GALACTICA

Page 1: ...te Gebrauchsanweisung aufmerk sam durch Lea atentamente las instrucciones Leia cuidadosamente todas as instruções Neem alle instructies zorgvuldig door LB 1200 GALACTICA Istruzioni per l uso Instructions for Use Guide d utilisation Gebrauchsanleitung Instrucciones de uso Instruções para utilização Gebruiksinstructies ISTRUZIONI ORIGINALI ...

Page 2: ...tes de poner en funcionamiento la máquina le aconsejamos leer atentamente las instrucciones de empleo que explican cómo utilizarla limpiarla y mantenerla en perfecto estado de funcionamiento Sólo nos queda desearle muchos deliciosos espressos gracias a Lavazza ES Página 57 Herzlichen Glückwunsch Sehr geehrter Kunde wir gratulieren Ihnen zum Kauf der Espressomaschine Lavazza LB 1200 Galactica und b...

Page 3: ... PREPARAZIONE BEVANDE FREDDE 10 MANUTENZIONE E PULIZIA 10 SANIFICAZIONE MIXER 10 PULIZIA AUTOMATICA GRUPPO ESPRESSO 11 PULIZIA BECCUCCIO EROGATORE ESPRESSO 11 PULIZIA SUPPORTO CAPSULA 11 PULIZIA CASSETTO RACCOGLI GOCCE CAPSULE USATE ESPRESSO 12 PULIZIA CASSETTO RACCOGLI GOCCE CAPPUCCINATORE 12 SOLUZIONI AI PROBLEMI PIÙ COMUNI 13 SICUREZZA 14 SOMMARIO preparato per bevanda al gusto di cioccolato PA...

Page 4: ...icazione mixer Cassetto raccogli gocce Cassetto raccogli gocce cappuccinatore Cassetto raccogli capsule Becc cio erogatore raccogli sanific Frullino mixer Mixer Gruppo motore cappuccinatore Serbatoio acqua con controllo livello acqua Coperchio serbatoio acqua Tappo serbatoio acqua per rabbocco Vano inserimento capsule Sportello vano supporto capsula Leva caricamento capsula co Lavazza China Mug La...

Page 5: ... Lavazza china mug Paper cup 12oz 360ml Capsula espresso Latte freddo fino a 3 livello Laterale Bevanda al gusto di cioccolato 12oz 360ml Lavazza china mug Paper cup 12oz 360ml Latte freddo o acqua fino a 3 livello Cioccolato in polvere 3 4 cucchiaini Mokaccino 12oz 360ml Lavazza china mug Paper cup 12oz 360ml Capsula espresso Latte freddo o acqua fino a 3 livello Cioccolato in polvere 3 4 cucchiaini...

Page 6: ...o non pieno Tutti i tasti accesi fissi Apertura leva caricamento capsula con macchina in riscaldamento 1 suono all apertura ed alla chiusura della leva caricamento capsula Apertura leva caricamento capsula con macchina pronta in temperatura 1 suono all apertura ed alla chiusura della leva caricamento capsula Risparmio energetico La macchina va in risparmio energetico dopo circa 1h di inattività Tu...

Page 7: ...ono accesi con luce fissa e sul display appare la scritta Lavazza AVVIAMENTO MACCHINA Posizionarelamacchinasuunasuperficiepiana orizzontale e stabile lontano da acqua fiamme e fonti di calore Scollegare l alimentazione elettrica se presente La macchina accesa non deve mai essere coper ta con strofinacci o altro Lo sportello del serbatoio dell acqua dispone di una chiusura con chiave 1 Ruotare la chiav...

Page 8: ... Premendo i tre tasti espresso sul pannel lo di sinistra l erogazione avviene tramite il beccuc cio erogatore A Premendo i quattro tasti bevanda sul pannello di destra l erogazione avviene tramite il beccuccio erogatore B In caso di mancato inserimento capsula avviene solo la montatura del latte öODIÒ QPTTB BWFSF JOJ JP M FSPHB JPOF USBNJUF JM CFDDVDDJP FSPHBUPSF MBUFSBMF B il supporto del CJDDIJF...

Page 9: ...io alternativo dei tasti selezione ed una segnalazione acustica indicano che il cassetto cap sule usate è pieno ed occorre svuotarlo e reinserirlo TTJDVSBSTJ DIF MB NBDDIJOB TJB QSPOUB BMM FSPHB JP OF UBTUJ FSPHB JPOF BDDFTJ DPO MVDF mTTB 3 Premere il tasto erogazione dose libera espresso per iniziare l erogazione Una volta raggiunta la quantità desiderata di espresso erogato premere nuovamente il...

Page 10: ...l interno di un bic chiere Al primo avviamento all uscita dallo stato di stand by dopo un prolungato inutilizzo e dopo ogni preparazione di bevande con utilizzo del mixer e necessario effettuare la sanificazione del mixer stesso vedere sezione SANIFICAZIONE MIXER 10 I tasti cappuccino e latte macchiato HFOF SBOP VOB QSFQBSB JPOF EJ P NM TF QSFNVUJ VOB WPMUB P NM TF QSFNVUJ EVF WPMUF VSBOUF MB QSFQBS...

Page 11: ...nterno di un bic chiere Effettuare la sanificazione solo con mixer inse rito nell apposito bicchiere per sanificazione mixer 6 Sul display appare il messaggio Eseguire la sanificazione del mixer vedi SANIFICA ZIONE MIXER 10 PREPARAZIONE LATTE MACCHIATO 8 12oz 240 360ml B QSFQBSB JPOF EFM MBUUF NBDDIJBUP Ò VHVBMF BMMB QSFQBSB JPOF EFM DBQQVDDJOP 1FS MF RVBOUJUË WF dere la sezione PARAMETRI 3 PREPARAZIO...

Page 12: ...iare la sanificazione del mixer senza avere prima inserito il frullino nell apposita pro tezione 1 Sollevare completamente il mixer ed estrarre com pletamente con movimento rotatorio il bicchiere per sanificazione mixer con relativo supporto por tandoli sotto il frullino del mixer Se il supporto bicchiere non è tutto esteso la sa nificazione non ha inizio 2 Abbassare completamente il mixer il frullin...

Page 13: ...to il tasto pulizia automatica gruppo espresso per più di tre secondi 3 Attendere la fine di lavaggio automatico In caso di necessità è possibile interrompere il ciclo di lavaggio automatico premendo nuovamente il tasto pulizia automatica PULIZIA BECCUCCIO EROGATORE ESPRESSO Sfilare il beccuccio erogatore tirandolo verso il bas so Lavarlo con acqua fredda o tiepida quindi rimon tarlo esercitando una...

Page 14: ...tto raccogli gocce capsule usate Estraendo il cassetto la macchina azzera il conteggio delle capsule inserite 2 Estrarre il cestello e svuotare le capsule usate Svuotare i liquidi presenti nel cassetto 3 Separare i componenti e lavarli con acqua fredda o tiepida quindi asciugarli e rimontarli correttamente PULIZIA CASSETTO RACCOGLI GOCCE CAPPUCCINATORE 1 Estrarre il cassetto raccogli gocce cappucc...

Page 15: ...ento capsula Rabboccare con acqua fresca potabile e ripetere il caricamen to del circuito idraulico Verificare inserimento del filtro Brita e ripetere il caricamen to del circuito idraulico vedere istruzioni fornite col filtro L espresso non è abbastanza caldo Le tazzine sono fredde Preriscaldare le tazzine erogandovi acqua calda L espresso sgorga troppo velocemente non si forma la crema nell espress...

Page 16: ...serito interamente il mixer nel bicchiere o nell apposita protezione Pulizia Prima di pulire la macchina è indispensabile staccare la spina dalla presa di corrente ed aspettare che la macchina si raffreddi Mai utilizzare detergenti alcalini solventi alcol o sostanze aggressive Non immergere la macchina nell acqua È severamente vietato cercare d intervenire all interno della macchina Non utilizzare ...

Page 17: ...22 PREPARING A CAPPUCCINO 8 12 oz 240 360 ml 22 PREPARING A LATTE LATTE MACCHIATO 8 12 oz 240 360 ml 23 CHOCOLATE DRINKS 23 PREPARING COLD DRINKS 24 MAINTENANCE AND CLEANING 24 MIXER SANIFICATION 24 AUTOMATIC CLEANING OFTHE ESPRESSO UNIT 25 CLEANINGTHE ESPRESSO BREWING SPOUT 25 CLEANINGTHE CAPSULE SUPPORT 25 CLEANINGTHE DRIP USED ESPRESSO CAPSULETRAY 26 CLEANINGTHE MILK FROTHER DRIPTRAY 26 TROUBLE...

Page 18: ... sanification cylinder Drip tray Drip tray for the milk frother frothing device Used capsules drawer Side bre p brewing capsules r sanification cy s Mixer milk frother Mixer Milk frother motor unit Capsule compartment Pod holder arm compartment Capsule loading lever ment Water tank with water level control Water tank cover Water tank cap for topping up wa Lavazza China Mug Lavazza Paper Cup 12oz 3...

Page 19: ... milk up to level 3 Hot drinks Flat white 12oz 360ml Lavazza china mug Paper cup 12oz 360ml Espresso capsule Cold milk up to level 3 Side Hot chocolate drink 12oz 360ml Lavazza china mug Paper cup 12oz 360ml Cold water or milk up to level 3 Powdered chocolate 3 4 tsp Mokaccino 12oz 360ml Lavazza china mug Paper cup 12oz 360ml Espresso capsule Cold water or milk up to level 3 Powdered chocolate 3 4...

Page 20: ...ening the capsule loading lever while the machine is heating 1 sound will be heard when the capsule loading lever is opened or closed Opening the capsule loading lever when the machine is ready right temperature has been reached 1 sound will be heard when the capsule loading lever is opened or closed Energy saving The machine enters the energy saving mode after about 1 hour of inactivity All keys ...

Page 21: ...the display 3 The machine will be ready for brewing when the drink selection keys are switched on with a steady light and the word Lavazza appears on the display STARTING THE MACHINE Place the machine on a flat horizontal and sta ble surface not close to water open flames or sources of intense heat Disconnect the electric power supply if connect ed When switched on the machine must never be covered ...

Page 22: ...n Place the cup on the grid A B SELECTING THE BREWER The machine has two brewing spout one at the centre A and one at the side B A B When the three keys espresso on the left hand panel are pressed brewing will occur by means of the spout A When the four keys other drinks on the right hand panel are pressed brewing will occur by means of the spout B IG B DBQTVMF JT OPU JOTFSUFE POMZ UIF NJML GSPUIJ...

Page 23: ...rning signal will indicate that the lever has been properly closed If the lever is low ered without a capsule having been inserted when one of the keys for brewing espresso is pressed an acoustic signal will be emitted the pressed key will start blinking for three seconds and the following symbol will appear on the display BLF TVSF UIF NBDIJOF JT SFBEZ GPS CSFXJOH CSFX JOH LFZT TXJUDIFE PO XJUI B ...

Page 24: ...when it is low ered and placed in a glass When the machine is used for the first time after a prolonged period of inactivity or after each preparation of a drink with the use of the mixer the mixer will have to be sanitized see section MIXER SANIFICATION 24 The cappuccino and latte keys initiate the CSFXJOH PG P NM JG QSFTTFE PODF BOE P NM XIFO QSFTTFE UXJDF 8IFO BO P ESJOL JT CSFXFE B CVUUPO UIBU ...

Page 25: ...xtremely careful to turn the mixer on to pre pare hot beverages only when it is low ered and placed in a glass Only clean and sanitise with the mixer inside the special mixer sanitisation beaker 6 The following symbol will appear on the screen Sanitising the mixer see MIXER SANIFICATION 24 PREPARING A LATTE LATTE MACCHIATO 8 12 oz 240 360 ml 1SFQBSBUJPO PG B MBUUF ESJOL JT UIF TBNF BT UIBU SFRVJSF...

Page 26: ...ctive cylinder 1 Raise the mixer fully and completely remove the mixer sanitisation beaker and its support using a swivelling movement bringing them under the mixer s whisk If the cylinder support is not fully extended the sanification process will not begin 2 Lower the mixer fully the whisk will be inserted into the mixer sanitisation beaker 3 Start the automatic cleaning operation pressing the au...

Page 27: ...key for more than three seconds 4 Wait for the end of the automatic wash If necessary it is possible to interrupt the automatic washing cycle by pushing the automatic wash button again CLEANING THE ESPRESSO BREWING SPOUT Extract the brewing spout pulling it downwards Wash with cold or lukewarm water and then re place pressing upwards slightly CLEANING THE CAPSULE SUPPORT 1 Raise the capsule loadin...

Page 28: ...move the drip used capsule tray WIFO UIF USBZ JT FYUSBDUFE UIF NBDIJOF XJMM SFTFU the capsule counter 2 Pull out the tray and remove the used capsules Re move any liquid remaining in the tray 3 Separate the components and wash them with cold or lukewarm water allow them to dry off and then replace in the proper manner CLEANING THE MILK FROTHER DRIP TRAY 1 Remove the Milk frother drip tray 2 Separat...

Page 29: ...e correct temperature has been reached Lower the capsule loading lever Top up with fresh drinking water and repeat loading of the hydraulic circuit Check insertion of the Brita filter and repeat loading of the hydraulic circuit see the instructions provided with the filter The espresso is not hot enough The cups are cold Preheat the cups filling them with warm water The espresso spurts out too quickl...

Page 30: ...ion device Cleaning Before cleaning unplug the machine and let it cool down Never use alkaline detergents solvents alcohol or aggressive substances Do not put the machine under water It is strictly forbidden to tamper with the internal parts of the machine Do not use the water in the tank for food use Storing the machine If the machine is to remain inactive for a long time unplug it and store it i...

Page 31: ...PRÉPARATIONS CHOCOLATÉES 37 PRÉPARATION DE BOISSONS FROIDES 38 ENTRETIEN ET NETTOYAGE 38 LAVAGE DU MIXEUR 38 NETTOYAGE AUTOMATIQUE DU GROUPE ESPRESSO 39 NETTOYAGE DU BECVERSEUR DE ESPRESSO 39 NETTOYAGE DU SUPPORT DE CAPSULE 39 NETTOYAGE DUTIROIR RAMASSE GOUTTES CAPSULES USAGÉES DE ESPRESSO 40 NETTOYAGETIROIR RAMASSE GOUTTES DU MOUSSEUR À CAPPUCCINO 40 SOLUTIONS AUX PROBLÈMES LES PLUS FRÉQUENTS 41 ...

Page 32: ...r Tiroir ramasse gouttes Tiroir ramasse gouttes du mousseur à cappuccino Tiroir ramasse capsules Bec e distribution masse s nettoyage ne appuie Fouet mixeur Mixeur Groupe moteur du mousseur Réceptacle insertion capsule Couvercle réceptacle support capsule Levier chargement capsule Réservoir d eau avec contrôle de niveau d eau Couvercle du réservoir d eau Bouchon réservoir d eau pour remplissage é ...

Page 33: ...40ml Capsule espresso Lait froid jusqu au 2ème niveau Latéral Deux appuis sur la touche Espresso renversé 12oz 360ml Lavazza mug Paper cup 12oz 360ml Capsule espresso Lait froid jusqu au 3ème niveau Boissons chaudes Cafè au lait 12oz 360ml Lavazza mug Paper cup 12oz 360ml Capsule espresso Lait froid jusqu au 3ème niveau Latéral Boisson au goût chocolaté 12oz 360ml Lavazza mug Paper cup 12oz 360ml ...

Page 34: ...lumées de manière fixe Ouverture du levier de chargement capsule à machine en réchauffage 1 signal sonore à l ouverture et à la fermeture du levier de chargement de la capsule Ouverture du levier de chargement cap sule à machine prête en température 1 signal sonore à l ouverture et à la fermeture du levier de chargement de la capsule Économie d énergie La machine se place en mode d économie d énergi...

Page 35: ...re utilisée lorsque les touches de sélection de boisson sont allumées de manière fixe et que l écran affiche le logo Lavazza DÉMARRAGE DE LA MACHINE Placer la machine sur une surface plane hori zontale et stable loin de sources d eau flammes et de sources de chaleur Débrancher l alimenta tion électrique le cas échéant La machine allu mée ne doit jamais être recouverte de chiffons ou autres LF DPVWFSDMF...

Page 36: ... becs de distribution un central A et un latéral B A B En appuyant sur une des trois touches de espresso sur le panneau de gauche la distribu tion est effectuée par le bec verseur A En appuyant sur une des quatre touches de boisson sur le panneau de droite la dis tribution est effectuée par le bec verseur B SJ BVDVOF DBQTVMF O FTU JOTÏSÏF TFVMF MB GPODUJPO mousse de lait est lancée öODIÒ QPTTB BWFSF...

Page 37: ... un signal sonore indiquent que le tiroir des cap sules usagées est plein et qu il convient de le vider et de le remettre presso un signal sonore se déclenche la touche concer née clignote pendant trois secondes et l écran affiche S assurer que la machine est prête pour la distribu tion les touches de distribution doivent être allu NÏFT EF NBOJÒSF mYF 3 Appuyer sur la touche de distribution de dose ...

Page 38: ...ifique de nettoyage du mixeur 6 L écran affiche le message Procéder au nettoyage du mixeur voir LAVAGE DU MIXEUR 38 Au premier démarrage de la machine après une inutilisation prolongée ou bien après chaque préparation de boissons avec l utilisation du mixeur il faut effectuer un lavage du mixeur Voir section LAVAGE DU MIXEUR 38 Les touches cappuccino et espresso renversé EJTUSJCVFOU P NM QPVS VO BQQVJ...

Page 39: ...ctiver que s il est abaissé et plon gé dans un verre Le nettoyage ne doit être effectué que lorsque le mixeur est plongé dans le verre spécifique de nettoyage du mixeur 6 L écran affiche le message Procéder au nettoyage du mixeur voir LAVAGE DU MIXEUR 38 PRÉPARATION DE ESPRESSO RENVERSÉ 8 12 oz 240 360 ml La préparation du espresso renversé est identique Ë DFMMF EV DBQQVDDJOP 1PVS MFT RVBOUJUÏT WPJS M...

Page 40: ...s non abrasifs LAVAGE DU MIXEUR Ne pas lancer le lavage du mixeur sans avoir au préalable inséré le fouet dans sa protection 1 Soulever complètement le mixeur et extraire entiè rement le verre de nettoyage du mixeur et son sup port en lui appliquant un mouvement de rotation et placez les sous le fouet du mixeur Si le support du verre n est pas entièrement dé plié le lavage ne démarre pas PRÉPARATI...

Page 41: ...En cas de besoin il est possible d interrompre le cycle de lavage automatique en appuyant de nouveau sur la touche de nettoyage automatique NETTOYAGE DU BEC VERSEUR DE ESPRESSO Décrocher le bec verseur en le tirant vers le bas Le laver avec de l eau froide ou tiède puis le remonter en exerçant une légère pression vers le haut NETTOYAGE DU SUPPORT DE CAPSULE 1 Relever le levier de chargement de la ...

Page 42: ...masse gouttes capsules usagées de espresso Ensortantletiroir lamachineremetàzéroledécompte des capsules insérées 2 Extraire le panier et vider les capsules usagées Vider les liquides présents dans le tiroir 3 Séparerlescomposantsetleslaveravecdel eaufroide outiède puislesessuyeretlesremontercorrectement NETTOYAGE TIROIR RAMASSE GOUTTES DU MOUSSEUR À CAPPUCCINO 1 Extraire le tiroir ramasse gouttes ...

Page 43: ...isser le levier de chargement de la capsule Recharger avec de l eau fraîche potable et réamorcer le circuit hydraulique Vérifier la mise en place du filtre Brita et répéter le chargement du circuit hydraulique voir instructions fournies avec le filtre Le espresso n est pas assez chaud Les tasses sont froides Préchauffer les tasses en y versant de l eau chaude Le espresso coule trop rapidement la crème...

Page 44: ... lancer la vapeur sans avoir au préalable inséré complètement le mixeur dans le verre lui même ou dans sa protection Nettoyage Avantdenettoyerla machine ilestindispensablededébrancherlafichedelaprisedecourantetd attendrequelamachinerefroidisse Nejamaisutiliser de détergents alcalins de solvants d alcool ou des substances agressives Ne pas plonger la machine dans l eau Il est strictement interdit d ...

Page 45: ...60 ml 50 ZUBEREITUNG EINES LATTE LATTE MACCHIATO 8 12 oz 240 360 ml 51 SCHOKOLADENDRINKS 51 ZUBEREITUNGVON KALTGETRÄNKEN 52 WARTUNG UND REINIGUNG 52 REINIGUNG DES MIXERS 52 AUTOMATISCHE REINIGUNG DER ESPRESSOEINHEIT 53 REINIGUNG DER GETRÄNKEAUSGABE 53 REINIGUNG DER KAPSELKAMMER 53 REINIGUNG DER AUFFANGBEHÄLTER KAPSELAUFFANGBEHÄLTER 54 REINIGUNG DES CAPPUCCINATORE AUFFANGBEHÄLTERS 54 PROBLEMBEHANDL...

Page 46: ...Auffangschale Auffangschale für den Cappuccinatore Aufschäumer Kapselauf fangbehälter Auffa e Getränkeaus elauf f f behälte er g g etränke Spr aus g de G Reinigung b mit Glasb mit Glasb Mixer Milchaufschäumer Mixer Motor des Cappuccinatore Aufschäumers Kapselkammer Abdeckung des Kapselkammergehäuses Kapselheber zum Einsetzen der Kapsel Wassertank mit Maximalfüllanzeige Abdeckung des Wassertanks Wasse...

Page 47: ...tränke Flat white 12oz 360ml LavazzaTasse Pappbecher 12oz 360ml Espresso Kapsel kalte Milch bis Anzeige 3 seitlich Heiße Schokolade 12oz 360ml LavazzaTasse Pappbecher 12oz 360ml KaltesWasser oder Milch bis Anzeige 3 Schokoladenpulver 3 4TL Ciocco espresso 12oz 360ml LavazzaTasse Pappbecher 12oz 360ml Espresso Kapsel KaltesWasser oder Milch bis Anzeige 3 Schokoladenpulver 3 4TL Kaltgetränke Kalter ...

Page 48: ...ingesetzt wird AlleTasten leuchten dauerhaft Öffnen des Kapselhebers während die Maschine aufheizt Ein Signal ertönt wenn der Kapselheber geöffnet oder geschlossen wird Öffnen des Kapselhebers bei betriebsberei ter Maschine wenn die richtigeTemperatur erreicht wurde Ein Signal ertönt wenn der Kapselheber geöffnet oder geschlossen wird Energiesparmodus Die Maschine wechselt nach etwa einer Stunde der N...

Page 49: ...bsbereit wenn alle Getränke auswahltasten durchgehend leuchten und dasWort Lavazza auf dem Display erscheint DAS STARTEN DER MACHINE PositionierenSiedieMaschineaufeinemflachen und stabilen Untergrund fern von Wasser offe nem Feuer und anderen Wärmequellen Ziehen Sie den Netzstecker falls dieser ans Stromnetz angeschlossen ist Die Maschine darf nie mit Tü chern oder anderen Dingen abgedeckt werden we...

Page 50: ...Werden die vier Tasten andere Ge tränke auf der rechten Seite des Displays gedrückt so wird die seitliche Ausgabe aktiviert B WFOO OPDI LFJOF BQTFM FJOHFMFHU XVSEF TUBS UFU EJF BTDIJOF VOÊDITU OVS EJF VOLUJPO EFT JMDIBVGTDIÊVNFOT DBNJU EBT VTUFJMFO EVSDI EJF TFJUMJDIF FUSÊO LFBVTHBCF B NÚHMJDI JTU NVTT EBT VGTUFMMHJU UFS WÚMMJH VSàDLHF PHFO TFJO ZUBEREITUNG VON ESPRESSO 2 Verschließen Sie den Deck...

Page 51: ... wechselndes Blinken der Auswahltasten und auch akustische Signaltöne zeigen an dass der Kap selauffangbehälter voll ist und ausgeleert werden muss Stellen Sie sicher dass die Maschine betriebsbe SFJU JTU BMMF 5BTUFO VS FUSÊOLFBVTXBIM MFVDIUFO EVSDIHFIFOE 3 Drücken Sie die Taste zur Zubereitung einer frei dosierten Portion Espresso um die Zubereitung zu starten Sobald die erwünschte Menge an Espres...

Page 52: ...rabgesetzt und in das Glas eingeführt wurde Nach jeder Zubereitung eines GETRÄNKEN vor der ersten Inbetriebnahme oder nach längerem Nichtgebrauch muss der Mixer gereinigt werden weitere Informationen finden Sie REINIGUNG DES MIXERS 52 DJF 5BTUFO GàS Cappuccino und Latte sUBSUFO CFJ FJONBMJHFN SàDLFO EJF VCF SFJUVOH WPO P NM CFJ XFJNBMJHFN SàDLFO XFSEFO P NM zubereitet WFOO FJO FUSÊOL NJU P NM zuber...

Page 53: ...ktiviertwird nachdemdieserherabgesetzt und in das Glas eingeführt wurde Die Entkeimung darf nur durchgeführt werden wenn der Mixer in das extra dafür vorgesehene Glas eingeführt ist 6 Folgende Nachricht erscheint auf dem Display Entkeimung des Mixers siehe REINIGUNG DES MI XERS 52 ZUBEREITUNG EINES LATTE LATTE MACCHIATO 8 12 oz 240 360 ml Die VorbereitVOHFO GàS EJF VCFSFJUVOH FJOFT BU UF FUSÊOLFT ...

Page 54: ...e Reinigung des Mixers nie ohne zunächst den Milchaufschäumer hinter den Schutzzylinder zu positionieren 1 Den Mixer komplett anheben das Glas für die Ent keimung mit der dazugehörigen Halterung mit kreisenden Bewegungen entfernen und unter den Propeller des Mixers führen Die Entkeimung darf nur durchgeführt werden wenn der Mixer in das extra dafür vorgesehene Glas eingeführt ist 6 Folgende Nachri...

Page 55: ...igung der Espressoeinheit und halten Sie diese 3 Sekunden lang gedrückt 3 Das Ende der automatischen Reinigung abwarten FJ FJOFS PUXFOEJHLFJU LBOO EFS BVUPNBUJTDIF 3FJOJHVOHT ZLMVT EVSDI EBT FSOFVUF SàDLFO EFS 5BTUF VOUFSCSPDIFO XFSEFO REINIGUNG DER GETRÄNKEAUSGABE Entnehmen Sie den Ausgabetrichter indem Sie ihn nach unten abziehen Spülen Sie diesen mit kaltem oder lauwarmen Wasser und stecken Sie...

Page 56: ... der Kapselauffangbehälter entnommen wird setzt die Maschine den Kapselzähler zurück auf Null 2 Entnehmen Sie den Kapselauffangbehälter und entsorgen Sie die benutzten Kapseln Entfernen Sie auch weiteren möglichen Schmutz wie Trop fen aus den benutzten Kapseln 3 Trennen Sie die Komponenten und spülen Sie sie mit kaltem oder lauwarmen Wasser Lassen Sie sie trocknen und setzen Sie sie dann wieder ents...

Page 57: ...schesTrinkwasser nach und wiederholen Sie denVorgang zum Füllen des hydraulischen Kreislaufes Prüfen Sie den Einsatz des Brita Filters und wiederholen Sie den Vorgang zum Füllen des hydraulischen Kreislaufes Bitte beachten Sie dazu die Anleitung des Filters Der Espresso ist nicht heiß genug DieTassen sind kalt Erwärmen Sie dieTassen indem Sie sie mit heißemWasser füllen Der Espresso wird zu schnel...

Page 58: ...der Mixer nicht vollständig hinter der Schutzvorrichtung oder in einem Becher positioniert ist Reinigung Stellen Sie sicher dass vor der Reinigung der Netzstecker gezogen ist und das Gerät abgekühlt ist Verwenden Sie keine säurehaltigen Reinigungsmittel LösungsmitteloderandereätzendeFlüssigkeitenzumReinigen LegenSiedasGerätnichtinWasser JeglicheArtvonVeränderungenamInnenlebendes Gerätes ist streng...

Page 59: ...ZA 66 LIMPIEZA DE LA BATIDORA 66 LIMPIEZA AUTOMÁTICA DEL GRUPO DE ESPRESSO 67 LIMPIEZA DE LA BOQUILLA SUMINISTRADORA DE ESPRESSO 67 LIMPIEZA DEL SOPORTE DE LA CÁPSULA 67 LIMPIEZA DE LA BANDEJA DE GOTEO PARA RECOGER LAS CÁPSULAS USADAS PARA EL ESPRESSO 68 LIMPIEZA DE LA BANDEJA DE GOTEO DE LA MÁQUINA DE CAPUCHINO 68 SOLUCIONES A LOS PROBLEMAS COMUNES 69 SEGURIDAD 70 RESUMEN Mezcla para bebida con s...

Page 60: ...atidora Bandeja de goteo Bandeja de goteo de la máquina de capuchino Bandeja para colectar las cápsulas del limpieza de dispens e limpieza de par Mezcladora de la batidora Batidora Grupo del motor de la máquina de capuchino Compartimento para la inserción de cápsulas Puerta del compartimento de soporte cápsula Palanca de carga de cápsula Depósito de agua con control del nivel del agua Cubierta del...

Page 61: ...sta el segundo nivel Lateral Tecla apretada dos veces Latte macchiato 12oz 360ml Lavazza china mug Vaso papel 12oz 360ml Cápsula espresso Leche fría hasta el tercer nivel Bebidas calientes Espresso con leche 12oz 360ml Lavazza china mug Vaso papel 12oz 360ml Cápsula espresso Leche fría hasta el tercer nivel Lateral Bebida con sabor a chocolate 12oz 360ml Lavazza china mug Vaso papel 12oz 360ml Lec...

Page 62: ...e la bandeja no completamente llena Todas las teclas encendidas con luz fija Se abre la palanca para cargar cápsulas con la máquina en calentamiento 1 sonido cuando se abre y se cierra la palanca para cargar cápsulas Se abre la palanca para cargar cápsulas con la máquina lista en temperatura 1 sonido cuando se abre y se cierra la palanca para cargar cápsulas Ahorro de energía La máquina entre en el...

Page 63: ... máquina está lista para ser utilizada cuando las teclas para la selección de las bebidas están encen didas con luz fija y en la pantalla aparece Lavazza ARRANQUE DE LA MÁQUINA Colocar la máquina sobre una superficie plana horizontal y estable lejos del agua del fue go y de las fuentes de calor Desconectar la alimentación eléctrica si la hay La máquina encendida nunca debe estar cubier ta con toalla...

Page 64: ... tres teclas del espresso en el panel izquierdo el suministro sucede a través de la boquilla dispensadora A Al pulsar las cuatro teclas del bebida en el panel derecho el suministro sucede a través de la boquilla dispensadora B En caso de no inserción de la cápsula sólo se dis pensará la espuma de leche 1BSB FNQF BS FM TVNJOJTUSP B USBWÏT EF MB CPRVJMMB dispensadora lateral B el soporte del vaso pa...

Page 65: ...rnativo de las teclas seleccionadas y una señal acústica indican que la bandeja de las cápsulas usadas está llena y debe ser vaciada y rein troducida TFHVSBSTF RVF MB NÈRVJOB FTUÏ QSFQBSBEB QBSB el suministro del espresso las teclas de suministro FODFOEJEBT DPO MV mKB 3 Pulsar la tecla de suministración de las dosis libres de espresso para iniciar la suministración Una vez alcanzada la cantidad de...

Page 66: ... calientes Actívelo únicamente si lo ha bajado previamente y está dentro de un vaso Antes de utilizar la cafetera por primera vez si no se ha utilizado durante un periodo de tiempo prolongado o después de cada preparación de una bebida con el uso de el mezclador es necesa rio hacer a limpieza do mezclador véase LIMPIE ZA DE LA BATIDORA 66 Las teclas capuchino y latte macchiato He neran un suminist...

Page 67: ...idas calientes Actívelo únicamente si lo ha bajado previamente y está dentro de un vaso Limpie el mezclador únicamente cuando se en cuentre dentro del vaso destinado a su limpieza 6 En la pantalla aparece el mensaje Limpie el mezclador véase LIMPIEZA DE LA BATIDO RA 66 PREPARACIÓN LATTE MACCHIATO 8 12 oz 240 360 ml B QSFQBSBDJØO EFM MBUUF NBDDIJBUP FT JHVBM RVF MB QSFQBSBDJØO EFM DBQVDIJOP 1BSB MB...

Page 68: ... previamente la mezcladora dentro de su protección especial 1 Levante completamente el mezclador y extraiga totalmente el vaso para su limpieza y su correspon diente soporte con un movimiento circular hasta que queden debajo del espumador del mezclador Limpie el mezclador únicamente cuando se en cuentre dentro del vaso destinado a su limpieza 6 En la pantalla aparece el mensaje Limpie el mezclador...

Page 69: ...a limpieza automática del grupo espresso para más de tres segundos 3 Espere a que termine la función de limpieza auto mática Si es necesario puede interrumpir el ciclo de lim pieza automática pulsando de nuevo el botón de limpieza automática LIMPIEZA DE LA BOQUILLA SUMINISTRADORA DE ESPRESSO Retirar la boquilla suministradora tirando de ella ha cía abajo Lavar con agua fría o tibia después mon tar...

Page 70: ...bandeja de goteo para las cápsulas usadas Al retirar la bandeja la máquina empieza de cero el conteo de las cápsulas introducidas 2 Retire la canastilla y vaciar las cápsulas vacías Va ciar los líquidos presentes en la bandeja 3 Separar los componentes y lavarlos con agua fría o tibia después secarlos y recolocarlos correctamente LIMPIEZA DE LA BANDEJA DE GOTEO DE LA MÁQUINA DE CAPUCHINO 1 Retirar...

Page 71: ... la cápsula Volver a llenar con agua potable fresca y repetir la carga del circuito hidráulico Verificar la introducción del filtro Brita y repetir el cargo del circuito hidráulico ver las instrucciones proporcionadas con el filtro El espresso no está suficientemente caliente Las tacitas están frías Precalentar las tacitas haciendo suministrar el agua caliente El espresso sale muy rápido no se forma l...

Page 72: ...a batidora sin el vaso y sin haber introducido completamente la batidora en el vaso o en el dispositivo de protección especial Limpieza Antesdelimpiarelequipo esesencialdesconectarelenchufedelaparedyesperaraqueelequiposeenfríe Nuncausedetergentesalcalinos disolventes alcoholoproductosdelimpiezaagresivos Nosumergirelequipoenelagua Quedaestrictamenteprohibidointentarrepararelequipo Noutilizarelagua ...

Page 73: ...COLATE 79 PREPARAÇÃO DE BEBIDAS FRIAS 80 MANUTENÇÃO E LIMPEZA 80 LIMPEZA DO MISTURADOR 80 LIMPEZA AUTOMÁTICA DO GRUPO DO EXPRESSO 81 LIMPEZA DO BICO DE SAÍDA DE EXPRESSO 81 LIMPEZA DO SUPORTE DAS CÁPSULAS 81 LIMPEZA DA GAVETA RECOLHE GOTAS CÁPSULAS USADAS DE EXPRESSO 82 LIMPEZA DA GAVETA RECOLHE GOTAS DO DISPENSADOR DE CAPPUCCINO 82 SOLUÇÕES PARA OS PROBLEMAS MAIS COMUNS 83 SEGURANÇA 84 RESUMO pre...

Page 74: ...eta recolhe gotas Gaveta recolhe gotas do dispensador de cappuccino Gaveta recolhe cápsulas do regulável de de saída cápsulas limp lim suporte Batedeira do misturador Misturador Grupo motor do dis pensador de cappuccino Compartimento para inserção da cápsula Portinhola do compartimento para carregamento da cápsula Alavanca de carregamento da cápsula Reservatório de água com controlo do nível de ág...

Page 75: ... Cápsula expresso Leite frio até ao 2 º nível Lateral Botão premido duas vezes Latte macchiato 12oz 360ml Lavazza escuro mug Paper cup 12oz 360ml Cápsula expresso Leite frio até ao 3 º nível Bebidas quentes Expresso com leite 12oz 360ml Lavazza escuro mug Paper cup 12oz 360ml Cápsula expresso Leite frio até ao 3 º nível Lateral Bebida com sabor a choco late 12oz 360ml Lavazza escuro mug Paper cup ...

Page 76: ...tura da alavanca de carregamento da cápsula com a máquina em aquecimento 1 sinal aquando da abertura e do fecho da alavanca de carregamento da cápsula Abertura da alavanca de carregamento da cápsula com a máquina pronta na temperatura correcta 1 sinal aquando da abertura e do fecho da alavanca de carregamento da cápsula Poupança de energia A máquina passa ao modo de poupança de energia depois de c...

Page 77: ... A máquina está pronta a ser utilizada e os botões de selecção de bebidas estão acesos e no visor surge a palavra Lavazza ARRANQUE DA MÁQUINA Colocar a máquina sobre uma superfície pla na horizontal e estável afastada da água de chamas e de fontes de calor Desligar a corrente eléctrica se existir Quando ligada a máquina não deve nunca ser coberta com panos ou ou tros objectos A QPSUJOIPMB EP SFTFS...

Page 78: ...over e inseri la na posição inferior Apoiar a chávena grande na grelha A B SELECÇÃO DO BICO DE SAÍDA A máquina dispõe de dois bicos de saída um central A e um lateral B A B Premindo os três botões de expresso no painel do lado esquerdo o expresso sai pelo bico de saída A Premindo os quatro botões de bebi da no painel do lado direito a bebida sai pelo bico de saída B CBTP B DÈQTVMB OÍP UFOIB TJEP J...

Page 79: ...essário esvaziá la e voltar a inseri la Um sinal acústico indica que a alavanca está correc tamente fechada Se a alavanca for baixada sem ter sido inserida uma cápsula ao premir se um dos botões para saída de expresso é emitido um sinal acústico o botão fica intermitente durante três segundos e surge no visor FSUJmDBS TF EF RVF B NÈRVJOB FTUÈ QSPOUB QBSB B TBÓEB EF FYQSFTTP CPUÜFT EF TBÓEB EF FYQSF...

Page 80: ...s para só baixar o bico para dentro de um copo Da primeira vez que a máquina é ligada depois de um período de inactividade prolongado ou após cada preparação de bebidas com a utiliza ção de misturador é necessário efectuar a limpe za do misturador ver LIMPEZA DO MISTURADOR 80 OT CPUÜFT EF DBQQVDDJOP e latte macchiato pSPQPSDJPOBN VNB TBÓEB EF P NM quando premidos uma vez e de P NM quando pre midos...

Page 81: ...ção ao activar o misturador para preparação de bebidas quentes para só baixar o bico para dentro de um copo Efectuar a limpeza apenas com o misturador in serido na tampa do copo de limpeza do mistura dor 6 No visor surge a mensagem Efectuar a limpeza do misturador ver LIMPEZA DO MISTURADOR 80 PREPARAÇÃO DE LATTE MACCHIATO 8 12 oz 240 360 ml A QSFQBSBÎÍP EP MBUUF NBDDIJBUP Ï JHVBM Ë QSFQB SBÎÍP EP ...

Page 82: ...do a batedeira do compartimento de protecção 1 Levantar completamente o misturador e retirar totalmente e com movimento rotativo o copo de limpeza do misturador com o respectivo suporte colocando o por baixo da batedeira do misturador Efectuar a limpeza apenas com o misturador in serido na tampa do copo de limpeza do mistura dor 6 No visor surge a mensagem Efectuar a limpeza do misturador ver LIMP...

Page 83: ...ais de três segundos 3 Aguardar o final da lavagem automática N DBTP EF OFDFTTJEBEF Ï QPTTÓWFM JOUFSSPNQFS P DJDMP EF MBWBHFN BVUPNÈUJDB QSFNJOEP EF OPWP P CPUÍP EF MJNQF B BVUPNÈUJDB LIMPEZA DO BICO DE SAÍDA DE EXPRESSO Fazer deslizar o bico de saída puxando o para baixo Lavá locomáguafriaoutépidae emseguida voltara montá lo exercendo pressão para cima LIMPEZA DO SUPORTE DAS CÁPSULAS 1 Levantar a ...

Page 84: ...as usadas Ao extrair o gaveta a máquina efectuará a contagem das cápsulas inseridas 2 Retirar o cesto e esvaziar as cápsulas usadas Despe jar os líquidos presentes na gaveta 3 Separar os componentes e lavá los com água fria ou tépida em seguida enxugá los e voltar a montá los correctamente LIMPEZA DA GAVETA RECOLHE GOTAS DO DISPENSADOR DE CAPPUCCINO 1 Retirar a gaveta recolhe gotas do dispensador ...

Page 85: ...a alavanca de carregamento da cápsula Atestar com água fria potável e repetir o carregamento do circuito hidráulico Verificar a inserção do filtro Brita e repetir o carregamento do circuito hidráulico ver instruções fornecidas com o filtro O expresso não está suficientemen te quente As chávenas estão frias Aquecer previamente as chávenas deitando lhes água quente O expresso sai com demasiada rapidez e...

Page 86: ...par a máquina é indispensável retirar a ficha da tomada de corrente e esperar que a máquina arrefeça Não utilizar nunca detergentes alcalinos diluentes álcool ou substância agressivas Não mergulhar a máquina na água É rigorosamente proibido tentar efectuar qualquer intervenção no interior da máquina Não utilizar a água presente no reservatório para fins alimentares Arrumação da máquina Quando a máqu...

Page 87: ...LATTE MACCHIATO 8 12 oz 240 360 ml 93 CHOCOLADEDRANKEN 93 BEREIDINGVAN KOUDE DRANKEN 94 ONDERHOUD EN REINIGING 94 ZUIVERINGVAN DE MIXER 94 AUTOMATISCHE REINIGINGVAN DE ESPRESSOMODULE 95 REINIGINGVAN DETUITVAN DE ESPRESSODISPENSER 95 REINIGINGVAN DE CAPSULE STEUN 95 REINIGINGVAN DE LEKBAK OPVANGBAKVOOR GEBRUIKTE ESPRESSOCAPSULESÈ 96 REINIGINGVAN DE LEKBAKVAN DE CAPPUCCINATORE 96 PROBLEEMOPLOSSING 9...

Page 88: ...ing van de mixer Lekbak Lekbak voor de Cappuccinatore opschuimapparaat Opvangbak voor capsules Z s es e s zuivering Be g va dis zuivering Terugtre Melkopschuimer mixer Mixer Motorblok Cappuccinatore Capsule compartiment Deksel voor het capsule ondersteunings compartiment Laadhendel voor capsules Waterreservoir met waterniveau begrenzing Deksel van het waterreservoir Dop waterreservoir om bij te vu...

Page 89: ...Espresso capsule Koude melk tot maximaal niveau 2 Zijdelings Toets tweemaal ingedrukt Latte 12oz 360ml PorseleinenLavazza kopje Papierenbeker12oz 360ml Espresso capsule Koude melk tot maximaal niveau 3 Warmedranken Flat white 12oz 360ml PorseleinenLavazza kopje Papierenbeker12oz 360ml Espresso capsule Koude melk tot maximaal niveau 3 Zijdelings Warme chocoladedrank 12oz 360ml PorseleinenLavazza ko...

Page 90: ... lichten continu op Opening van de laadhendel voor capsules terwijl het apparaat aan het opwarmen is Het apparaat speelt een geluid af wanneer de laadhendel voor capsules geopend of gesloten wordt Opening van de laadhendel voor capsules wanneer het apparaat klaar is op tem peratuur Het apparaat speelt een geluid af wanneer de laadhendel voor capsules geopend of gesloten wordt Energiebesparing Het ...

Page 91: ...t zal klaar zijn voor drankbereiding wan neer de drankkeuzetoetsen ingeschakeld zijn con tinu oplichten en het woord Lavazza verschijnt op het scherm HET OPSTARTEN VAN HET APPARAAT Plaats het apparaat op een vlakke horizontale en stabiele ondergrond uit de buurt van warm te open vuur of bronnen van intense hitte Sluit de stroomtoevoer af indien deze aangesloten is Wanneer het apparaat ingeschakeld...

Page 92: ...resso op het linker paneel worden ingedrukt gebeurt de dis tributie door middel van tuit A Wanneer de vier toetsen andere dranken op het rechter paneel worden ingedrukt gebeurt de distributie door middel van tuit B IOEJFO FS HFFO DBQTVMF XFSE JOHFCSBDIU BM FOLFM EF NFMLPQTDIVJNJOH PQHFTUBSU XPSEFO DF TUFVO WPPS EF CFLFS WPPS EF VJWFSJOH EJFOU WPMMFEJH JOHFUSPLLFO UF XPSEFO WPPS BMFFS EJTUSJCVUJF E...

Page 93: ...oetsen en een akoestisch signaal geven aan dat de opvangbak voor gebruikte capsules vol is en dient geledigd te worden te knipperen gedurende 3 seconden en op het scherm verschijnt het volgende VFSJmFFS PG IFU BQQBSBBU LMBBS JT WPPS EJTUSJCVUJF EF EJTQFOTFSUPFUTFO JKO JOHFTDIBLFME FO MJDIUFO continu op 3 Druk op de dispensertoets voor vrije espressodo sering teneinde de distributie te starten Zodr...

Page 94: ... bereiding van warme dranken wanneer deze helemaal omlaag is ge bracht en in een beker is geplaatst Na elke bereiding van een cappuccino latte lat te macchiato of chocoladedrank dient de mixer te worden gezuiverd zie het deel ZUIVERING VAN DE MIXER 94 De cappuccino en latte toetsen initiëren EF EJTUSJCVUJF WBO P NM JOEJFO F FFONBBM JOHFESVLU XPSEFO FO P NM JOEJFO F UXFFNBBM JOHFESVLU XPSEFO Wannee...

Page 95: ...oorzichtig om de mixer alleen aan te zetten voor de bereiding van warme dranken wanneer deze helemaal omlaag is ge bracht en in een beker is geplaatst Reinig en ontsmet alleen met de mixer in de spe ciale mixer ontsmettingsbeker 6 Het volgende bericht zal op het scherm verschijnen Ontsmetten van de mixer zie ZUIVERING VAN DE MIXER 94 BEREIDING VA N EEN LATTE LATTE MACCHIATO 8 12 oz 240 360 ml F CF...

Page 96: ... VAN DE MIXER Start nooit de procedure voor de zuivering van de mixer zonder dat de melkopschuimer eerder in de beveiliging geplaatst werd 1 Breng de mixer helemaal omhoog en haal de mixer ontsmettingsbeker en de houder door middel van een draaibeweging helemaal weg en zet ze onder de mixerkop Reinig en ontsmet alleen met de mixer in de spe ciale mixer ontsmettingsbeker 6 Het volgende bericht zal ...

Page 97: ...res somodule in te drukken en ingedrukt te houden gedurende meer dan 3 seconden 3 Wacht tot de automatische spoelbeurt ten einde is OEJFO OPEJH JT IFU NPHFMJKL EF BVUPNBUJTDIF TQPFMDZDMVT UF POEFSCSFLFO EPPS OPHNBBMT PQ EF automatische spoelknop te drukken REINIGING VAN DE TUIT VAN DE ESPRESSODISPENSER Verwijder de dispensertuit door deze naar beneden te trekken Reinig met koud of lauw water waarn...

Page 98: ...ekbak opvangbak voor gebruikte capsules Wanneer de bak verwijderd is zal het apparaat de cap suleteller opnieuw instellen 2 Verwijder de bak waarna u de gebruikte capsules verwijdert Verwijder de resterende vloeistof 3 Scheid de onderdelen en reinig deze met koud of lauw water laat ze drogen waarna ze op de correcte wijze dienen teruggeplaatst te worden REINIGING VAN DE LEKBAK VAN DE CAPPUCCINATOR...

Page 99: ...aadhendel voor capsules naar beneden Vul bij met vers drinkwater en herhaal het laden van het hydraulisch circuit Controleer de wijze waarop de Brita filter werd ingebracht en herhaal het laden van het hydraulische circuit zie de instructies meegeleverd met de filter De espresso is niet warm genoeg De kopjes zijn koud Verwarm de kopjes voor door ze te vullen met warm water De espresso loopt te snel ...

Page 100: ...nigen dient u er steeds voor te zorgen dat de stroomtoevoer onderbroken is en te wachten tot het apparaat afgekoeld is Gebruik nooit alkalische schoonmaakmiddelen oplosmiddelen alcohol of agressieve substanties Het apparaat mag niet in water gedompeld worden Het is ten strengste verboden te knoeien met de interne onderdelen van het apparaat Gebruik het water in het reservoir niet om te koken Bewar...

Page 101: ...NOTE ...

Page 102: ...NOTE ...

Page 103: ...NOTE ...

Page 104: ...absoluteaftersales it Model LB 1200 10062897 00 03 12 ...

Reviews: