background image

KLIX

®


Operator’s Manual

Page 12

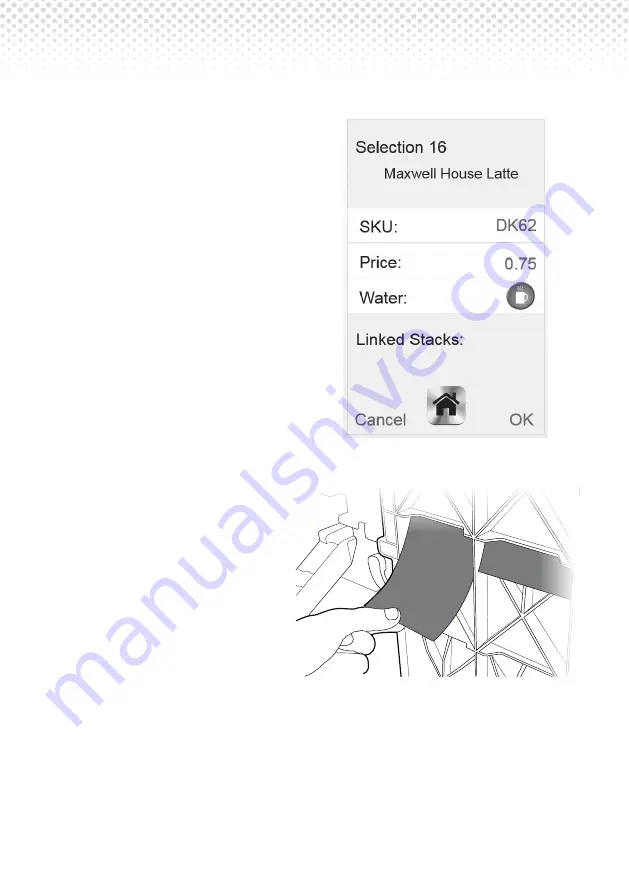
8.  The display will change to 

show the new drink. Make 

sure the drink name and drink 

water options match the label.

9.  If the price of the drink needs 

to change, select ‘Price’ and 

enter the new price.

10. Remember to ensure that 

the new drink label has the 

correct price sticker attached 

to the label before inserting 

the label in the door. 


11.  Always ensure the new 

product label is inserted into 

the correct slot on the back of 

the door panel. The selection 

number should correspond 

to the carousel number of 

the drink you are changing. 

Remember to price the label 

before inserting.

12. A green pre-printed sticker 

with the drink name should 

be affixed to the outside of 

the black plastic cup stack holder in the machine. This will help you and 

everyone else filling up the machine to know which product has to be 

filled in which stack.  To keep this information up to date, please remove 

the older sticker before fitting the new one. 

Summary of Contents for KLIX Series

Page 1: ...KLIX Operator s Manual Lavazza Professional UK Limited 2019 Issue 03C ...

Page 2: ...Welcome Welcome please write your important contact details here Machine Model Serial No Customer Service Tel Your Account No Web www lavazzapro co uk ...

Page 3: ... Specifications 4 Your Lavazza Professional KLIX Machine 5 Setting to Free Vend or Pay Vend 6 Payment Systems 7 Changing a Drink s Price 8 Round Buying 9 Machine Audits 10 Water Filter 11 Troubleshooting 12 Contact Details Page 1 2 5 6 15 16 17 19 20 21 24 26 Please read and save these instructions ...

Page 4: ...the machine or machine specification at any time Whilst every effort has been made to ensure that the information in this operator s manual is accurate Lavazza Professional disclaims any liability for any direct or indirect losses arising from use or reliance on the information included in this operator s manual For information about the availability of translated versions of this operator s manua...

Page 5: ...f freezing occurs contact Lavazza Professional Customer Service department immediately The machine can be used by persons including children from 8 years with reduced physical sensory or mental capabilities or lack of experience and knowledge if they have been given supervision or instruction concerning use of the machine in a safe way and understand the hazards involved Children should be supervi...

Page 6: ...l supply and contact Lavazza Professional Customer Service department immediately Never power the machine using extension cables This machine must not be cleaned using a pressurised water system This machine must not be installed near a pressurised water system Always ensure the machine is installed on a level surface Failure to do so could result in injury or damage to machine New hose sets suppl...

Page 7: ... of the user Caution This symbol indicates the need to consult the operating instructions provided with the appliance WARNING A potential risk exists if the operating instructions are not followed Hot Surface This symbol indicates the presence of a hot surface WARNING Hot surface inside contact may cause burn Do not touch High Voltage This symbol indicates the presence of electric shock hazards En...

Page 8: ...5 2 45 2 65 Protection Class Class I Class I Class I Class I Operating Ambient C 5 30 5 30 5 30 5 30 Water Pressure MPa 0 1 0 7 0 1 0 7 0 1 0 7 0 1 0 7 Transport Weight kg 103 134 109 131 Machine Size W x D x H mm 630 x 710 x 1830 630 x 710 x 1830 630 x 710 x 1830 630 x 710 x 1830 Operating Temperature ᵒC 5 30 5 30 5 30 5 30 Storage Temperature ᵒC 5 to 50 5 to 50 5 to 50 5 to 50 Ready to Vend from...

Page 9: ...p vending machine offering great tasting hot and cold drinks The in cup system ensures consistent product quality reliability simplicity and choice Product selection labels Coin slot Coin return knob Coin return tray Touch screen display KLIXKEY slot Door lock handle Key External Components of the KLIX Machine ...

Page 10: ...tch Product labels Coin mechanism Water filter Cash box Product label holder Waste bucket Chiller flush switch Drip tray Drum assembly Carousel rotate switch Dispense nozzle Hot tank drain tube Splash plate Carousel Key Internal Components of the KLIX Machine KLIX Momentum only ...

Page 11: ... be cleaned weekly Never use solvents to clean the coin mechanism 4 1 Cleaning and maintenance 4 2 Operator Menu In order to view or change any of the drink settings change prices or view the machine audits you will need to use the Operator Menu This menu is designed to give a user friendly interface for your KLIX machine The Operator Menu is displayed on the touch screen automatically when the do...

Page 12: ...ion button with the same number stamped on the back of the door where the labels are inserted 4 3 Product Re Filling 2 Checkthereferenceonthenew cup stack packaging to ensure the correct drink is being installed If there are existing cups in the stack remove the top lid from the existing stack of cups and add the new stack Note When filling with new cup stacks always leave an approximate 1cm gap b...

Page 13: ...olve to check the stock level in each stack Labels will be illuminated on every drink selection that has sufficient product available 1 With the door open press the selection button of the drink you want to change When you press the button the selection will be lit and the carousel will rotate to bring that selection s stack around to the filling point A inside the machine 2 Remove any old product...

Page 14: ...wing the current drink settings for the button selected 6 On the Touch Screen Display press the SKU option The display will show a list of all available drink codes in alphabetical order Scroll through the list and select the SKU code that matches the code on the new drink label 7 The code will be a 4 character code printed on the back of the label next to the drink name 4 4 Changing a Drink Cont ...

Page 15: ...ensure the new product label is inserted into the correct slot on the back of the door panel The selection number should correspond to the carousel number of the drink you are changing Remember to price the label before inserting 12 A green pre printed sticker with the drink name should be affixed to the outside of the black plastic cup stack holder in the machine This will help you and everyone e...

Page 16: ... one position then the machine will Link the stacks and vend from these stacks in rotation when any of the linked selection buttons are vended from This maintains the maximum freshness of the product by using stacks of identical product evenly When there are linked stacks these will be shown on the drinks setup screen when a drink with linked stacks is selected In the example below SC17 is in all ...

Page 17: ... claims Lavazza Professional UK recommends that KLIX vending machines are left continuously switched on however if machines are offline for storage or offline for prolonged periods it is recommended to consult with Lavazza Professional Customer Service or visit www lavazzapro co uk for recommissioning of machine To empty the cash box if fitted open the machine door Unlock and lift the cash box tow...

Page 18: ...uction poster inside the door see illustration to the right To set the machine to Free Vend or Pay Vend simply put the switch in the orientation shown Note The Free Pay vend switch can be disabled by altering the configuration settings Call Lavazza Professional Customer Service or visit www lavazzapro co uk for further advice and assistance FREE PAY ...

Page 19: ...e fitted with one of the following payment systems no payment coin operated KLIXKEY cashless system and a range of cashless systems Please contact Lavazza Professional Customer Services or visit www lavazzapro co uk for advice on what payment system would suit your needs ...

Page 20: ... save the new setting A pre printed price label must be placed on the front of the selection label showing the correct price If possible remove the old price before affixing a new one Single machine price You can set the price of a drink via the drink setup screen for each drink or through the Price Setting menu if you want to change multiple prices To set the prices of drinks without selecting ea...

Page 21: ...If you want to set all the drinks to the same price set the price for selection 1 and then press the All to Btn 1 option All the prices will now be set the same as Button 1 Remember to update the price stickers A pre printed price label must be placed on the front of the selection label showing the correct price if possible remove the old price before affixing a new one ...

Page 22: ...efore choosing another drink queuing drinks up in a round If the machine is a pay machine and change will be dispensed to the customer then the change will automatically be dispensed after the last queued up drink is vended If only one drink is selected i e no drinks are queued up then the change will be paid out when the first drink is vended If Round Buying mode is not required then this can be ...

Page 23: ...oor and select the Sales Audits option from the main menu Running audits These audit totals reflect the number of vends since the machine was first installed and cannot be zeroed Interim audits These audit totals can be zeroed and the vales shown are the values since the audits were last zeroed ...

Page 24: ...rded before they are a year old and fitted according to instructions outlined below failure to replace the filter as advised will result in only standard water permitted to be dispensed from the machine 1 Cold machines only vend a cold drink and set to one side This will be used to compare and test the water levels once a new filter is fitted Vend one cup 2 Open the machine door and remove the old...

Page 25: ...al Page 22 3 Remove the packaging from the new filter Remove the yellow plastic cap in the top of the filter 4 Insert the filter in the filter head and twist in a clockwise direction until the filter is screwed in tightly ...

Page 26: ... have an automatic time out This will occur if the Flush Button is held for longer than one minute If this happens shut the door of the machine This re sets the machine and the Flush Procedure can be resumed 7 Vend another cold drinks as in Step 1 Check the water levels are consistent If the levels are different check the filter is screwed in tightly to filter head Repeat step 6 onwards 8 If the c...

Page 27: ...ll See section 4 5 Emptying the cash box Machine may be set in Free mode Check the Free Pay mode switch refer to Key Internal Components of the Momentum Element diagram for switch location is on Pay Contact Lavazza Professional Customer Service department 11 1 General Sorry Machine out of order Check message on display see table 11 3 Additional messages may be shown when the door is opened Please ...

Page 28: ... Bucket is fitted correctly between the brackets and check bucket is not full of water Close the door Hot Tank Not Filling Check Water is On Check if water supply to machine is on and that adequate water pressure is present Drum Jammed Remove Drum and Clear Cups Remove drum and clear any obstructions Replace the drum by following the instructions on the Cleaning instruction label Replace Drum and ...

Page 29: ...azza Professional UK Limited Armstrong Road Basingstoke Hampshire RG24 8NU France fr serviceclient lavazzapro com 01 41 84 51 07 Lavazza Professional France ROISSYTECH 2 RUE DU CERCLE BP 11484 95708 ROISSY CDG CEDEX Germany de kundenservice lavazzapro com 04231 779 4100 Lavazza Professional Germany GmbH MAX PLANCK STRASSE 79 27283 VERDEN DEUTSCHLAND ...

Page 30: ...Notes ...

Page 31: ...KLIX Operator s Manual ...

Page 32: ...KLIX Manufactured in 2019 All information in this document was accurate on the date of printing Lavazza Professional UK Limited 2019 70 41 3330 Issue 03C ...

Reviews: