

LAUNCH
LAUNCH
1
.
The DLC (Data Link Connector) is typically a connector
where diagnostic code readers interface with the vehicle's on-board computer.
2
.
3
.
5
.
To
perform
vehicle
diagnosis
via
data
cable
,
connect
the
B-shaped
terminal
of
the
data
cable to the HD module and other end to the diagnostic tool.
Locate the vehicle’s DLC:
The
DLC location varies from vehicle to vehicle. It is generally located in driver’s cab. If
no DLC is found, please refer to Automobile Repair Manual.
Switch the ignition on.
For vehicles equipped with OBDII management system, plug one end of the
diagnostic cable into the vehicle’s DLC, and the other end into the diagnostic
socket of the HD module, and then tighten the captive screws.
For vehicles not equipped with OBDII management system, it is necessary to use
the corresponding adaptor cable, and then follow one of the methods below to
make connection:
1
Connections
2
3
2
4
HD
module
Diagnostic
cable
Cigarette
lighter
Battery
clamps
cable
Adaptor
cable
To
vehicle
'
s
DLC
To
Cigarette
lighter
receptacle
To
vehicle
battery
Power
adaptor
To
AC
outlet
A
B
C
If you had a diagnostic tool of 12V passenger car configuration and intend to
experience the diagnosis of commercial vehicles, follow the steps described below to
activate the module:
Note
:
Please
make
sure
that
the
diagnostic
tool
is
properly
connected
to
the
Internet
before
proceeding
this step.
1
.
Launch
the
application, then tap -> “Profile” -> “Activate Connector”.
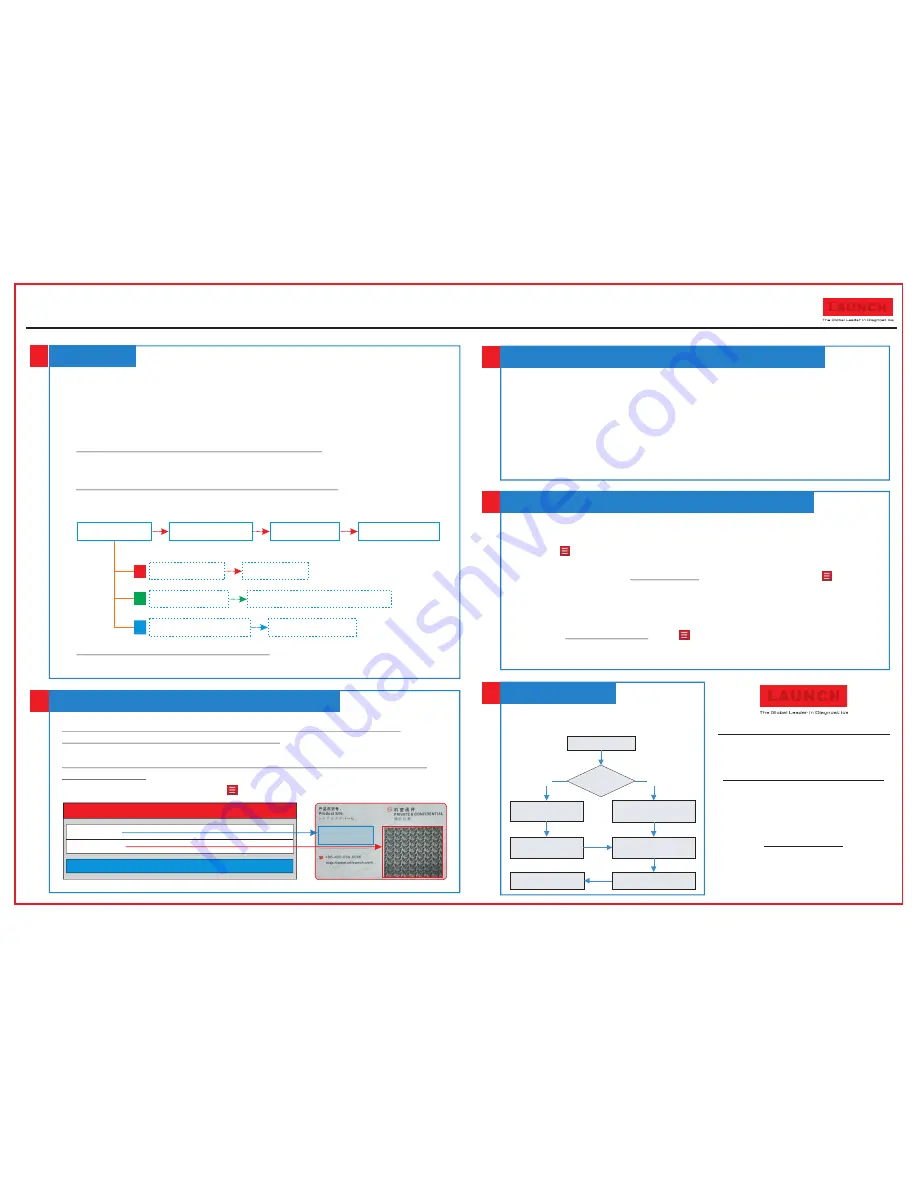
2
.
Input the Product S/N and Activation Code, which can be obtained from the
included Password Envelope, then tap “Activate” to activate it and advance to
the update center.
3
.
Tap “Update” to download and install it.
4. Once the module is activated, a new “Heavy-duty” tab appears on the
diagnostic main menu screen.
*Note: Once newer software is detected, a pop-up message will prompt you. In this case,
tap “Update now” to keep synchronized with the latest version.
If several VCI connectors and HD module are activated on the diagnostic tool, a
list of connectors will be displayed in the “My Connector”, which can be accessed
by tapping -> “Profile”-> “My Connector”.
If you want to switch from a passenger car to a commercial vehicle, enter “My
Connector” -> select the HD module S/N(starting with 98649) -> tap to
navigate to the diagnostic main menu -> connect the VCI module, diagnostic tool
and vehicle -> tap “Heavy-duty” tab to select the corresponding vehicle model ->
follow the on-screen prompts to start a diagnostic session.
To switch from a commercial vehicle to a passenger car, enter “My Connector” ->
select the VCI connector S/N -> tap to navigate to the diagnostic main menu
-> connect the VCI module, diagnostic tool and vehicle -> Use VINScan(or
manual diagnosis) to start diagnosis.
Activate
X-431 HD
Module & Download Software(Cont.)
Toggle Between Passenger and Commercial Vehicles
Activate
X-431 HD
Module & Download Software
Start Diagnostics
Follow the sequence below to start a new
diagnostic session.
X-431 HD
Module
Quick Start Guide
Activate Connector
Serial Number
Activation Code
Activate
Tap
“
Diagnostic
”
Tap
“
Heavy-duty
”
to
select vehicle model
Select test system
Select test function
Refer to Section 2 to
activate it
Is HD module
activated?
No
Select the module S/N
from
“
My Connector
”
Yes
Download diagnostic
software
*Note
:
Pictures
illustrated
herein
are
for
reference
only and this Quick Start Guide is
subject to change without written notice.
THANK YOU FOR CHOOSING LAUNCH!
If you have any questions or comments
please forward them to:
LAUNCH Tech USA Product Support
Phone: 877-528-624 xt: 4
Fax: 562-463-1590
1820 S. Milliken Ave. Ontario, CA 91761
Monday - Friday 5 am - 5 pm PST
9
Service & Repair
Phone: 877-528-624 xt: 5
Monday - Friday 8 am - 5 pm PST
Please visit our public form @
http://launch.activeboard.com
9


