background image

13

EN

LAUNCH


Professional 123E User Manual

*Note: To detect more and accurate VINs, a stable network connection is highly 

recommended for this function.
*CAUTION: Don’t connect or disconnect any test equipment with ignition on or engine 

running.

A. 

Once the system successfully obtains the VIN (Vehicle Identification Number) 

information of the currently identified vehicle, it will continue scanning the 

vehicle systems. After the scanning is complete, a diagnostic report will be 

automatically generated and sent to your email box (if bound). 

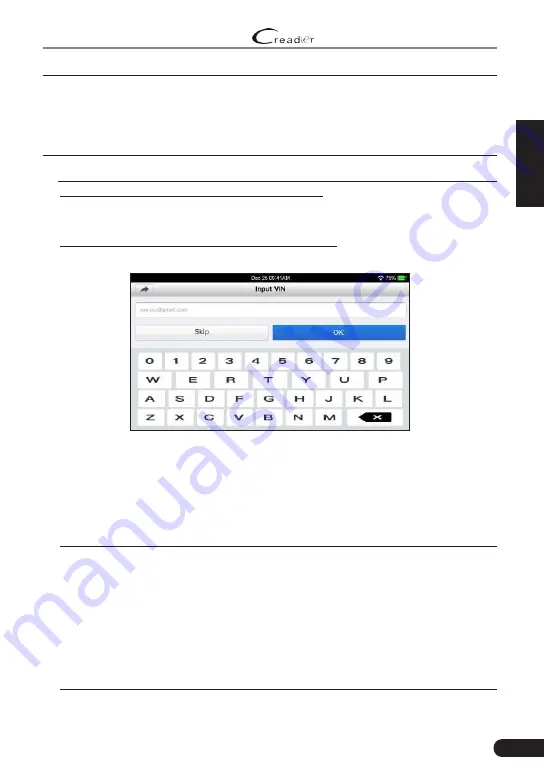
B. If the tool failed to access the VIN information

, the screen will display as 

below:

Fig. 5-2

  Input the VIN, and tap “OK”, the system will automatically identify the vehicle 

model. If the vehicle VIN is successfully decoded, it will perform auto-

diagnosis until a diagnostic report is automatically output. Otherwise it will 

enter manual diagnosis mode. For details on manual diagnosis, see Chapter 

5.2.2.

*Notes: 

•  The most recognizable location for this number is in the top left corner on 

the vehicle’s dashboard. Other locations include the driver’s door or post, 

and the firewall under the hood. 

•  In general, vehicle identification numbers are standardized - all contain 17 

characters. VIN characters may be capital letters A through Z and numbers 

1 through 0; however, the letters I, O and Q are never used in order to avoid 

mistakes of misreading. No signs or spaces are allowed in the VIN.


Summary of Contents for Creader Professional 123E

Page 1: ...NCH trademarks service marks domain names logos and company names referred to in this manual are either trademarks registered trademarks service marks domain names logos company names of or are otherw...

Page 2: ...s as a result of accident misuse or abuse of this unit or unauthorized modifications repairs or alterations to this unit or failure to strictly comply with LAUNCH operating and maintenance instruction...

Page 3: ...e harmful interference and 2 this device must accept any interference received including interference that may cause undesired operation This device has been evaluated to meet general RF exposure requ...

Page 4: ...3 Product Descriptions 7 3 1 Outline of Creader Professional 123E 7 3 2 Technical Specifications 8 3 3 Accessories Checklist 8 4 Initial Use 9 4 1 Charging The Tool 9 4 2 Getting Started 9 4 3 Job Men...

Page 5: ...7 7 User Manual 27 8 Settings 28 8 1 Units of measurement 28 8 2 Automatic detection on connect 28 8 3 Display Brightness 28 8 4 Sound 28 8 5 Network 28 8 6 Date Time 28 8 7 Language 29 8 8 Email Set...

Page 6: ...rs manual diagnosis is also available Diagnosis functions include Version Information Read DTCs Clear DTCs and Read Data Stream supports 3 display modes Value Graph and Merged OBD II Diagnosis 10 mode...

Page 7: ...e system will also store important information about the detected malfunction so that a technician can accurately find and fix the problem Here below follow three pieces of such valuable information 1...

Page 8: ...d computer The DLC is usually located 12 inches from the center of the instrument panel dash under or around the driver s side for most vehicles If Data Link Connector is not located under dashboard a...

Page 9: ...s emissions control strategy Continuous Monitors Some of the vehicle components or systems are continuously tested by the vehicle s OBD II system while others are tested only under specific vehicle op...

Page 10: ...monitor has not been completed the monitor status will be reported as Not Complete or Not Ready In order for the OBD monitor system to become ready the vehicle should be driven under a variety of norm...

Page 11: ...been erased from the PCM s memory or after the battery has been disconnected Running through a vehicle s complete drive cycle will set the readiness monitors so that future faults can be detected Driv...

Page 12: ...1 2 3 4 5 Figure 3 1 No Name Descriptions 1 Charging LED Red means Charging and Green means Fully charged 2 LCD Indicates test results 3 5V Charging port To connect to external DC power for charging t...

Page 13: ...Screen 5 touch screen RAM 1G ROM 8GB OBD II input voltage range 9 18V Charging via DC 5V charging cable or Diagnostic cable through connection to vehicle s DLC Dimension 228mm x 125mm x 34 5mm Workin...

Page 14: ...hicle s DLC Once the charging LED illuminates solid green it indicates that the battery is fully charged 4 2 Getting Started If it is the first time you have used this tool you need to make some syste...

Page 15: ...e and time and navigate to step 6 6 After the network connection is done tap Next Step to configure email address Input the email address and tap Next Step to go to next step Note You are strongly rec...

Page 16: ...This function also can be done by performing OBD II Diagnosis I M Readiness For detailed operation please refer to Chapter 5 3 OBD II This option presents a quick way to check for DTCs isolate the cau...

Page 17: ...refer to Automobile Repair Manual 3 Plug one end of the diagnostic cable into the DB 15 connector of the tool and tighten the captive screws Connect the other end to the vehicle s DLC Diagnostic Cabl...

Page 18: ...play as below Fig 5 2 Input the VIN and tap OK the system will automatically identify the vehicle model If the vehicle VIN is successfully decoded it will perform auto diagnosis until a diagnostic rep...

Page 19: ...roceed Refer to the flowchart illustrated as below to diagnose a vehicle manually Select Diagnose Automatic Note This mode allows your tool to scan the vehicle test system automatically Manual Select...

Page 20: ...ealth Report Quick Test This function varies from vehicle to vehicle It enables you to quickly access all the electronic control units of the vehicle and generate a detailed report about vehicle healt...

Page 21: ...ide it Enter Tap to select other test functions For detailed operations refer to Chapter 5 2 2 2 System Selection Report Tap to save the diagnostic result as a report Clear DTC Tap to clear the existi...

Page 22: ...e location of the problem This information can be found in the vehicle s service manual On screen Buttons Freeze Frame When an emission related fault occurs certain vehicle conditions are recorded by...

Page 23: ...code s will appear again and the check engine light will illuminate as soon as the problem that cause the DTC to set manifests itself D Read Data Stream This option retrieves and displays live data an...

Page 24: ...s in waveform graphs Combine this option is mostly used in graph merge status for data comparison In this case different items are marked in different colors On screen Buttons Tap it to view the wavef...

Page 25: ...to erase the codes from the vehicle Before performing this function please be sure the vehicle s ignition key is in the ON position with the engine off Notes Before performing this function make sure...

Page 26: ...low 1 EGR System 2 O2 Sensors 3 Catalyst 4 Evaporative System 5 O2 Sensor Heater 6 Secondary air Injection 7 Heated Catalyst 8 A C system I M refers to Inspection and Maintenance that is legislated by...

Page 27: ...rt the Oxygen Sensors screen 7 On board monitor test This function can be utilized to read the results of on board diagnostic monitoring tests for specific components systems 8 EVAP System Test The EV...

Page 28: ...view the details of the last diagnostic report To delete certain diagnostic history select it and then tap Delete To delete all historical records tap Select All and then tap Delete Tap Quick access...

Page 29: ...lar basis This function requires a stable network connection Tap Upgrade on the Job menu to enter the update center By default all diagnostic software is selected To deselect certain software tap Unse...

Page 30: ...it 7 2 Diagnostic Record If user records the running parameters or waveform graphs while reading data stream it will be saved as diagnostic records and appear under this tab Tap Diagnostic Record to...

Page 31: ...diagnostic problems to us for analysis and troubleshooting Tap Feedback the following 3 options will be displayed on the left column of the screen A Feedback Tap a tested vehicle model to enter the fe...

Page 32: ...the handset gets a stable network signal it will be uploaded to the remote server automatically 7 6 Firmware Fix Use this item to upgrade and fix diagnostic firmware During fixing please do not cut po...

Page 33: ...u adjust the volume and other sound settings 8 5 Network Note Once WLAN is set as ON the tool will consume more power While it keeps unused please set it off to save power While WLAN keeps unused plea...

Page 34: ...automatically receiving the diagnostic reports 8 9 Recovery Use this item to reset this tool to the default factory setting Warning Resetting may cause data loss Before doing so please be careful to...

Page 35: ...r is in proper temperature 4 What to do if the system fails to start auto VIN detection Please check the following possible reasons Whether the tool is properly connected to the vehicle s DLC Whether...

Page 36: ...AUNCH Professional 123E User Manual 7 What if the tool cannot be switched on even after a period of recharging Please recharge it for at least 3 hours until the power LED lights up then it can be swit...

Page 37: ...by LAUNCH No agent employee or representative of LAUNCH has any authority to bind LAUNCH to any affirmation representation or warranty concerning LAUNCH automotive meters except as stated herein Order...

Reviews: