


Quick Start Guide
Quick Start Guide
LAUNCH
LAUNCH
5.
Vehicle Connection
Tap on
Diagnose
Select vehicle model
Select software version
Select test system
Select test function
Note:
you are suggested to check for updates on a frequent
basis and keep synchronized with the latest available
software.
For more detailed operations, please refer to the
User Manual.
To enjoy more capabilities and functions,
Note:
For commercial vehicles, refer to the following connection method to proceed. For
passenger vehicles, replace the
Non-16pin Adapter Cable
with
OBD I Adapter
+
Non-16pin Connector
(for passenger vehicles). Other connections shall also apply.
Preparation
Before diagnosing, please make sure the
following:
The ignition is turned on.
The vehicle battery voltage is 9
-
18Volts or 11-
36Volts
.
hrottle should be in a closed position.
The t
6.
Start Diagnostics
This tool supports three kinds of diagnosis approaches: Smart Diagnosis, Manual Diagnosis
and Tech to Tech Remote Diagnosis.
Smart Diagnosis(AutoDetect):
Through simple Bluetooth communication between the tablet and VCI, the system will guide
you directly to the fix and help you eliminate guesswork, without step-by-step manual menu
selection.
Manual Diagnosis:
You need to manually select the menu-driven command.
Tech to Tech:
This helps repair shops or mechanics to diagnose a remote vehicle, and launch instant
messages, allowing for improved efficiency and faster repairs.
For new users, the Manual Diagnosis is recommended as follows:.
1.
Charging & Turning On
2.
Changing
Language
4.
Register & Update
3.
Wi-Fi Setup
4.
Register & Update(Cont.)
1. Plug one end of the included power adaptor into the charging port of the tablet, and then
other end into the AC outlet.
2. Once the battery is fully charged, disconnect the power adaptor from the AC outlet.
tablet
3. Press
the
[
POWER]
button on the
, the system starts initializing and then enters the
home screen.
The tablet supports multiple languages. To change the language of the tool, please do the
following:
1. On the home screen, tap on
Settings -> System -> Language & input -> Languages
.
2. Tap on
Add a language
, and then choose the desired language from the list.
3. Tap and hold the desired language and drag it to the top of the screen and then release it,
the system will change into the target language.
The tablet has a built-in Wi-Fi module that can be used to get online. Once you're online, you
can register your tool, update the diagnostic software & APK, surf the Internet and send email
on your network.
-> Network & Internet -> WLAN
, the tablet
, the tablet
1. On the home screen, select
Settings
.
2
.
Select
the
Wi
-
Fi
switch
to
ON
will
start
searching
for
available
wireless
networks.
3
.
Select
a
wireless
network
:
If
the
chosen
network
is
open
will
connect
automatically.
If
the
selected
network
is
encrypted
a
network
password
will
need
to
be
entered
.
1. Launch App:
tap on the application icon on the home
screen, and then tap on
Login
on the upper right
corner of the screen. Tap on
New Registration
to go
to Step 2.
2.
Create an App Account:
Input the information
(items with * must be filled)
and then tap on
Register
. Refer to Figure
B
.
3.
Activate VCI: Input the Product S/N and Activation Code
(can be obtained from the
password envelope)
, and then tap on
Activate
. Refer to Figure
C
.
4.
Finish Registration: To download the diagnostic software, tap on
Yes
to navigate to the
download page. Tap on
No
to download and install it later.
On the download page, tap on
Update
to start downloading until it is complete.
Select
Country
*
*
Confirm
Password
*
Password
*
Username
*
CAPTCHA
CAPTCHA
Register
2
3
1
Create an Account
Activate VCI
Finish Registration
Register
B
Create an Account
Activate VCI
Finish Registration
Register
1
3
2
Serial
Number
Activation
Code
Where
is
my
activation
code
?
>> Skip
Activate
C
Register
1
2
3
Yes
No
Congratulations
!
You
have
registered
successfully
.
Do
you
download
vehicle
software
now
?
Create an Account
Activate VCI
Finish Registration
D
Login
Username
Password
Retrieve
password
New Registration
Login
A
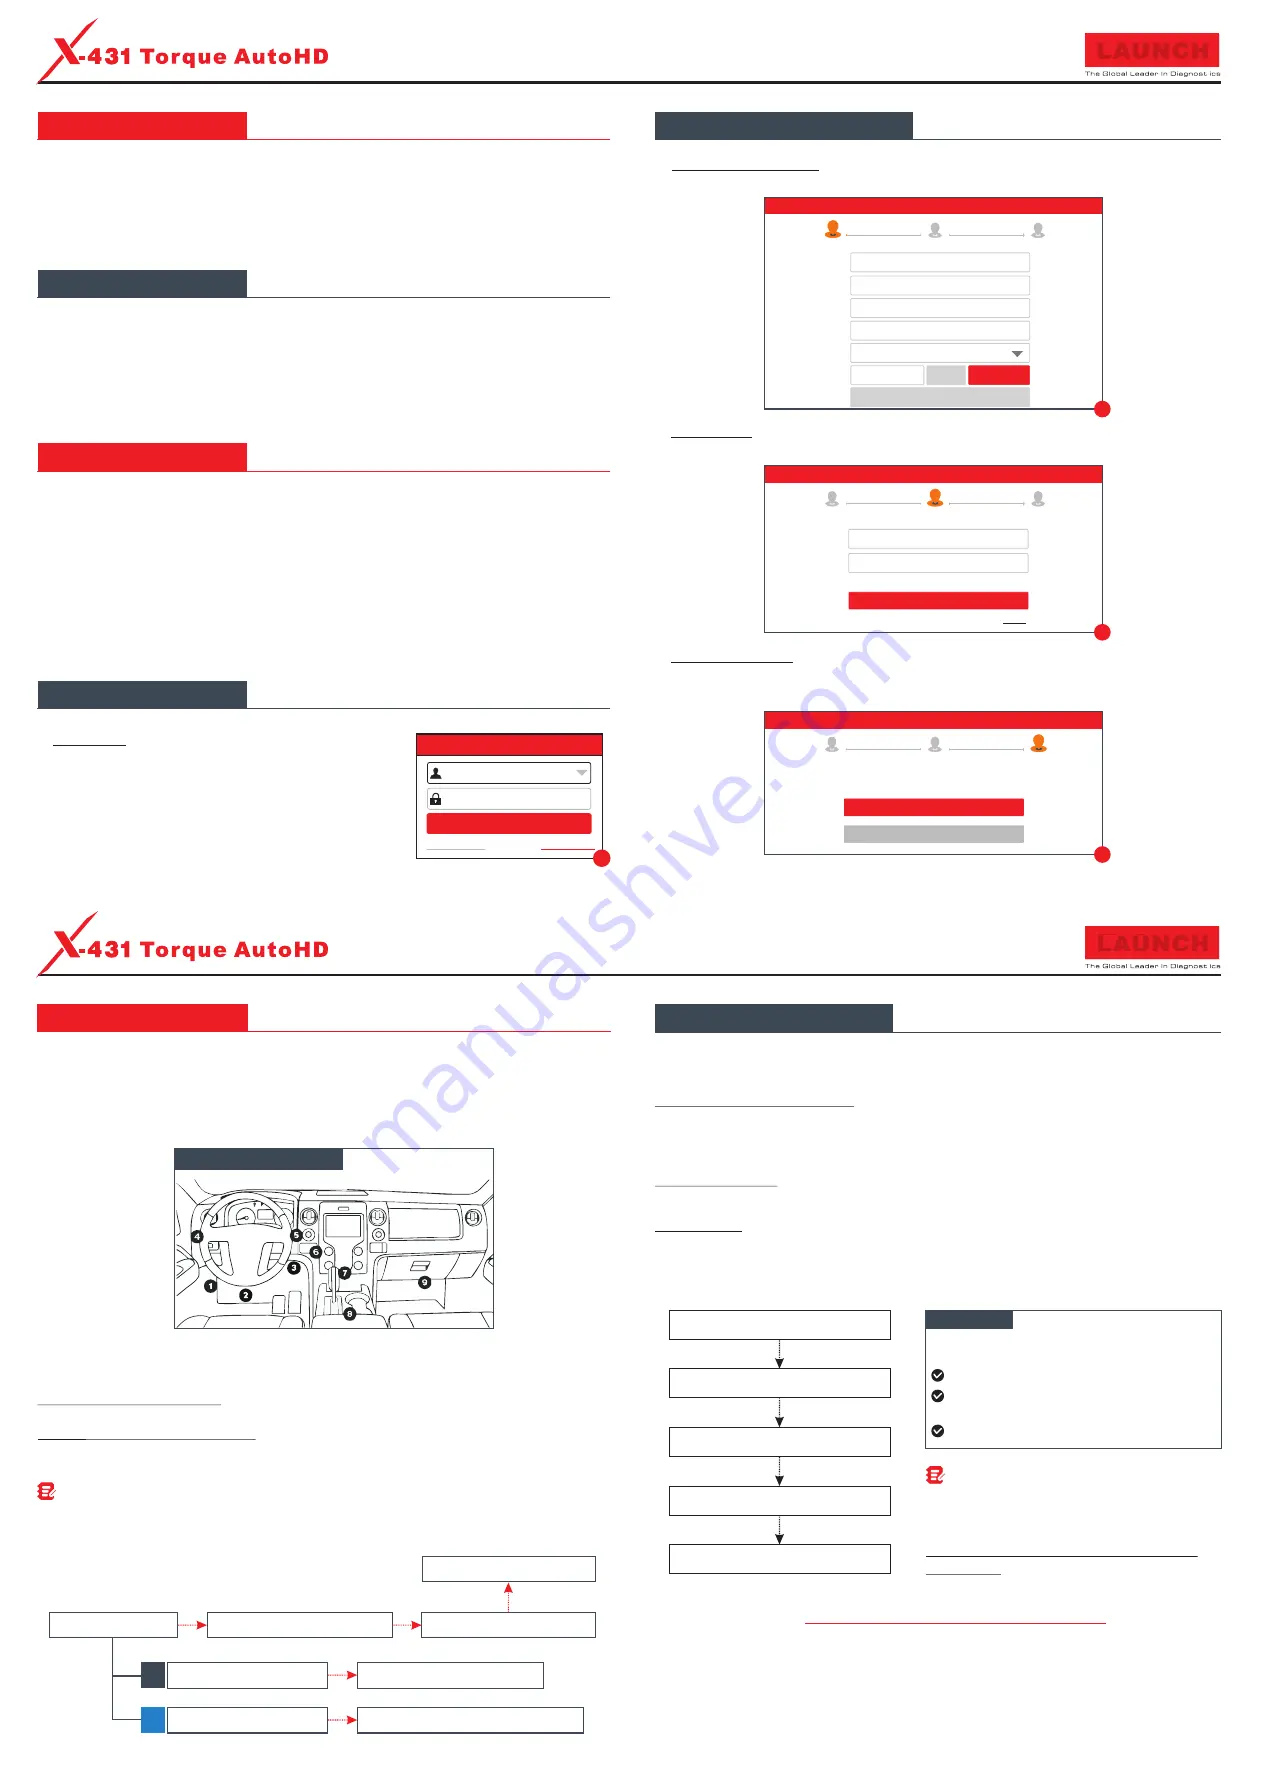
1. Locate vehicle’s DLC
The DLC (Data Link Connector) is typically a connector where diagnostic code readers
interface with the vehicle's on-board computer.
For passenger vehicles,
For commercial vehicles, it is generally located in the driver's cab.
If the DLC cannot be found, refer to the vehicle’s service manual for the exact location.
2. Vehicle connection
If the tool is testing a vehicle equipped with OBD II diagnostic
socket, please use the diagnostic cable directly.
B. Non-
For vehicles with non-OBD II diagnostic socket, a non-
16pin adapter cable is required. Follow any one of the following methods below to make
connection:
this usually located on driver’s side, about 12 inches away from the
center of dashboard.
A. OBD II Vehicle Connection:
OBD II Vehicle Connection:
A
B
VCI Module
To vehicle’s DLC
Non-16pin Adapter Cable*
To
Cigarette Lighter Receptacle
To
Vehicle’s Battery
Diagnostic Cable
Cigarette Lighter
Battery Clamps Cable
Possible DLC
Location
THANK YOU FOR CHOOSING LAUNCH!
If you have any questions or comments please forward them to:
LAUNCH Tech USA Product Support
Phone: 877-528-6249 xt: 4
Fax: 562-463-1590
1820 S. Milliken Ave. Ontario, CA 91761
Monday - Friday 5 am - 5 pm PST
Service & Repair
Phone: 877-528-6249 xt: 5
Monday - Friday 8 am - 5 pm PST
Please visit our public form @
http://launch.activeboard.com
Summary of Contents for X-431 Torque Auto HD
Page 3: ...III ...


