13
DE/FR/IT/EN/ES/NL/CS/LT/PL/HU/RU/BG
DE
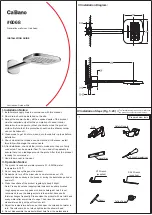
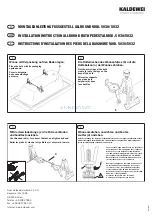
Ausrichten der Griffe
1) Geriffelten Einsatz (2) auf das Oberteil (1) setzen
2) Schraube (3) um
eineinhalb Umdrehungen
festziehen
3) Griff (4) ohne einzuklinken (in beliebiger Position) auf den Einsatz (2)
setzen
4) Griff (4) bis zum Anschlag
(in Schliessrichtung) drehen
- Der Kaltwassergriff schliesst im Gegenuhrzeigersinn
- Der Warmwassergriff schliesst im Uhrzeigersinn
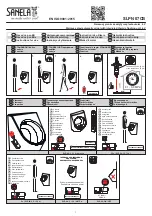
Wichtig:
Die Einstellungen 5) bis 10) erfolgen, ohne die Griffe (4)
definitiv einzuklinken
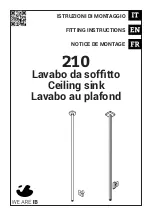
5) Griff (4) wegnehmen und wie in der (fig.1) gezeigt positionieren
6) Winkel (A) in Grad abschätzen
siehe (fig.2)
7) Griff (4) wegnehmen und den geriffelten Einsatz (2) anheben, bis er am
Schraubenkopf einklinkt
Distanz a)
8) Griff (4)
sorgfältig ohne einzuklinken
auf den Einsatz (2) setzen
Distanz
b) (Riffelungen um etwa die Hälfte ihrer Länge frei)
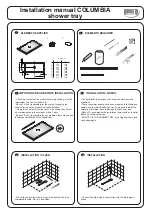
9) Das Ganze um die Anzahl Klicks (A) gleich den abgeschätzten Graden (A) in
Schliessrichtung drehen (siehe fig.1)
10) Griff (4) vollständig wegnehmen und horizontal ausgerichtet wieder aufsetzen
(Darauf achten, den Warmwassergriff nicht um 180° zurückzudrehen
eine
einzige Position gilt als ausgerichtet)
Wenn der Winkel (A) nicht richtig geschätzt worden ist, die Arbeitsgänge 5)
bis 9) wiederholen, bis die Griffe (4) genau ausgerichtet sind.
Sobald der Griff (4) genau ausgerichtet ist, diesen wegnehmen und die
Schraube (3) ganz festziehen und den Griff (4) definitiv am Einsatz (2)
einklinken
IT
Allineamento delle manopole
1) Infilare sul vitone (1) l’inserto scanalato (2)
2) Stringere la vite (3) di
un giro e mezzo
3) Infilare la manopola (4) sull’inserto (2) senza innestarla nell’arpionismo
(in posizione indifferente)
4) Girare la manopola (4) fino all’arresto
(attenzione al senso di chiusura)
- l’acqua fredda si chiude in senso antiorario
- l’acqua calda si chiude in senso orario
Importante:
Le operazioni di regolazione da 5) a 10) si eseguono
senza innestare definiti-
vamente
le manopole (4)
nell’arpionismo
5) Togliere la manopola (4) e posizionarla come indicato nella fig. 1
6) Valutare l’angolo in gradi (A)
vedi fig.2
7) Togliere la manopola (4) e sollevare l’inserto scanalato (2) finché si innesta
sulla testa della vite
distanza a)
8) Posare
delicatamente
la manopola (4) sull’inserto (2)
senza innestarla
nell’arpionismo
(scanalature libere per circa la metà della loro altezza)
9) Fare girare il tutto nel senso di chiusura di un numero di clic (A) pari al
numero di gradi stimati (A) (vedi fig. 1)
10) Togliere completamente la manopola (4) e poi rimetterla allineata orizzontal-
mente (Attenzione a non girare la manopola dell’acqua calda di 180°
una
sola posizione è allineata)
Se l’angolo (A) è stato sottovalutato, ripetere le operazioni da 5) a 9) finché
le manopole (4) sono perfettamente allineate
Una volta che la manopola (4) è perfettamente allineata, toglierla per
serrare a fondo la vite (3) e poi innestarla definitivamente sull’inserto (2)
EN
Alignment of the handles
(1) Place the grooved insert (2) onto the cartridge (1)
(2) Tighten the screw (3) a
turn and a half
(3) Place the handle (4) on the insert (2) (in any position) without enga-
ging it on the ratchet
(4) Turn the handle (4) up to the stop
(in the OFF direction)
- cold water turns off anticlockwise
- hot water turns off clockwise
Important
:
Adjustment operations (5) to (10) are carried out
without finally engaging
the
handles on the ratchet (4)
(5) Remove the handle (4) and position it as in (fig.1)
(6) Estimate the angle (A) in degrees
see (fig.2)
(7) Remove the handle (4) and raise the grooved insert (2) until it engages on
the screw head
distance (a)
(8)
Delicately
place the handle (4) on the insert (2)
distance (b)
without
engaging it
(leave about half the height of the grooves exposed)
(9) Turn the whole assembly in the OFF direction for a number of clicks (A) equal
to the estimated number of degrees (A) (see fig.1)
(10) Completely remove the handle (4) then replace it horizontally aligned (Take
care not to turn the hot water handle through 180°
only one position is
aligned)
If angle (A) was underestimated, restart operations (5) to (9) until the handles
(4) are perfectly aligned
Once the handle (4) is perfectly aligned, remove it to tighten the screw (3)
and finally click it onto the insert (2)
FR
Alignement des poignées
1) Introduire l’insert cannelé (2) sur le chapeau (1)
2) Serrer la vis (3) sur
un tour et demi
3) Introduire la poignée (4) sur l’insert (2) sans l’encliqueter.
(En position indifférente)
4) Tourner la poignée (4) jusqu’en butée
(attention au sens de
fermeture)
- l’eau froide se ferme dans le sens contraire des aiguilles d’une montre
- l’eau chaude se ferme dans le sens des aiguilles d’une montre
Important :
Les opérations de réglages 5) à 10) s’effectuent
sans encliqueter définitive-
ment
les poignées (4)
5) Ôter la poignée (4) et la positionner comme sur (fig.1)
6) Estimer l’angle en degrés (A)
voir (fig.2)
7) Ôter la poignée (4) et soulever l’insert cannelé (2) jusqu’à encliquetage sur la
tête de vis
distance a)
8) Poser
délicatement sans l’encliqueter
la poignée (4) sur l’insert (2)
distance b) (cannelures dégagées sur environ la moitié de leur hauteur)
9) Faire tourner l’ensemble dans le sens de la fermeture d’un nombre de clics
(A) égal au nombre de degrés (A) estimés (voir fig.1)
10) Retirer complètement la poignée (4) puis la reposer alignée horizontalement
(Attention à ne pas retourner la poignée d’eau chaude de 180°
une seule
position est alignée)
Si l’angle (A) a été sous-estimé, recommencer les opérations 5) à 9) jusqu’à
alignement parfait des poignées (4)
Une fois la poignée (4) parfaitement alignée, l’ôter pour serrer la vis (3) à fond
et l’encliqueter définitivement sur l’insert (2)
Montage und Ausrichten der Griffe
Montage et alignement des poignées
Montaggio ed allineamento delle manopole
Fitting and alignment of the handles
Montaje y alineación de los volantes
Montage en uitlijnen van de knoppen
Montáž a vyrovnání kohoutků
Rankenėlių montavimas ir išlygiavimas
Montaż i ustawienie uchwytów
A karok összeszerelése és beállítása
Монтаж и выравнивание ручек
Монтаж и центроване на дръжките