background image


SkyNode

® 

S100 Installation and Operation Manual


Page 

18

 of 

32


S100-400, R2.01


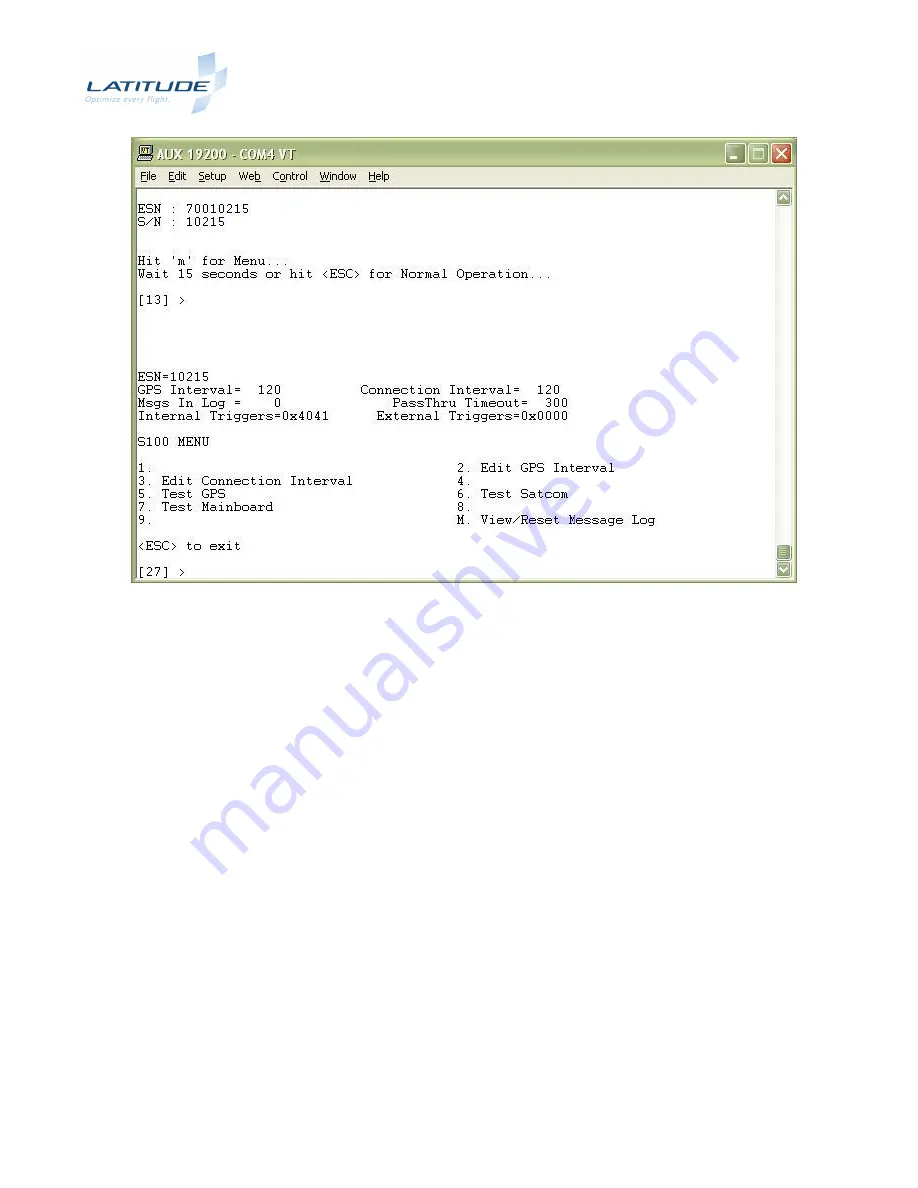
Figure 4 - S100 Terminal Menu 


The lower half of the screenshot above shows the options that the S100 Menu provides.  Each of the 
options shown can be accessed by pressing the number or letter to the immediate left of the option 
(e.g. Press ‘2’ to Enter a new GPS Interval). 
 
Immediately above the options are the current settings of the S100.  Accessing any of the provided 
Menu options will result in explicit instructions on how the option is used.   
 
The following sections provide a brief description of what the modifiable settings indicate. 


5.1.1.


 Edit GPS Interval 


The GPS Interval is the length of time between the S100’s processing and storing of a GPS position.  
The setting is provided in seconds.  Note 

– this value cannot be set to a greater value than the 

Scheduled Report Interval. 


5.1.2.


 Edit Connection Interval 


The Connection Interval is the length of time between regularly scheduled transmissions of GPS data.  
This setting is provided in seconds.  Note 

– this value must be a multiple of GPS Intervals and must be 

greater than the configured GPS Interval.  (e.g. If the GPS Interval is 60 s, the Scheduled Report 
Interval can be 60s, 120s, 180s, etc.). 


Summary of Contents for SkyNode S100

Page 1: ...YNODE S100 TRACKING SYSTEM P N S100 001 Document No S100 400 Creation Jan 24 2007 Revision 2 01 Jun 17 2014 LATITUDE TECHNOLOGIES CORPORATION 101 3375 Whittier Ave Victoria BC Canada V8Z 3R1 Tel 250 4...

Page 2: ...ES Information in this document is subject to change without notice Latitude Technologies reserves the right to change or improve their products and to make changes in the content of this material wit...

Page 3: ...all shipping charges duties and taxes for products returned to Latitude Technologies Corporation from outside of Canada This warranty shall not apply to damage resulting from Improper or inadequate m...

Page 4: ...7 S100 DIMENSIONS 10 4 INSTALLATION 11 4 1 INTRODUCTION 11 4 2 UNPACKING 11 4 3 AIRWORTHINESS INTEGRITY DESIGN CONSIDERATIONS 11 4 3 1 Cable Routing 11 4 3 2 Grounding 11 4 3 3 Wiring Integrity 11 4...

Page 5: ...igure 4 S100 Terminal Menu 18 List of Tables Table 1 Latitude Technologies KT006 Kit 9 Table 2 Latitude Technologies KT007 Kit 9 Table 3 S100 Input Interface 13 Table 4 S100 Output Interface 13 Table...

Page 6: ...may have occurred since the printing of this document Please contact Latitude Technologies Corporation for the most recent version 1 2 Acronyms and Abbreviations CPU Computer EMI Electromagnetic Inter...

Page 7: ...n recommendations of Section 4 and the Environmental Qualification Table of Appendix C 1 6 Safety Precautions There is no specific safety precaution as such associated with this equipment 2 Referenced...

Page 8: ...ns Length 6 80 inches 17 3cm Width 4 00 inches 10 2cm Height 1 10 inches 2 8 cm Weight 0 94 lbs 426 g Mounting Any direction Provide access for visibility of Status Indicators for Troubleshooting Mate...

Page 9: ...traight crimp for RG 400 cable M39012 55 4502 1 CN048 TNC straight plug for RG400 cable M39012 30 0503 1 550 0101 Ziploc bag 2 x 3 1 550 0103 Ziploc bag 4 x 6 Table 1 Latitude Technologies KT006 Kit T...

Page 10: ...SkyNode S100 Installation and Operation Manual Page 10 of 32 S100 400 R2 01 3 7 S100 Dimensions Dimensions are provided in inches Figure 2 S100 Outline Drawing...

Page 11: ...ge the airworthiness integrity of the aircraft being modified Special attention should therefore be taken in the following areas 4 3 1 Cable Routing While installing the additional wiring required for...

Page 12: ...is compatible with the Environment that the S100 was qualified to See Appendix C It is also mandatory that the S100 be installed so that the side of the unit that shows the status lights can be acces...

Page 13: ...to a squat switch Engine On Off when connected to the engine hours meter or many other possibilities Configuring discrete inputs is done remotely by Latitude Technologies Corporation for assistance ca...

Page 14: ...or communication The main RS 232 port is P2 the DB9 9 pin serial port on the front of the device this port outputs all the debug information and can also be used with Latitude API devices This is also...

Page 15: ...ge when the weight decreases a certain amount i e if the aircraft releases a load The analog inputs can measure DC voltage levels from 0V to 28V You may be required to change the firmware version on y...

Page 16: ...Systems antenna 3 5 dia passive GPS antenna TNC jack white Table 8 GPS Antenna Part Numbers 4 4 4 3 Iridium Antenna Latitude P N Manufacture s P N Description MD015 S3IR16RR P XTB 1 Antcom Iridium An...

Page 17: ...uble checked and verified whenever changes are made To determine what firmware version is currently installed and the unit s serial number power up the S100 and observe the serial port data output dis...

Page 18: ...n is used The following sections provide a brief description of what the modifiable settings indicate 5 1 1 Edit GPS Interval The GPS Interval is the length of time between the S100 s processing and s...

Page 19: ...messages will display all logged position messages that have not been transmitted successfully Deleting Resetting the log will clear any untransmitted position messages Deleting the log cannot be und...

Page 20: ...at all LED s are off on the S100 Table 10 Pre Test Checklist 6 2 Functional Test No Engine This test requires a facility to monitor the availability of the aircraft on the Latitude web site Prior to p...

Page 21: ...ngine s Turn all electrical and electronic equipment on the aircraft Landing Lights Taxi Lights Blowers XPDR ADF GPS etc While performing the tests below ensure that there is no noticeable disturbance...

Page 22: ...D Patterns during Startup On startup the system will enter its internal system check During this time the system will cycle through the LEDs from top to bottom twice Provided that all internal system...

Page 23: ...ata signal 15 VDC 15 RTS AUX RS232 output Auxiliary serial data signal 5 VDC 16 GND Ground Signal Ground return 0 VDC 17 GPS IN RS232 input NMEA 0183 serial data receive alternate GPS source input 15...

Page 24: ...TS RS232 input Serial data signal 15 VDC 8 CTS RS232 output Serial data signal 5 VDC 9 RI 5V RS232 output Serial data signal 5 VDC Factory option to set P2 Pin 9 to a fixed 5V 100mA supply Table 14 S1...

Page 25: ...SkyNode S100 Installation and Operation Manual Page 25 of 32 S100 400 R2 01 APPENDIX B INTERCONNECT INTERFACES...

Page 26: ...COAX CONNECTOR SMA OR TNC Single Wires ALL WIRES PER AWG22 UNLESS OTHERWISE SPECIFIED M22759 41 22 9 OR EQUIVALENT Connector P1 DB25 Connector P2 DB9 GPS Antenna Connector M39012 30 0503 Straight or M...

Page 27: ...g Connectors TNC male straight plug P N TNC male 90 plug P N 10 MIL C 17 RG400 0 195 1 00 M39012 30 0503 M39012 20 0007 12 MIL C 17 RG400 0 195 1 00 M39012 30 0503 M39012 20 0007 12 MIL C 17 RG142 0 1...

Page 28: ...6 4502 15 MIL C 17 113 RG142 0 195 1 00 M39012 55 4502 M39012 56 4502 15 MIL C 17 128 RG400 0 195 1 00 M39012 55 4502 M39012 56 4502 20 MIL C 17 128 RG400 0 195 1 00 M39012 55 4502 M39012 56 4502 25 M...

Page 29: ...SkyNode S100 Installation and Operation Manual Page 29 of 32 S100 400 R2 01 Figure B1 Typical Wiring Installation COMBINED GPS IRIDIUM ANTENNA GPS ANTENNA IRIDIUM ANTENNA...

Page 30: ...Skynode S100 Installation and Operation Manual Page 30 of 32 S100 400 R2 01 APPENDIX C ENVIRONMENTAL TESTS TABLE...

Page 31: ...temperature 85 o C Operating 60 o C 50 000 feet 8000 feet to 50000 feet 15000 feet Temperature Variation 5 0 Equipment tested to Category B 5 o C min Humidity 6 0 Equipment tested to Category A 95 RH...

Page 32: ...ategory X no test performed Radio Frequency Susceptibility 20 0 Equipment identified as Category X no test performed Emission of Radio Frequency Energy 21 0 Equipment tested to Category B Lightning In...

Reviews: