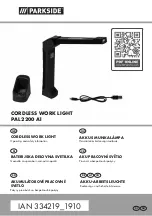
The Golight® RadioRay® is a Portable Searchlight designed
to be permanently or temporarily attached to a vehicle for
your specific use. The 2-Speed Searchlight with Directional
Flexibility is controlled by a wireless remote, which gives the
operator a full 370° horizontal rotation and a 135° vertical
tilt with fingertip control. The RadioRay® provides superior
light penetration with Cr5 PentaBeam™ technology in a
halogen configuration or with state of the art P-Vex™ lens
and LED technology.
The RadioRay® Includes:
•
RadioRay® Searchlight
•
Remote Control
•
2 A23 12V Batteries
•
Permanent/Magnetic Mounting Shoe
(Press spring lock to release and remove
light.)
•
Permanent Mounting Gasket
•
Rockguard (not Available with LED units)
MOUNTING INSTRUCTIONS
Temporary (Suction):
1. Always clean mounting surface with a clean cloth.
2. Remove light from permanent mount shoe by depressing
spring-loaded lock and sliding light out.
3. Place suction base on clean, dry surface and move side
lever into the locked position.
WARNING:
Check the suction cup frequently to ensure that
suction strength is maintained. Temperature variations, rough
terrain, grease and dirt affect the length of time that the suction
cup will remain in place. Suction mounting is not
recommended for road use.
Permanent:
1. On clean, dry surface, place gasket and shoe in desired
location. Using 3/16” screws, attach shoe to vehicle.
2. Slip the RadioRay® into the shoe. Verify that the spring lock
secures the RadioRay® into the shoe. An optional magnetic
mounting shoe is available (see web store).
Magnetic Mount:
1. Select the best location on your vehicle for the magnetic
mount. Make sure the metal area under the magnetic
base is flat and clean to ensure a strong bond.
2. Route the power cord into the vehicle through a door
frame and connect to 12V power outlet.
The magnetic mount Golight® RadioRay® should be removed from
vehicle’s exterior while traveling at excessive speeds and in strong
wind conditions.
PROGRAMMABLE REMOTE INSTRUCTIONS
The Golight® RadioRay® is controlled with a programmable
remote with 2187 different channels. This feature allows you the
freedom to change the channel selection, and the receiver
relearns the new selection.
PROGRAMMING THE TRANSMITTER.
This light has been pre-programmed at the factory, it is not
necessary to re-program the transmitter, but is recommended.
1. IMPORTANT: Disconnect power.
2. Remove battery cover from remote control.
3. Set the 7 dip switches to a selection of your choice. There are 3
positions on each; positive, negative and neutral. Use a small
screwdriver and select a position for each dip switch. *Please
note that the orientation of the +/- switch positions may vary
among different models of wireless remote controls.
4. Insert both A23 12 V batteries with the +/– in the same
direction. Be sure batteries have adequate charge.
5. Replace battery cover.
a. Depress the on/off button and hold it down. Red LED
will light.
b. While holding the on/off button down, reinstall the
power (plug the cigarette lighter plug in).
c. Keep on/off button depressed for 5-6 seconds, and
then release. The light should now be programmed.
OPERATION OF GOLIGHT® RADIORAY®
1. Place your RadioRay® into the mounting shoe or attach to the
outside of your vehicle (see mounting instructions).
2. Plug your RadioRay® into your vehicle’s cigarette lighter outlet
or12 Volt direct battery hookup.
3. Using the remote control, turn on the light by depressing the
on/off button.
4. With the 4-way arrows on the remote control, rotate your light
to the desired location. Depending upon conditions, the
wireless remote may be used up to 80 feet from the RadioRay®.
5. The speed of the light rotation can be controlled by
depressing the tortoise/hare button one time and by
depressing it again to restore the original speed.
6. Unplug and remove light from vehicle. Store the light and
remote control in optional carrying case when not in use to
extend the life of your RadioRay®.
7. The spotlight should not be turned on when the snap on
lens cover (rockguard) is attached. (Not applicable for LED)
BATTERY INSTALLATION AND DISPOSAL
•
Remove Battery Cover: remove the phillips head screw
securing the battery cover then remove the cover. With the
battery compartment now exposed, insert batteries
according to correct polarity. Remove the batteries by
gripping the positive end of each battery and lifting.
For information regarding the proper disposal/recycling of
the batteries contact Golight at 800.557.0098
Use only 12v-A23 batteries in the Golight remote control
USAGE:
»
This light is intended for off-road and utility use only
»
This light is intended to be mounted outside the vehicle
while in use
»
This light may only be disassembled and repaired by an
authorized representative
MISUSE:
»
This light is not approved for road or highway use
»
This light is not approved for underwater use
»
This light is not approved for inverted mounting
»
This light is not approved for use inside a vehicle or
enclosure and power should be disconnected prior to placing
the light in such circumstance
»
This light may be damaged if operated in icing conditions
»
This light may only be dismantled by an authorized Golight
representative
»
Any violation of the above referenced misuses will be
considered grounds for warranty refusal